FEATURES
This module allows you to present the current articles: Choose category
 Leading article
 Images size
 Image alignment
 Show thumbnails with a lot positions
 Intro
Intro
 Order
Order
 Article link * Columns
 Maxchars
Download
JV News is a free module, to be able to download the module you need to sign up for a membership account (free or paid).
Log into you account, visit JV News overview page, where you can download the extension.
Click on "Download" button to go to download area, where you can download the module

If the file(s) you downloaded has unzip_first in its name, please extract it before continuing with installation.
Installation
After successfully downloaded the package, Log into the administration area, navigate to Extensions >> Extension Manager, Browse the package file and finally, click "Upload & Install"

Then you will see a success message

Enable the module
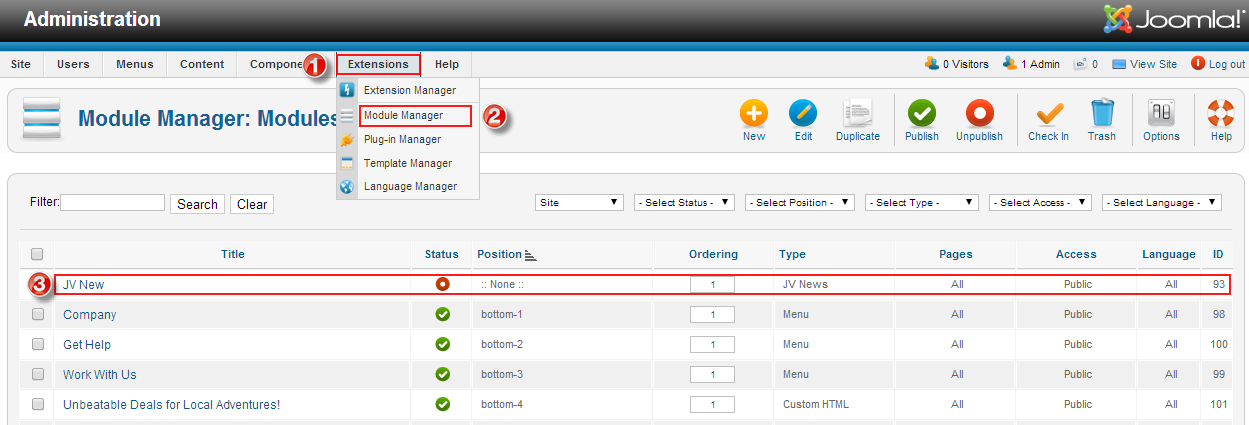
After successful installation, go to Extensions >> Module Manager, you will see a list of modules, click on JV New to access to module manager page

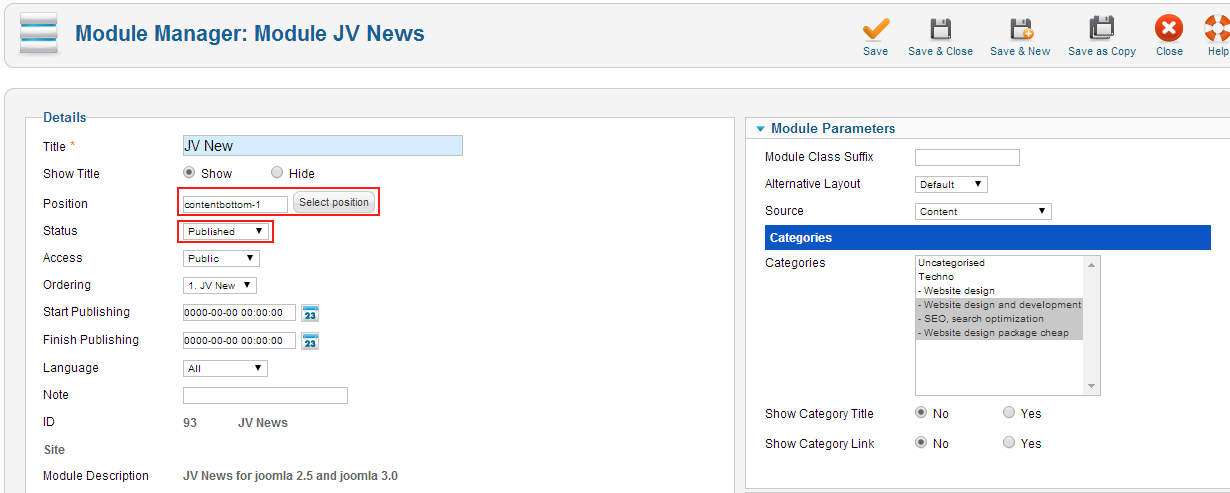
To make sure the module display in front-end, at least you have to go through three fields:
- Select a position for module
- Publish the module

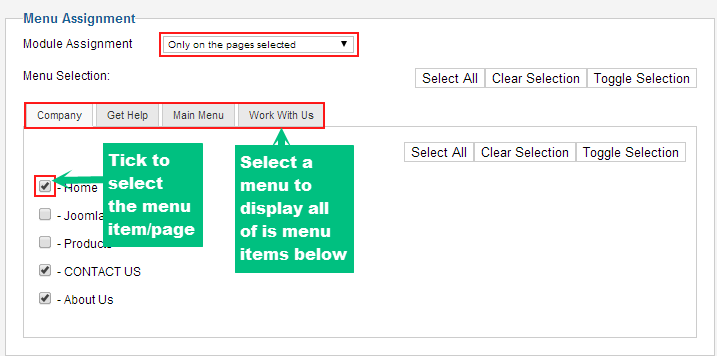
- Assign the module to menu item(s): in this field, there are 4 choices: On all pages, No pages, Only the pages selected, On all pages except those selected.
You can select a page/menu item by tick the box beside it.

menu configuration
Now we will inside the find out the parameters of the module.
1. Module parameter:

- Module Class Suffix: In case you installed more than 1 JV-News or duplicated it, and want to display each of them with different style, you must assign a different class suffix to each of them.
- Alternative Layout: Choose a different layout for JV News, currently in progress.
- Source: The source of the items/articles you will display with JV News. There are 3 choices: Content, Content Featured Items, Content Related Items.
- Categories: Select the category containing articles you want to use by highlighting it. If no category was selected, all categories will be used by default.
- Show Category Title: If this is enabled, the articles will be grouped into categories, with the name of the category displayed.
- Show Link: If Show Category Title was enabled, this will turn the category title into a link to that category.
2. Leading setting:

- Leading: Here you can enter the number of leading articles
- Clear images: If enabled, all the images in the leading article(s) will be removed from the content shown on the News board.
- Show title: Show the title of the leading article(s)
- Title link: If enabled, the title of the leading article(s) will be • converted into a link to the full article.
- Created time: Show the leading article(s)’s creation date.
- Author name: Show/hide the name of the article(s)’s author.
- Print icon: Show/hide the print button for the leading article(s).
- Email Icon: Show/hide the leading article(s)’s e-mail button.
- Show Read more: Show/hide the ‘read more’ line linked to the article(s) being used as leading(s).
- Show Content: Show/hide the content of the leading article(s).
- Maxchars: The maximum number of characters within the leading article(s) that will be shown if you enabled Show Content.
- Show thumbnails: Show/hide the thumbnail of leading article(s).
- Positions: Select the thumbnail’s position within the leading (above/before the title, below/after the title, within the article’s content, below/after the article’s content)
- Align: Aligning the thumbnail image (left, right and center).
- Width: You can set the thumbnail image’s width here.
- Height: You can set the thumbnail image’s height here.
- Resize: Select how the leading article(s)’s image(s) will get resized to fit the thumbnail size you set (resize, adaptive resize, crop and crop from center).
3. Intro setting:
Intro: Here you can enter the number of intro articles.
- Clear images: If enabled, all the images in the intro article(s) will • be removed from the content shown on the News board.
- Show title: Show the title of the intro article(s)•
- Title link: If enabled, the title of the intro article(s) will be converted • into a link to the full article.
- Created time: Show the intro article(s)’s creation date.•
- Author name: Show/hide the name of the article(s)’s author.
- Print icon: Show/hide the print button for the intro article(s).•
- Email Icon: Show/hide the intro article(s)’s e-mail button.•
- Show Read more: Show/hide the ‘read more’ line linked to the • article(s) being used as intro(s).
- Show Content: Show/hide the content of the intro article(s).•
- Maxchars: The maximum number of characters within the intro • article(s) that will be shown on the News board if you enabled Show Content.

- Thumbnail:
- Show thumbnails: Show/hide the thumbnail of intro article(s)
- Positions: Select the thumbnail’s position within the intro (above/before the title, below/after the title, within the article’s content, below/after the article’s content)
- Align: Aligning the thumbnail image (left, right and center).
- Width: You can set the thumbnail image’s width here.
- Height: You can set the thumbnail image’s height here.
- Resize: Select how the intro article(s)’s image(s) will get resized to fit the thumbnail size you set (resize, adaptive resize, crop and crop from center).
4. Link setting:

- Link: Here you can enter the number of link(s).
- Show tooltip: Enable/disable content tip for link(s).
- Clear Images: Remove all images from the text.
- Show Title: Show/hide the title of the article.
- Show Content: Show/hide the content of the article.
- Maxchars: The maximum number of characters of the article’s content that will be shown in the content tip.
- Show Thumbnails: Enable/disable content tip’s thumbnail.
- Position: Select the thumbnail’s position within the tip (above/ before the title, below/after the title, within the article’s content, below/after the article’s content)
- Align: Aligning the thumbnail image (left, right and center).
- Width: You can set the thumbnail image’s width here.
- Height: You can set the thumbnail image’s height here.
- Resize: Select how the article’s image will be resized to fit the thumbnail size you set (resize, adaptive resize, crop and crop from center).
5. specific article setting

- Article: Select an Article as Special Article, which will be stick at the top of the News board and won’t be affect by Pagination.
- Clear images: If enabled, all the images in the Special article(s) will be removed from the content shown on the News board. .
- Show title: Show/hide the article’s title.
- Title link: If enabled, the title of the Special article will be converted into a link to the full article.
- Created time: Show/hide the article’s creation day.
- Author name: Show/hide the article’s author’s name.
- PDF Icon: Show/hide the article’s Pdf button.
- Print Icon: Show/hide the article’s Print button.
- Email Icon: Show/hide the article’s E-mail button.
- Show Read more: Show/hide the ‘read more’ line linked to the article being used as Special article.
- Show Content: Show/hide the content of the article.
- Maxchars: The maximum number of characters of the article’s content that will be shown on the News board.
- Show Thumbnails: Enable/disable Special article’s thumbnail.
- Position: Select the thumbnail’s position within the Special article (above/before the title, below/after the title, within the article’s content, below/after the article’s content).
- Align: Aligning the thumbnail image (left, right and center).
- Width: You can set the thumbnail image’s width here.
- Height: You can set the thumbnail image’s height here.
- Resize: Select how the article’s image will be resized to fit the thumbnail size you set (resize, adaptive resize, crop and crop from center).
6. Pagination setting:
- Show Pagination: Enable/disable Pagination. When enabled, if the number of selected articles is greater than the number of Leading(s) + Intro(s), the rest will be assigned to other pages.
- Enable Ajax: Enable/disable Ajax effect (for page transition).
- Auto play: Enable/disable Ajax effect autoplay. If auto-play were enabled, after a certain amount of time, the News board will change to the next page automatically.
- FX Mode: Select the effect for page transition.
- FX Transition: Select the transition for Effect.
- Ease: Select whether you want the effect to ease in, ease out or ease in out.
- Duration: The duration of the effect.
- Time: Here you can set how long each page will be displayed on the News board if auto-play is enabled.
- Wait: Here you can set the News board’s wait time. This feature will be removed in the future, so it’s irrelevant.

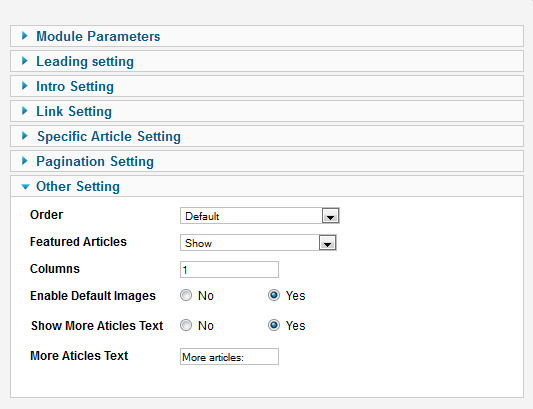
7. Other settings:
- Order: You can select the order with which the items will be organized.
- Featured Articles: Show/hide article designated as ‘featured’ or show only the featured article.
- Columns: Here you can set the number of columns of intro articles.
- Enable Default Images: If enabled, a default image will be used as thumbnail when there is no image in an article.
- Show More Articles Text: Show/hide More Articles text (above the links)
- More Articles Text: Enter the More Article text you want. This will be shown if the Show More Articles text was enabled.

