Downloading
JV Contact is a free extension designed by Joomlavi. To download the module, you need to register for a free membership package or you've already had a paid membership account
Log-in to your account and go to JV Contact download page, from there you can download this module.
The package you download is the latest version of the module. We always update the newest version of JV Contact after fixing new bugs or updating. If you find out any bugs during usage period of this module, please let us know!
Installation
Once you have JV Contact zip file downloaded on your computer. Now it's time to install it on your Joomla. There are three ways of installation in Joomla, each way is a little bit different. The first way is always the most popular choice.
Log into back-end, go to Extensions >> Extensions manager >> Browse JV Contact zip package >> Click Upload & Install
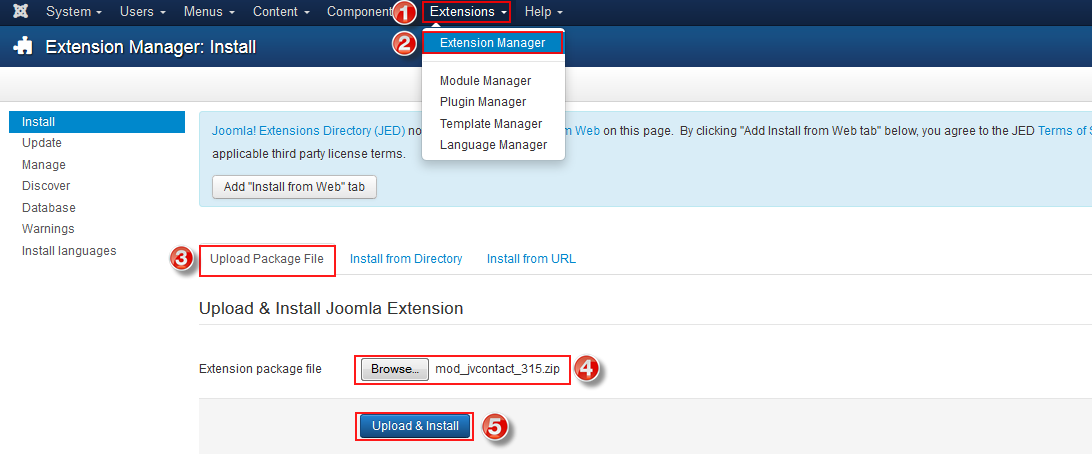
If you are not familiar with Extensions (templates, modules, plugins and components) Installation, please view the following guide:
Configuration
After successful installation, next step you need to do is activate this module and configure the module
Navigate to Extensions => Module Manager, you will see a list of modules installed in your Joomla!
If your site has lots of modules, you can use filters to search for the module.
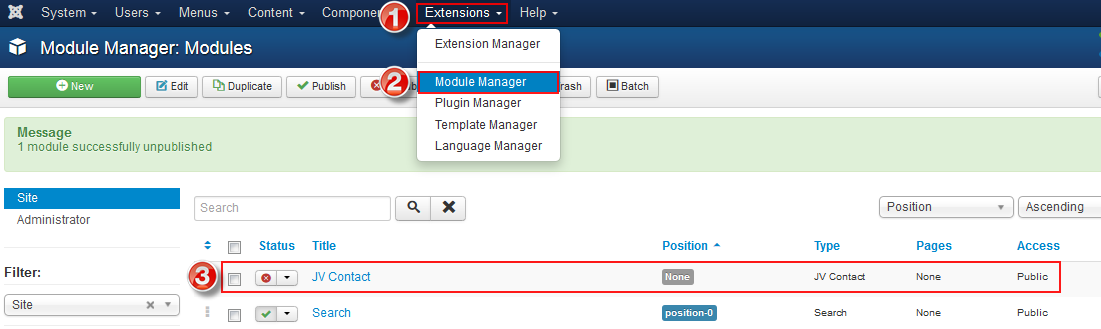
As you can see in the picture above: After a fresh installation, JV Contact has not been published and set position, title is JV Contact assigned on no pages...
Click on JV Contact to access to mod_jvcontact manager page, within the new page you can see 10 tabs, each tab contains parameters to config. Now we will go to each tab to config"
1. Tab Module
This is an important tab, which you see first after access to mod_jvcontact page.
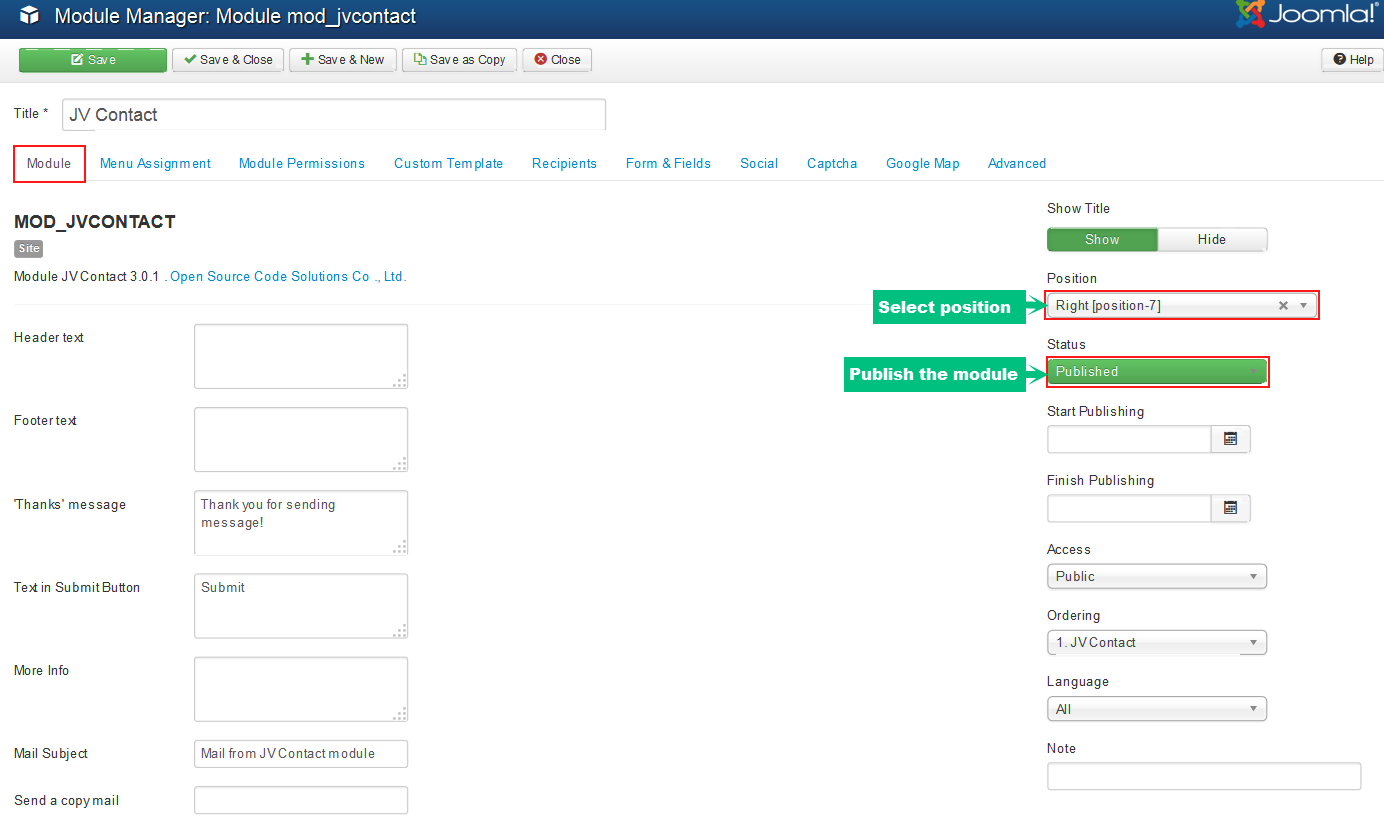
In this tab, there are must-pass 3 fields you need configure to make JV Contact display on your site:
- Tittle: a module must have a tittle, if not you can not save your settings
- Position: It's very essential to set the position for this module, If you do not set position for JV Contact, It can not appear on front-end. but you can select your desired position.
- Status: Remember to select published, some people usually forget this section and wonder why their module do not display on front-end.
Other parameters :
- Header text: add header text ( in HTML )
- Footer text: add fotter text ( in HTML )
- "Thanks" message: add text
- Text in submit button: add text
- More info: add text ( in HTML )
- Mail subject : add text
- Send a copy email: select whether to show checkbox to send a copy email to sender
- Show title: Show/hide tittle
- Start publishing: Choose a day to start publishing the module
- Start finishing: Choose a day to finish publishing the module
- Access: choose an access level group that is allowed to view the module on front-end
- Ordering: choose order for the module among those have same module position
- Language: choose language
- Note: enter optional note to display in module list
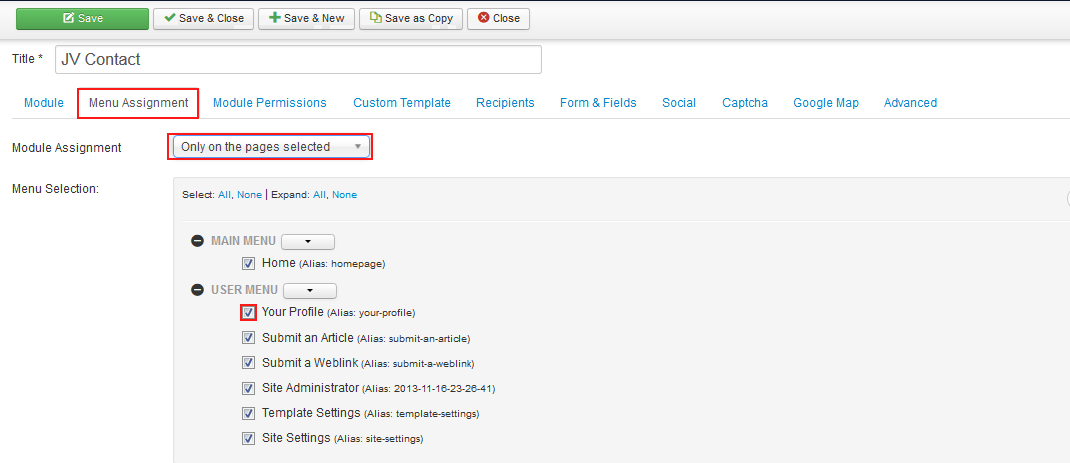
2. Module Assignment
In this tab, you can see all the menu items configured in your Joomla! website. This will allow selection of where to show a module by content page associated with menu item. This tab is also a must pass section, it allows you to assign the module on pages. You can assign on all pages, no pages, only on the pages selected or on all pages except those selected. 4 choices for you convenience.
- On all pages: the module will be shown on all pages
- No pages: the module will be shown on no pages
- Only the pages selected: the module will be shown on the pages selected by ticking in the box(es)
- On all pages except those selected: the module will be shown on all pages except those selected by ticking the box(es)
3. Module Permissions
This tab helps you to set permission for groups to delete/edit/change state any content of the extension
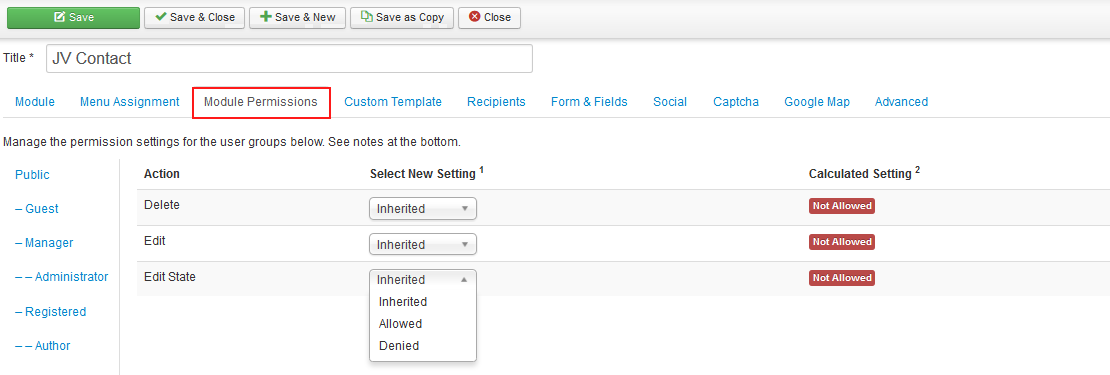
Delete: (Inherited/Allowed/Denied). Allow or deny Delete for users in the Public group. Delete Allows users in the group to delete any content in this extension.
Edit: (Inherited/Allowed/Denied). Allow or deny Edit for users in the Public group. Edit Allows users in the group to edit any content in this extension.
Edit State: (Inherited/Allowed/Denied). Allow or deny Edit State for users in the Public group. Edit State Allows users in the group to change the state of any content in this extension.
4. Custom Template
This tab allows you to customize the contact form template
- Select a layout: select layout for the contact form (custom or default), if you would to to custom HTML, CSS select "custom"
- Custom HTML: within this box, you can custom HTML by using custom fields below by tag
- Elements: list of custom fields
- Custom CSS: this box allows you to custom CSS for elements
5. Recipients
This tab allows you to select recipients or enter recipient email address
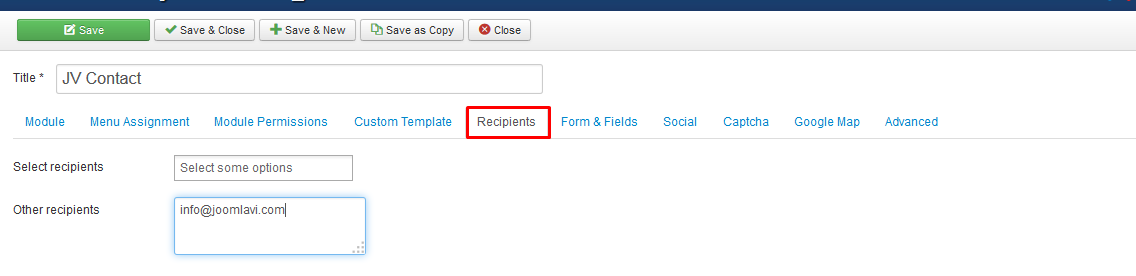
- Select recipients: select recipients from list of existing users in your site
- Other recipients: enter recipient email address
6. Form & Field
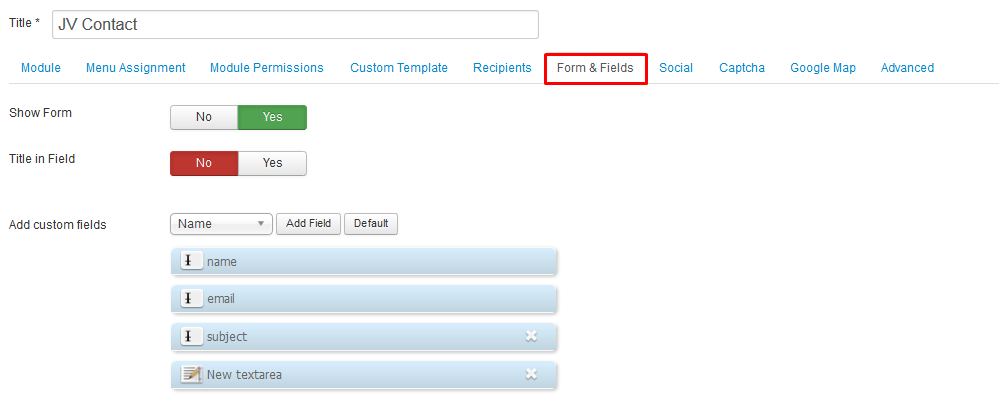
- Show form: select whether to show form or not
- Title in Field: select whether to include the title in the field or not
- Add custom fields: select fields from a dropdown list to add; or you can select default with 4 fields: name, email, subject, text
7. Social
This tab allows you to show social buttons in the form

- Show Social buttons: select not to show Social buttons or show with 3 style selections
- Show Facebook: show Facebook icon or not
- Show Tweeter: show Twitter icon or not
- Show Gplus: show Gplus icon or not
- Show LikedIn: show LikedIn icon or not
- Show More: show More button or not
8. Captcha
In this tab, you can config parameters for Captcha, to get Captcha you to visit https://www.google.com/recaptcha/admin#whyrecaptcha to get "Public key" and "Private Key"
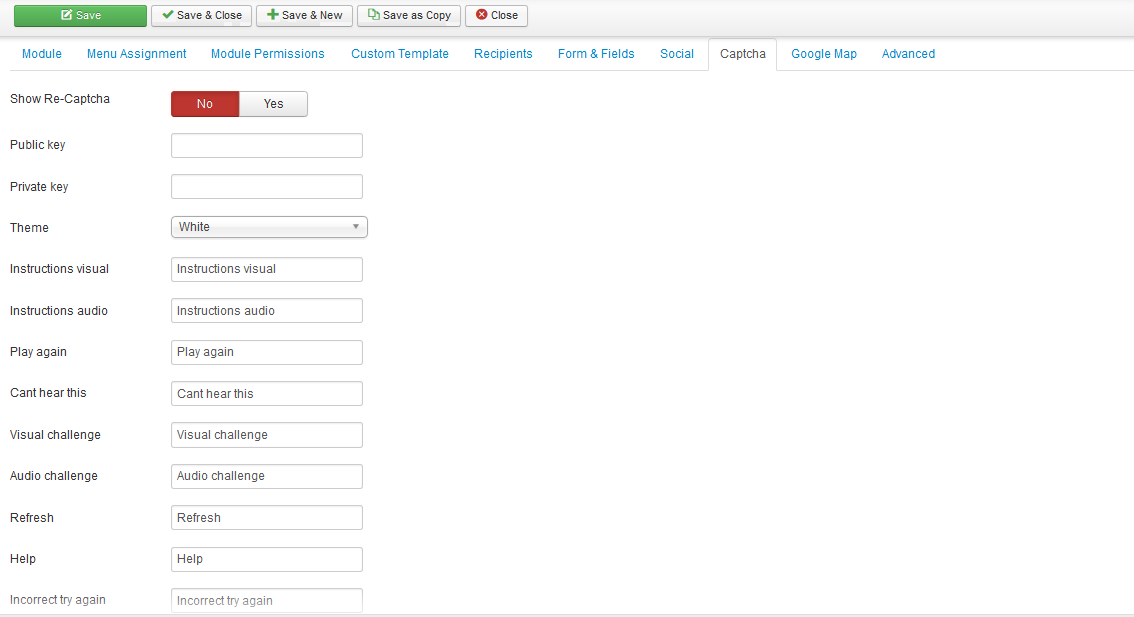
- Show Re-Captcha: show or hide Re-Captcha
- Public key: insert public key after signing up and creating reCaptcha
- Private key: insert private key after signing up and creating reCaptcha
- Theme: select theme for reCaptcha from dropdown menus
- Instructions visual: enter your own text for "instructions visual"
- Instructions audio: enter your own text for "instructions audio"
- Play again: enter your own text for "play again"
- Cant hear this: enter your own text for "cant here this"
- Visual challenge: enter your own text for visual challenge
- Audio challenge: enter your own text for audio challenge
- Refresh: enter your own text for instructions visual
- Help: enter your own text for "help"
- Incorrect try gain: enter your own text for "incorrect try again"
9. Google Map
This tab allow you to show and config parameters for google map
To be able to us google map in contact form, you need to visit https://code.google.com/apis/console/ to get API key to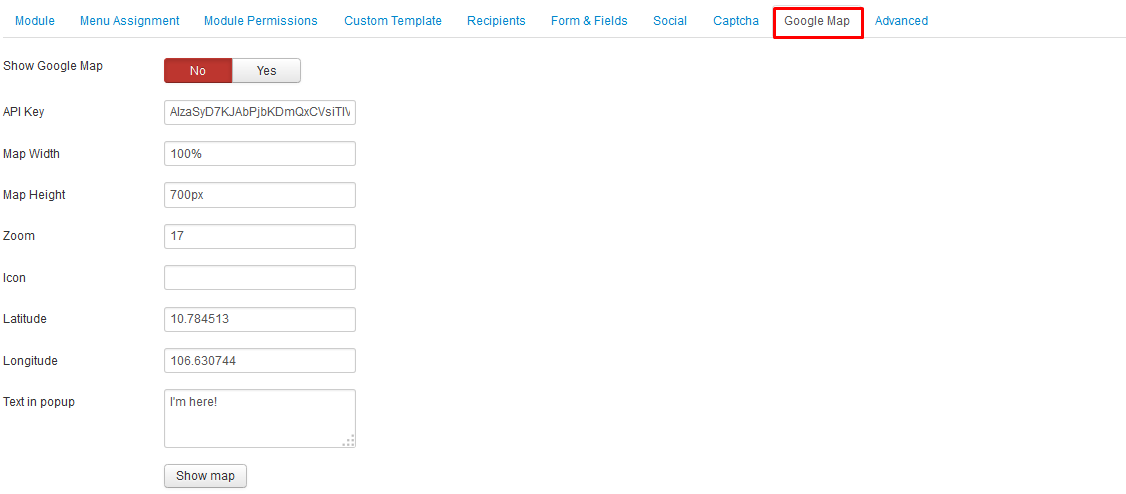
- Show Google Map: Show or hide google map in front-end
- API Key: insert APT key
- Map Width: insert map width (in pixel or %)
- Map Height: insert map height(in pixel)
- Zoom: insert zoom ratio
- Icon: insert URL of the icon image
- Latitude: latitude of the location
- Longtitude: longtide of the location
- Text in popup: change the text "I'm here" with yours
- Show map: show google map in backend
10. Advanced
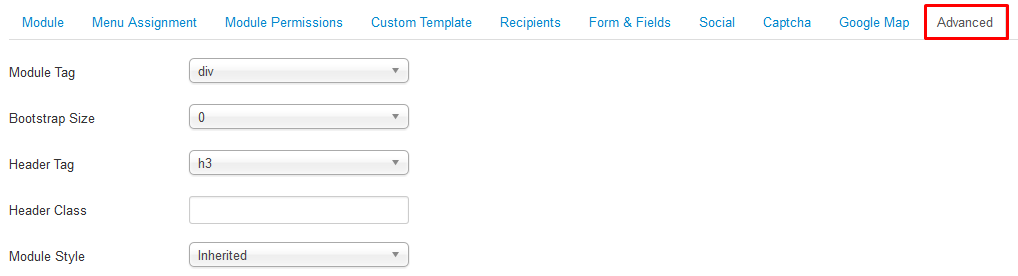
Parameter explanation:
- Module Tag: The HTML tag for the module to be placed in. By default this is a div tag but other HTML5 elements can also be used.
- Bootstrap Size: (Values 0 to 12) This allows you to choose the width of the module via the span element built into bootstrap. For more information see the bootstrap documentation.
- Header Tag: The HTML tag to use for the modules header or title this can be either a h1-h6 tag or a p tag.
- Header Class: Here you can add optional CSS classes to add to the modules header or title element.
- Module Style: You can use this option to override the templates style for its position.
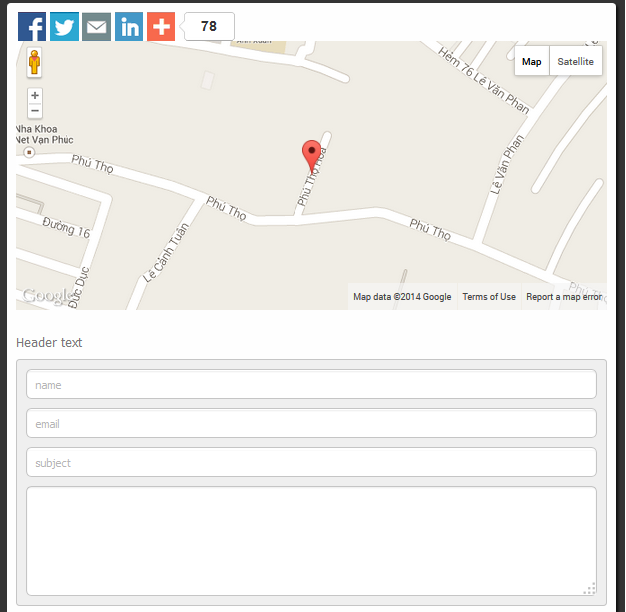
JV Contact in front-end