
Downloading
JV Social is a free Joomla extension designed by Joomlavi team. In order to download the extension, you need to register for a free membership package or once you've already had a paid membership account
Log-in to your account and go to JV Social download page, from there you can download the modules.
Installation
Once you have JV Social zip file downloaded on your computer. Now it's time to install it on Joomla.
Note: This extension includes a module and a plugin, you need to extract the package to get the module and plugin, then install each separately.
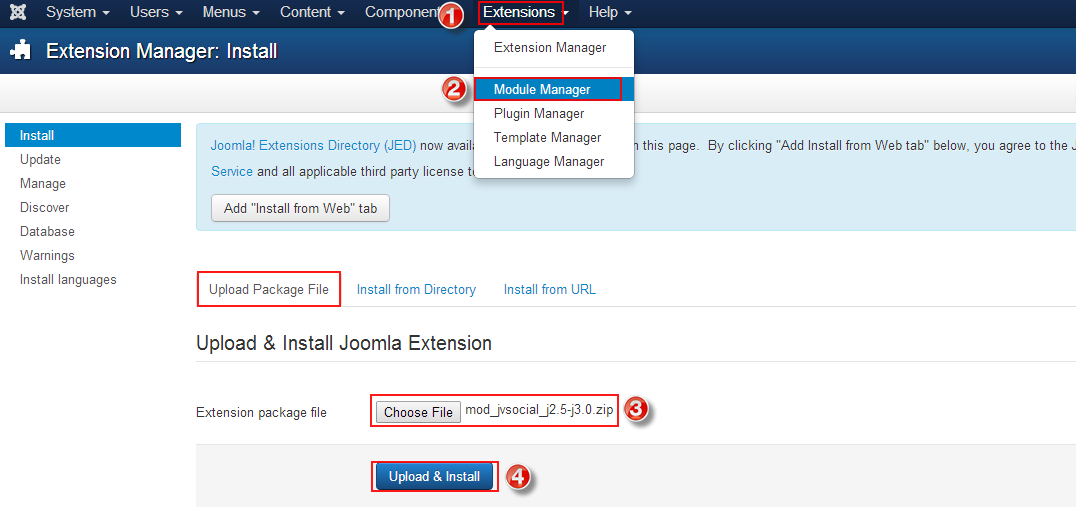
In the back-end, navigate to Extensions >> Extension Manager. You will see three ways of installation in Joomla, each way is a little bit different. The first way is always the most popular choice due to it's ease in installation.
- Upload from package file: Browse and choose the zip file, then click Upload & Install
If you install from directory, just extract each package zip file and enter the path, then click install. For example, you copy the extracted folder to C driver, then insert the path C:\jv-social-module as you can see in the picture below:
You can only install 1 package for a installation. So you need to install the module and plugin separately.
If you are not familiar with Extensions (templates, modules, plugins and components) Installation, please view the following guide:
Module Configuration
After successful installation, next step you need to do is activate this JV Social module and configure its parameters
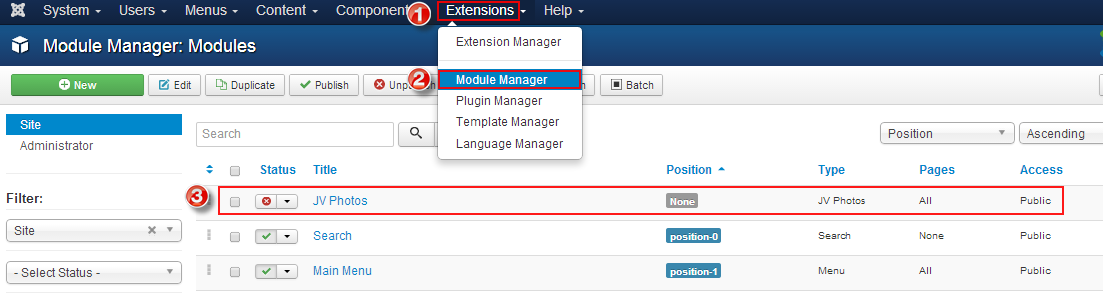
Navigate to Extensions => Module Manager, you will see a list of modules installed in your Joomla!
If your site has lots of modules, you can use filter to search for the module.
As you can see in the picture below: JV Social has not been published and set position, title is JV Social assigned on all pages...
Click on the title to configure its parameters
After accessing to the module JV Social manager there are 4 tabs in the module.
1. Tab Module
You will land on this tab first when you first access JV Social manager .
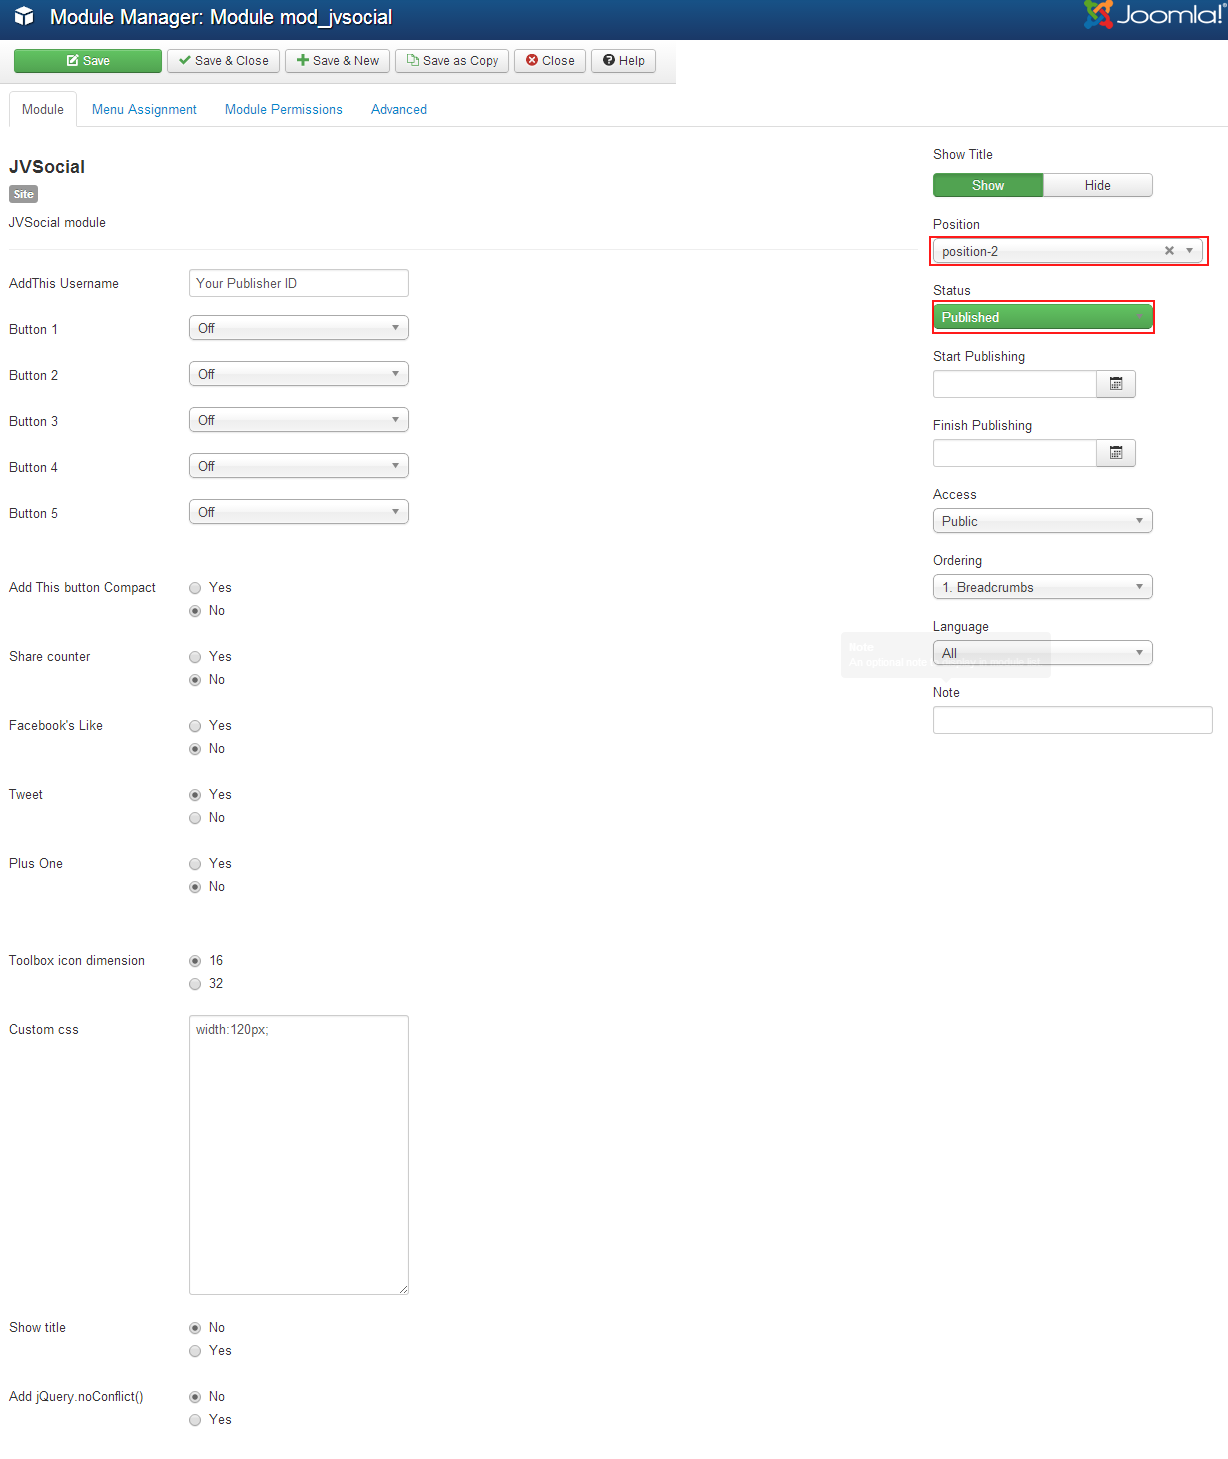
Parameter explanations
- Position: It's very essential to set the position for this module, If you do not set position for JV Social , It can not appear on front-end.
- Status: publish/unpublish the module
- Button 1, button 2, button 3, button 4, button 5: select social button for each
- Add this button compact(Yes/No): add the buttons to compact style
- Share counter (Yes/No): show the number of times the page has been shared
- Facebook's like (Yes/No: show Facebook like button
- Tweet (Yes/No): show tweet button
- Plus one (Yes/No): show +1 button
- Toolbox icon dimension (16/32): set dimension for social icons
- Custom css: allow you to custom CSS in the box
- Show title (Yes/No): show/hide title
- Add jQuery.noConflict() (Yes/no): Avoide jQuery conflict
- Start publishing: Choose a day to start publishing the module
- Start finishing: Choose a day to finish publishing the module
- Access: choose an access level group that is allowed to view the module on front-end
- Ordering: choose order for the module among those have same module position
- Language: choose language
- Note: enter optional note to display in module list
2. Tab Module Assigment
This tab is also a must-pass section for front-end display, it allows you to assign the module on pages. You can assign on all pages, no pages, only on the pages selected or on all pages except those selected. 4 choices for you convenience.
- On all pages: the module will be shown on all pages
- No pages: the module will be shown on no pages
- Only the pages selected: the module will be shown on the pages selected by ticking in the box(es)
- On all pages except those selected: the module will be shown on all pages except those selected by ticking the box(es)
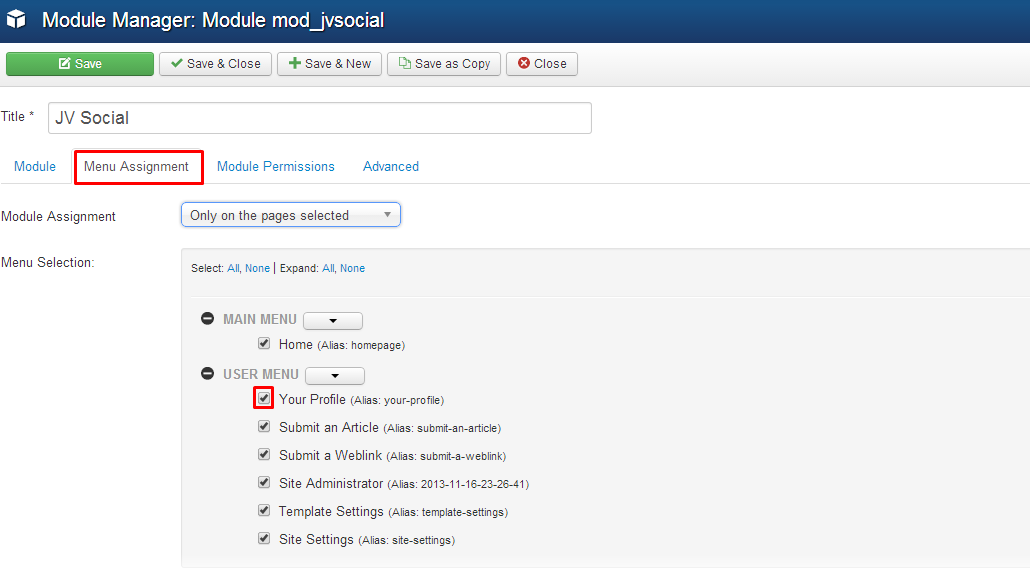
To ensure the module display in front-end, please do not forget to enter the module, set position, publish the module and assign the module on at least one visible page. The new users usually forget to set one of these parameters and ask why the module do not display. So keeping in mind these parameters will help you save much time!
3. Tab Module Permission
This tab helps you to set permission for groups to delete/edit/change state any content of the extension
Delete: (Inherited/Allowed/Denied). Allow or deny Delete for users in the Public group. Delete Allows users in the group to delete any content in this extension.
Edit: (Inherited/Allowed/Denied). Allow or deny Edit for users in the Public group. Edit Allows users in the group to edit any content in this extension.
Edit State: (Inherited/Allowed/Denied). Allow or deny Edit State for users in the Public group. Edit State Allows users in the group to change the state of any content in this extension.
4. Tab Advanced
Within this tab to you can configure advanced parameters for the module
Parameter explanation:
- Module tag: select the HTML tag for the module
- Bootstrap size: select the number of columns the module will use
- Header tag: select the HTML tag for the module tittle
- Header class: enter CSS class for the module tittle
- Module Style: select to override the template style for it's position
Plugin Configuration
JV Social Plugin allows you to shows social buttons on content
To config the plugin, log into administrative area, select Extensions >> Plugin Manager, Click on JV Social Plugin.
Back-end settings:
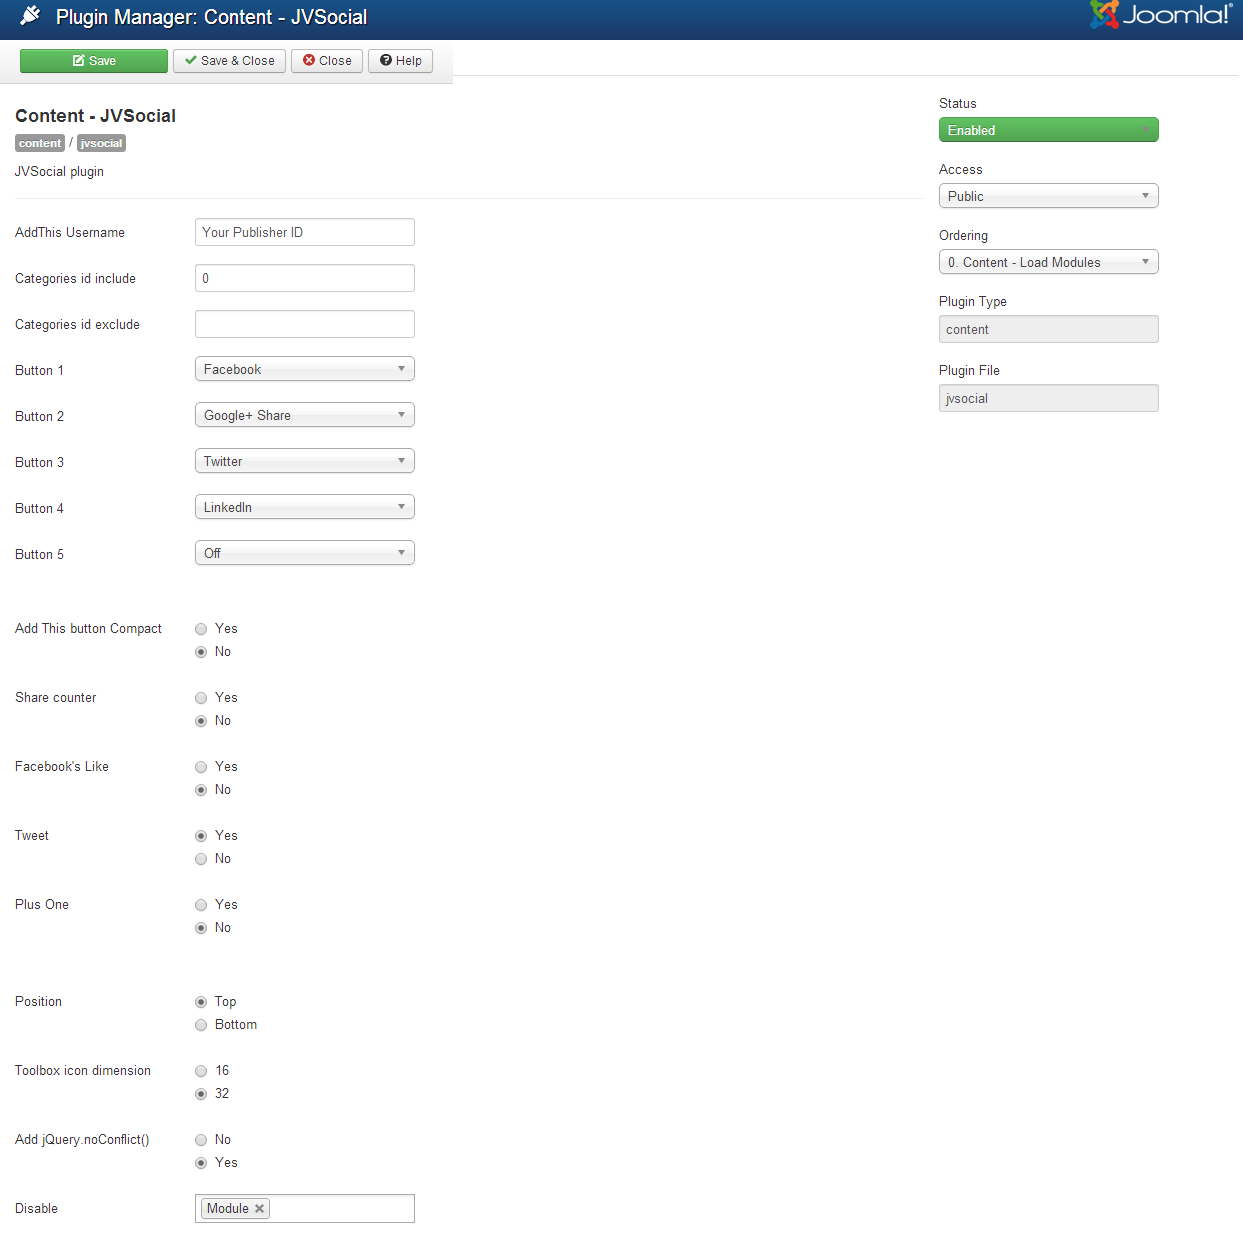
Parameter Explanations:
- Addthis Username: Enter your Addthis username
- Categories ID include: Enter ID number of categories that enable the plugin
- Categories ID exclude: Enter ID number of categories that disable the plugin
- Button 1, 2, 3, 4, 5: Select social network buttons for each
- Addthis button compact(Yes/No): Select Compact style for AddThis buttons
- Share counter(Yes/No): Share the number of times the page has been shared via AddThis
- Facebook's like(Yes/No): Show Facebook like button
- Tweet(Yes/No): Show Tweet button
- Plus one(Yes/No): Show G+ button
- Position(Top/bottom): Select position for the plugin
- Toolbox icon dimension(16/32): Select the size of the icons to be shown
- Add jQuery.noConfict()(Yes/No): Add jQuery.noConflict
- Disable: Select parts to disable the plugin from a drop-down menu
Plugin Front-end appearance:
The image below is a example of an article plugged JV Social in
