JV Expo & Downloading
To download JV Expo, you need to purchase a package for download privileges.
Go to download page,
There will be multiple files in the download page. Before selecting which file(s) to download, please consider what you are planning to do.
If you are setting up a new site, download Quickstart package.
If you already have a site and don’t want to replace it, or you only want the template without extensions and styling, the Theme version will be your choice. Installing a theme will give you only a new template/theme without any extra extension or data loss.
After you have confirm the file(s) you need, select them by ticking the box(es) in front of said file(s), then click download.
If the file you downloaded has ‘unzip_first’ in its name, please extract it before continuing with the installation.
Installation
1. Installation with Quick-start version
2. Installation with template/theme version
You will need to install a theme managing component called JV Framework before you can install JV Expo as a theme.
Installing JV Framework:
- Click on JV Frame Work download on the upper right corner, just under user menu.
- In the new page, select the version(s) you need and click download. There are different versions for Joomla! 1.5 and Joomla 1.7. From JV Framework version 4.5 and newer, the ‘install file’ can be used for all version of Joomla!.
- If the file you downloaded has ‘unzip_first’ in its name, remember the extract the file before continue installing. The resulting file(s) from extracting an ‘unzip_first’ file will be called ‘install file(s)’ henceforth,
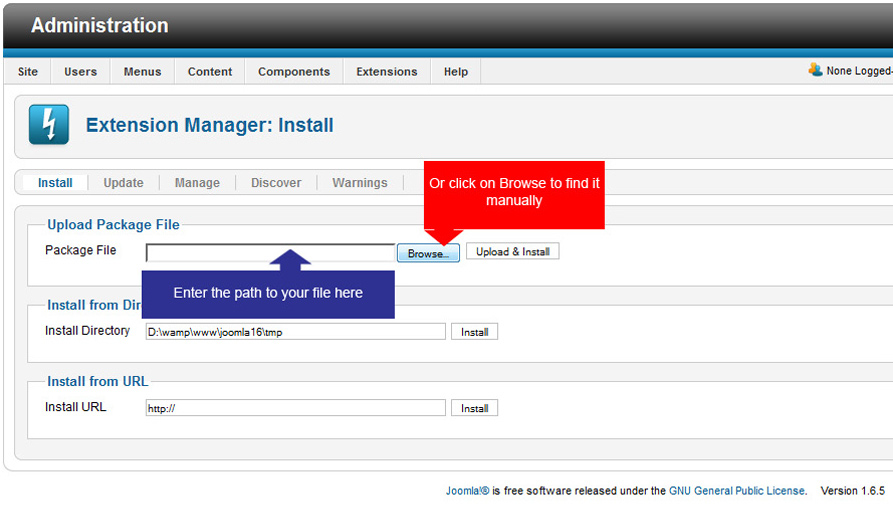
- Log into your joomla! back end, select extension manager (Joomla! 1.7) or Install/Uninstall (Joomla! 1.5) from extension manager menu.

- On install tab, type the path to your file into the blank field of ‘install from package’ section or click on ‘browse’ to find it manually
- Click on ‘Upload & Install’.
- Now you can find ‘JV Framework” from the component menu.
Installing JV Expo theme
Using upload theme:
Version 4.4 (1.5.4.4 or 1.7.4.4) or older:
- Rename your install file and remove the number at the end, leaving only the theme’s name.
- From back end, access JV Framework from component menu.
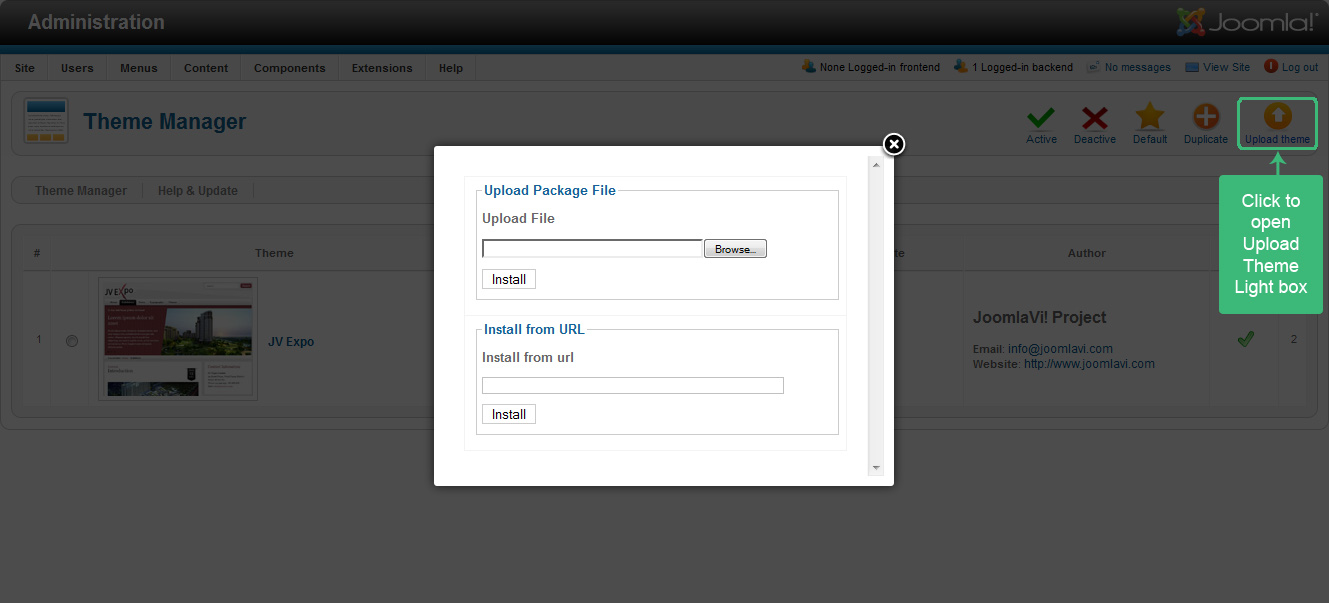
- Inside JV Framework theme manager page, click on the upload theme button.

- Type the path to your file into the blank field or click on browse to find the theme manually.
- Click on install to finish uploading the new theme.
Version 4.5 or newer:
- From back end, access JV Framework from component menu.
- Click on tab ‘Theme manager’ tab.
- Inside JV Framework Theme manager page, click on the ‘Install theme’ button.
- Type the path to your file into the blank field or click on browse to find the theme manually.
- Click on install to finish uploading the new theme.
Installing manually:
- Extract the theme’s ‘install file’.
- Copy the resulting folder to <templates\jv-framework\themes> within your site’s source folder.
- Return to JV Framework’s theme manager in your site’s back end and check your theme list.
Managing JV Expo with JV Framework - jV expo layout
For the basic functions of JV Framework, please refer to JV Framework User guides
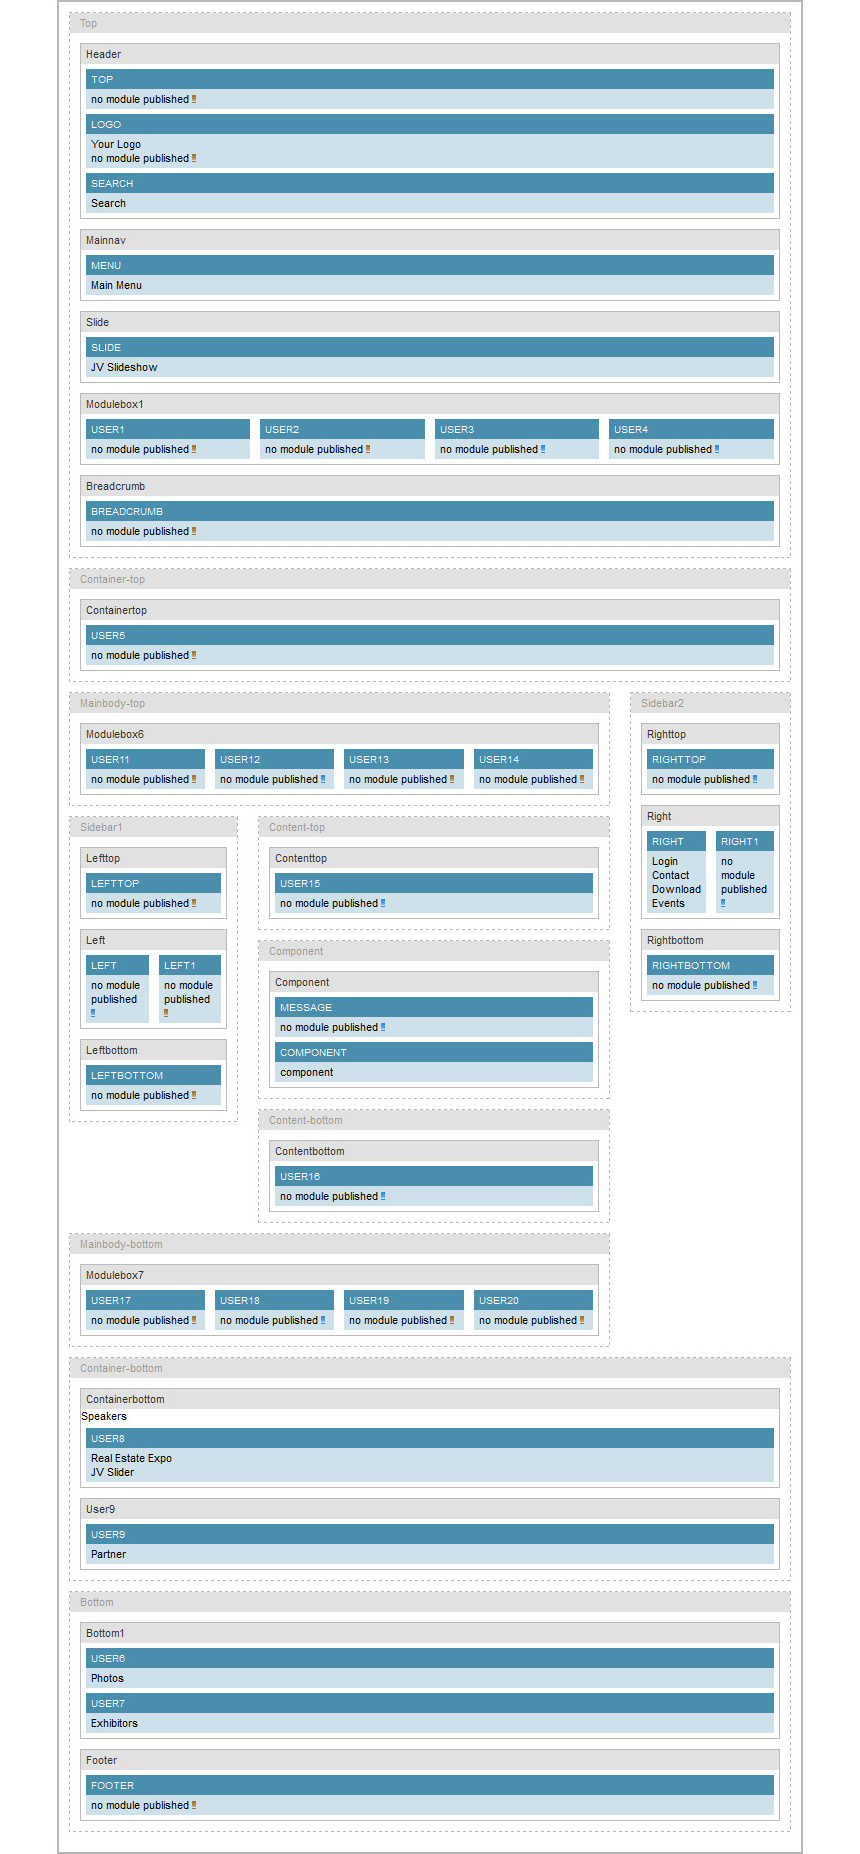
The main difference between themes when using JV Framework is the position layout. The following image will show the default layout of JV Expo:

Extensions
If you used the Quick-start version of JV Expo template, the following extensions will be included, styling included. For a JV Expo theme user, you would have to download and install these extensions manually:
1. JV Slideshow
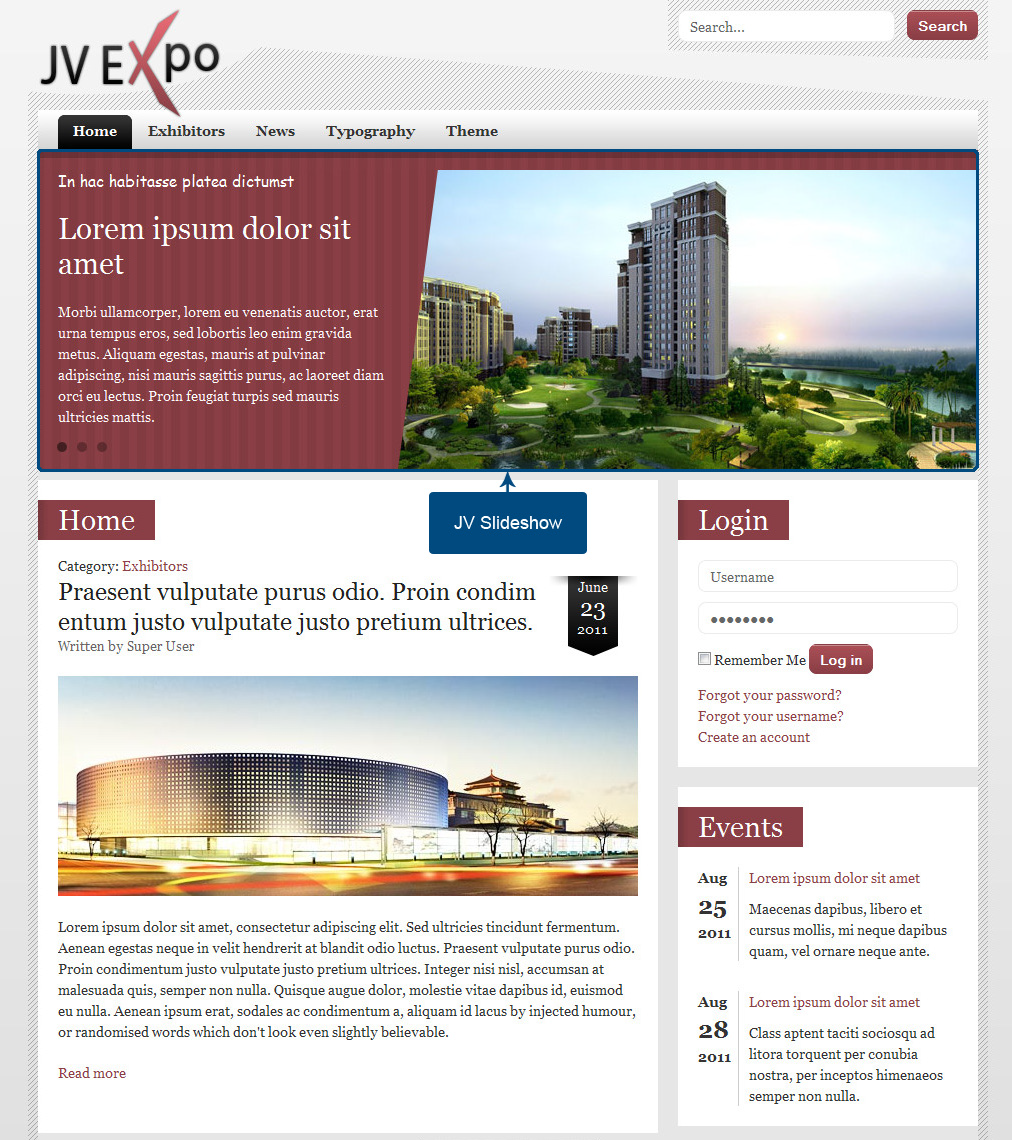
To replicate the Demo site, this module should be assigned to the position ‘Slide’ on all pages.
- Prepare a folder where you store the images you wanted to use. If you wanted to display thumbnails for your slides, create a “thumbnails” folder within the image folder and store the resized images you want to use as thumbnails there .
- Within your site back end, go to Module Manager and click on the module’s name.
- Inside Module mod, set the location to your image folders, select your source and set the parameters.
- Set the module to published/enable and select the pages where you want to display it.
- Save the setting and click on Preview (Joomla! 1.5) or View Site (Joomla! 1.7).
For the parameters’ effects, please read JV Slideshow User Guide

2. JV Slider(Module)
To replicate the Demo site, this module should be assigned to the position ‘user8’ on on all pages.
- Prepare a folder where you store the images you wanted to use. If you want the slider to displays thumbnails instead of large images, create a ‘thumbnails’ folder within the aforementioned directory and store the resized images there.
- Within your site back end, go to Module Manager and click on the module’s name.
- Inside Module mod, set the location to your image folders, select your source and set the parameters.
- Set the module to published/enable and select the pages where you want to display it.
- Save the setting and click on review.
For the parameters’ effects, please read the JV Slider User Guide

3. JV Gallery (Module)
To replicate the Demo site:
Create a folder in your website’s directory and upload your image to that folder.
If you want to use thumbnails, create another folder named ‘thumbnail’ in the aforementioned one and upload the thumbnails to it (the thumbnails should have the same name as their respective full size versions)
Create a Custom HTML module named ‘Photos’ and assign it to position ‘user6’ on all pages.
Set up a gallery with the images you upload in this module using gallery code or the ‘Insert Gallery’ button.
Creating/inserting a gallery:
As a module:
- Go to Module Manager within Extensions Menu
- Create a new module with the custom html module type and scroll down to Custom Output section.
- If you have installed the button plugin, click on ‘insert gallery’ and configure the properties of your gallery (see Insert Gallery’s property box), then click on ‘insert’
- If you only installed the system plugin, manually type down the code in this pattern:
{jvgallery folder=”images/gallery” theme=”1” height=”100” width=”120” cols=”0” } 5cm 1.jpg=”title|desc” 5cm 2.jpg=”title|desc” 5cm 3.jpg=”title|desc” {/jvgallery}
Inserting a gallery into a new or existing articles/description:
- Go to Content menu, Article Manager. If you want to create a K2 Article, use the K2 choice within Components menu.
- Create a new article or edit an existing one. For K2, use New Item or choose Item, then click on ‘new’ for a new article or an item’s name to edit an existing article.
- If you have installed the button plug-in, click on ‘insert tab’ and configure the properties of your gallery (see Insert Tab property box below), then click on ‘insert’
- If you only installed the system plug-in, manually type down the code in this pattern:
{jvgallery folder=”images/gallery” theme=”1” height=”100” width=”120” cols=”0” } 5cm 1.jpg=”title|desc” 5cm 2.jpg=”title|desc” 5cm 3.jpg=”title|desc” {/jvgallery}
Insert Gallery’s Property Box
- Choose Folder: Select the folder where the images for your gallery are stored
- Title and description: Allow you to set the images’ titles and descriptions.
After you have selected the folder, image names will be shown in this field in the following pattern: <image name>=”title|desc”
Replace ‘title’ with the title you want to assign to that image and ‘desc’ with that image’s description.
For more info, please read JV Gallery’s document.

