
Introduction
JV Fashion has a modern and responsive design optimized for all screen size including desktops, tablets, and smartphones. It is designed ideally and perfectly for Fashion Shop but also suitable for any kind of eCommerce Store. JV Fashion is compatible with Joomla 3, and ready for selling products online with Hikashop Component – a powerful e-commerce solution
1. Features
 Fully responsive
HTML5 & CSS3
Bootstrap 3 integration
Joomla 3 support
RTL support
Ecommerce template with Hikashop
Mega Menu
Mở lớpTiếng Anh Doanh nghiệpkhóa học được thiết kế đặc biệt danh cho các công ty có nhu mở lớp học anh văn doanh nghiệp ngay tại văn phòng
2. JV and third party extensions supported
JV Slide Pro
Hikashop
Acymailing
EasyBlog
K2
3. Module positions
As you know, each Joomla module is placed in a module position. All module positions are specified by the template structure. It's very useful to understand the structure of the template.
You can also find module positions on the demo of the JV Fashion template. Visit JV Fashion demo, go to Explore >> Module positions
View: module positions
References
This guide is not intended to cover everything, Joomla! and third party extension configuration knowledge is extremely wide, so you can refer following link to view more details:
Joomla! 3.x Installation guide
Acymailing configuration guide
K2 Documentation
System requirements
1. Browser compatibility
JV Fashion was tested to be ready for seamless display on the following web browsers
Firefox 2+
IE (Internet Explorer) 9+
Google Chrome 14+
Opera 12+
Safari 5+
Flock 0.7
Netscape
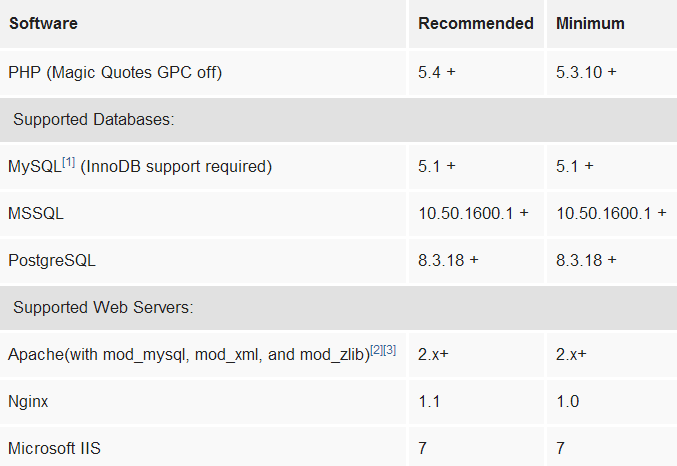
2. Joomla 3 requirements
3. Development requirement
We recommend you using Localhost for development process. The following servers are preferred:
Windows:
WAMP
XAMPP for windows
Linux:
LAMP Buddle
XAMPP for Linux
Download & Installation
You need to sign up for a membership account to be able to download JV Fashion
Visit JV Fashion download page, from there you can select suitable package for your site development.
If you are new to Joomla! or planing to create a completely new Joomla Site which looks like JV Fashion Demo, download quickstart package.
If you've already had a existing Joomla! site or experienced in Joomla!, download JV Fashion template and included extensions,
1. Quickstart Installation
Choosing quickstart package to install helps you create an entire Joomla site site which includes Joomla! CSM, JV Fashion templates, JV extensions, sample articles, default Joomla! modules . This installation procedure is a perfect choice for those who are new to Joomla!. Following our guide can help you create your own site without much knowledge in programming!
After finishing this quickstart installation, you only need to edit or add text, logo, product images and information, menu, new articles... in the back-end administrative area.
Please refer to the following guide to learn how to install quickstart package
2. Install JV Fashion on your existing Joomla site
Another way to install JV Fashion is installing each separate part: JV Fashion template, Extensions, and adding default Joomla! and custom HTML modules to your site.
Note: please view the next section to know how to configure the default Joomla! and custom HTML modules.
Please view the following guide to know how to install new extensions (template, components, module, plugin) on your current Joomla site.
Template Customization
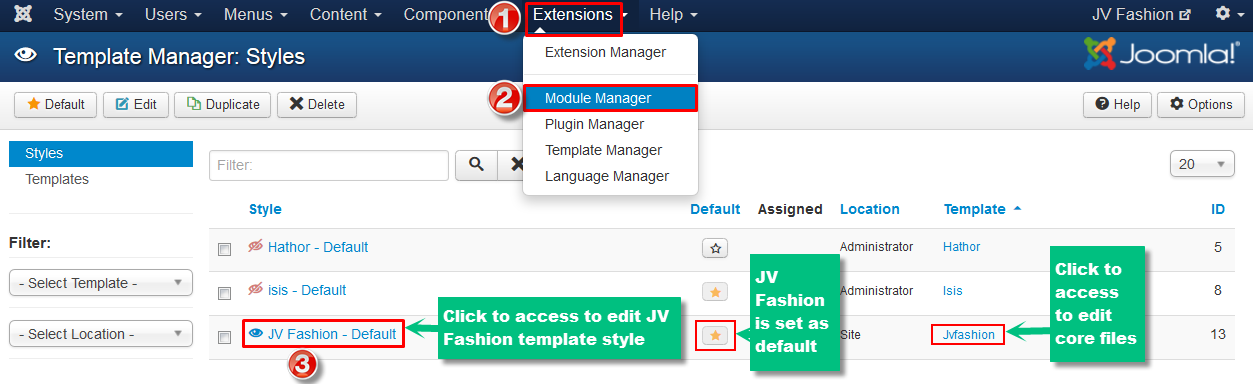
You can manage the template by Navigating to Extensions >> Template Manager
Click on the name of the template in the Style column to edit style with parameters
Click on the name of the template in the Template column to edit core files
Styles column refers to changing the available parameters of a template, such as color, font-color, logo, etc. These are dependent on the parameters a template maker made available and are a convenience for quick changes. Template - column refers to editing the actual template files.
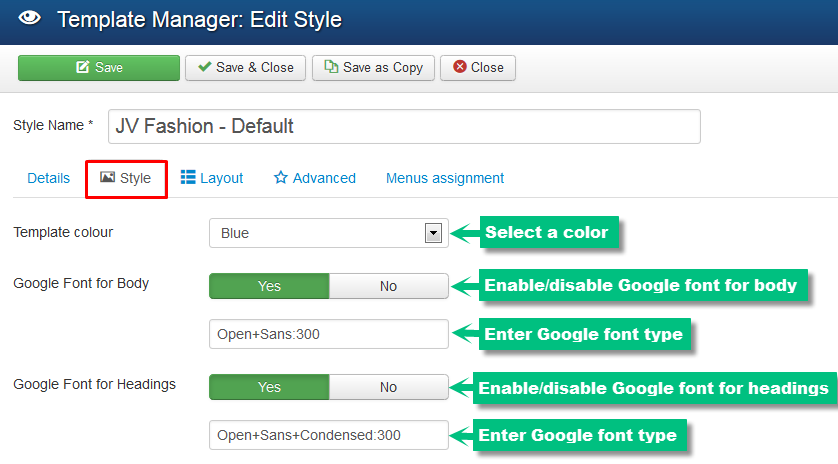
1. Edit Style
Accessing to Edit Style you can edit JV Fashion style by editing parameters. This area includes 5 tabs: Details, Style, Layout, Advanced, Menus Assignment.

1.1 Tab Style
This tab allows you to edit color and choose Google font types for body and headings.
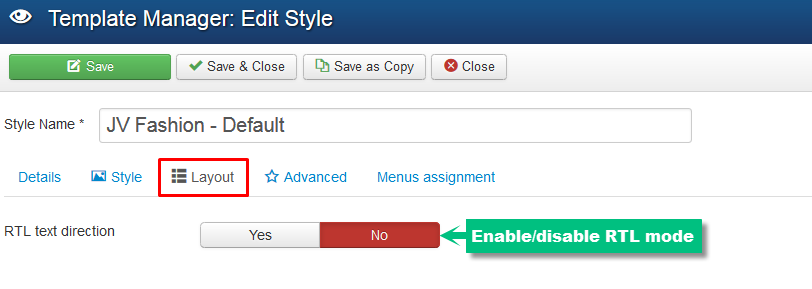
1.2 Tab Layout
This tab allows you to enable or disable RTL text direction mode. RTL mode is disabled as default.
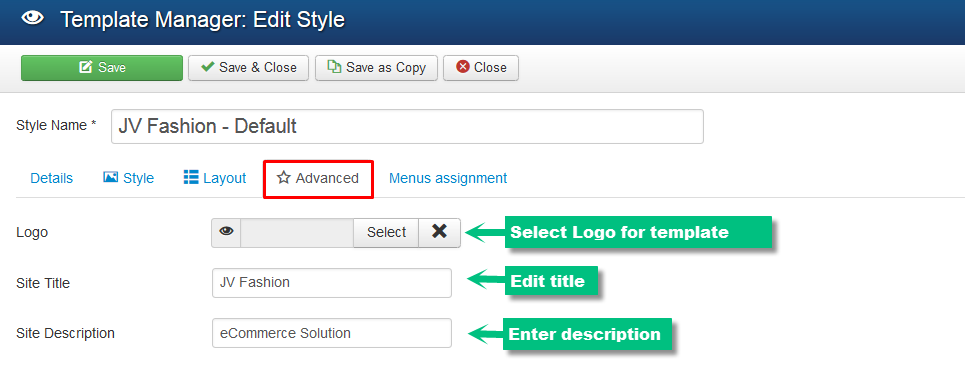
1.4 Tab Advanced
You can select Logo, enter/edit title, description for the template
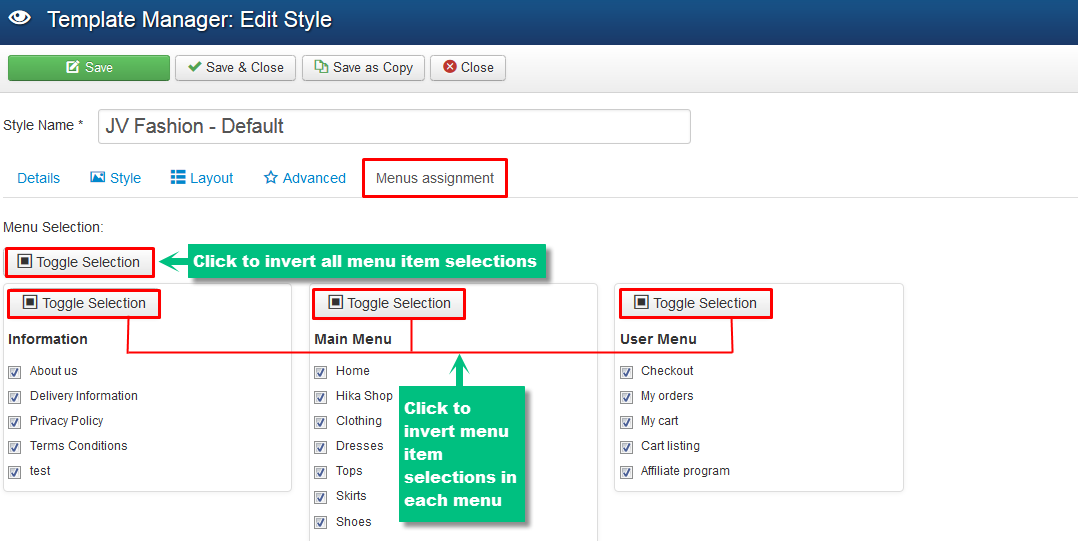
1.5 Tab menus Assignment
This section contains all the menu items configured in your Joomla! website. To apply the current style to a menu item's corresponding web page, check the box next to the menu item. You can press the Toggle Selection button to invert the menu item selections.
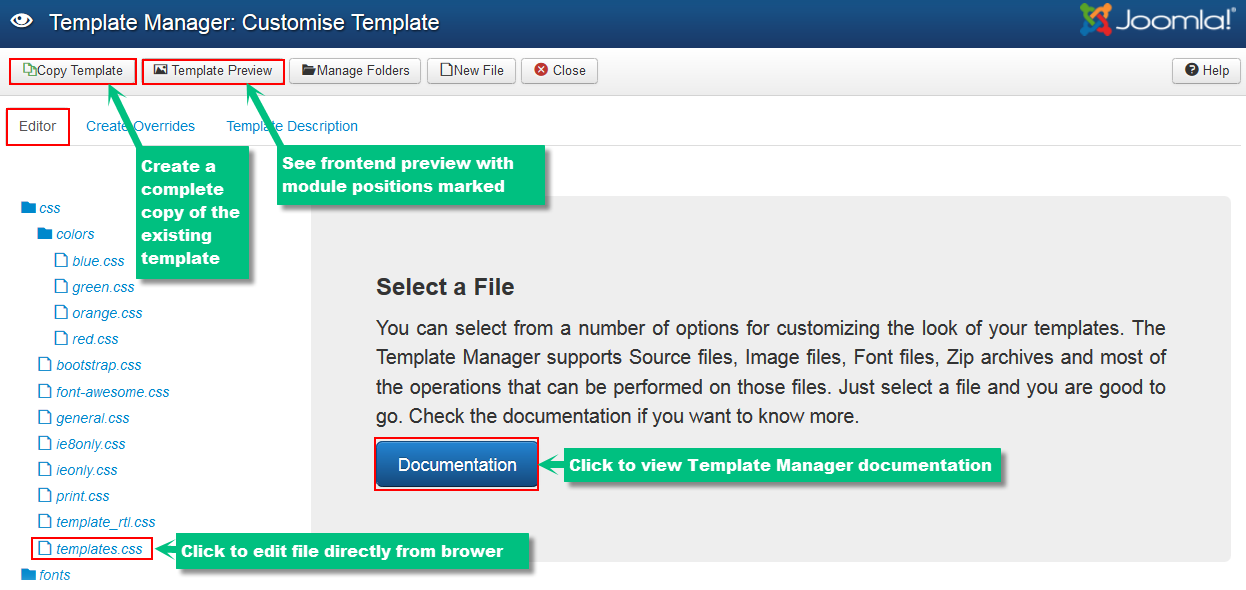
2. Customize template
Note: this section is suitable for those who have been experienced in HTML & CSS,and want to customize the template style further by editing template files.
Click any file and you'll be able to edit it directly in the browser.
CSS files explanation:
green.css, blue.css, orange.css, red.css: contain specific styling for each color variation. Only a certain file will be upload if the color variation is chosen in back-end.
bootstrap.css:
font-awesome.css: contains specific styling for icon
ieonly: contains specific styling for IE browser
ie8only: contains specifc styling for IE 8 browser
print.css: contains specific styling for printing output
template.css: contains entire template styling. This the biggest css file containing all the template styling. For your easy to find and edit code quickly, the file is arranged into the main segments:
template_rtl.css: contains specific styling for RTL layout mode. This file is loaded when RTL mode is enabled only.
We recommend you using FireBug - a web development tool to find and edit elements on webpage easily. You can view the FireBug guide to know steps to find, edit, copy HTML elements
2.1 Main menu Styling
For some reason, you may like to change main menu background color, you can take the following step:
Step 1: Inspect element with Firebug.
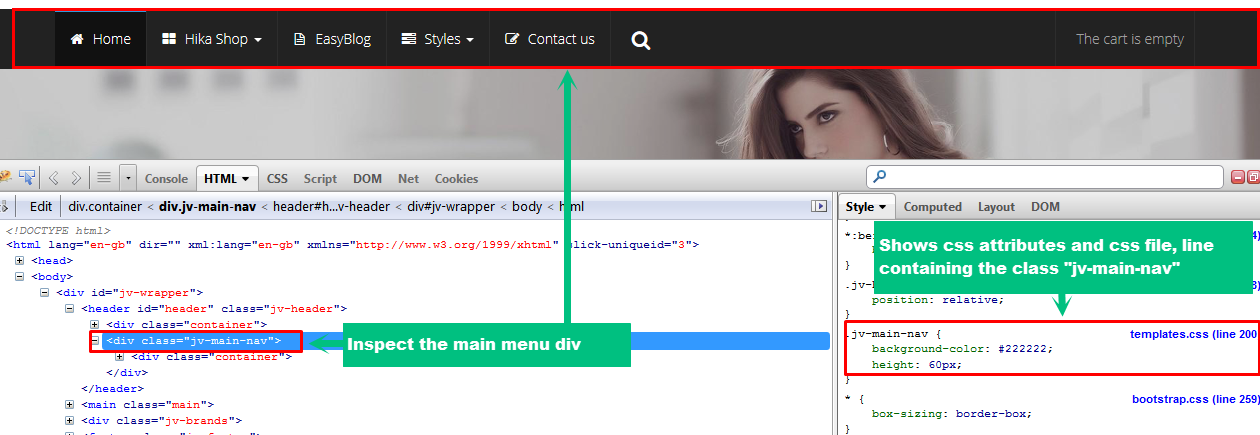
Step 2: Open template.css
Step 3: Search css selector .jv-main-nav to modify the attributes then save the file.
![]() Tip! By using Firebugs to inspect elements, you can easily style any section in the template
Tip! By using Firebugs to inspect elements, you can easily style any section in the template
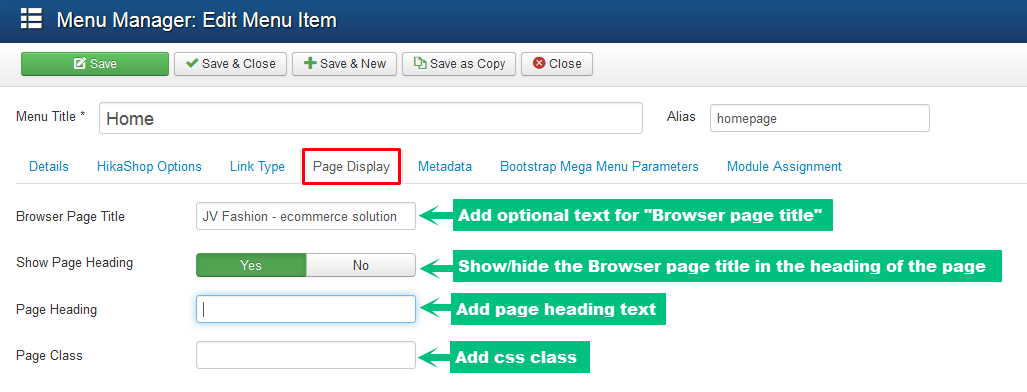
2.2 Website title configuration
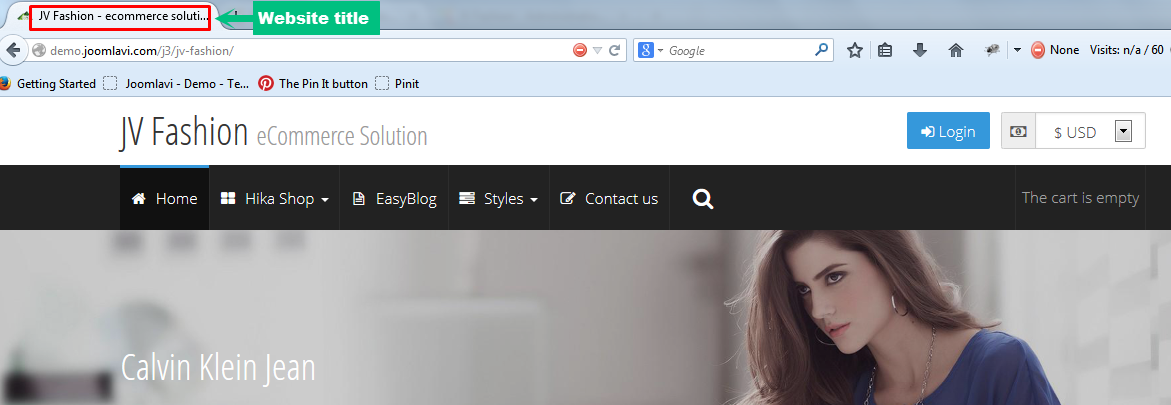
In order to change website title, take the following steps:
Step 1: Go go Menus >> Main Menu in back-end admin panel
Step 2: In Menu Item Manager, select item Home

Step 3: In the Edit Menu Item page, choose tab Page Display, then add page title for the Menu Item
2.3 Changing Favicon
If you install JV Fashion quickstart package, you may need to change the favicon.
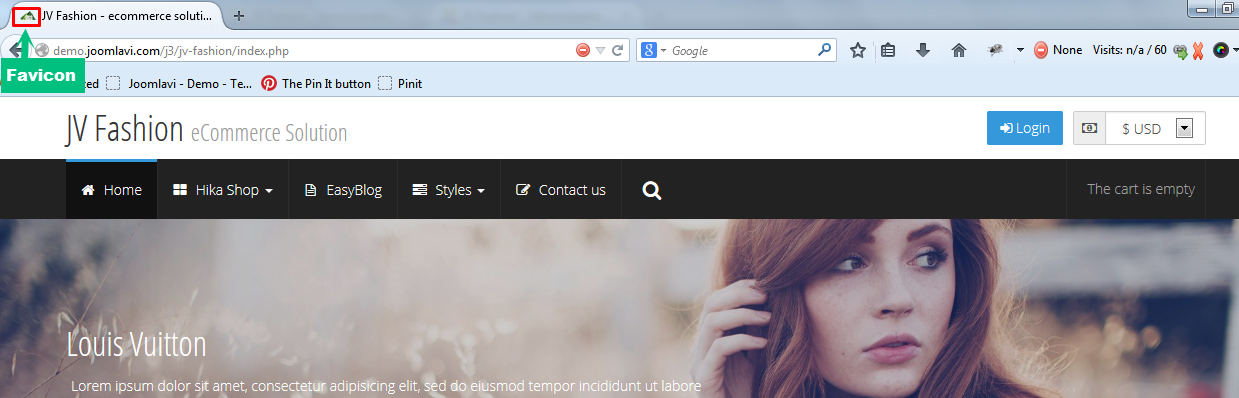
To change favicon, take the following steps:
Step 1: Create a 16x16 pixel image
Step 2: Name the image favicon.ico , so you have your own favicon
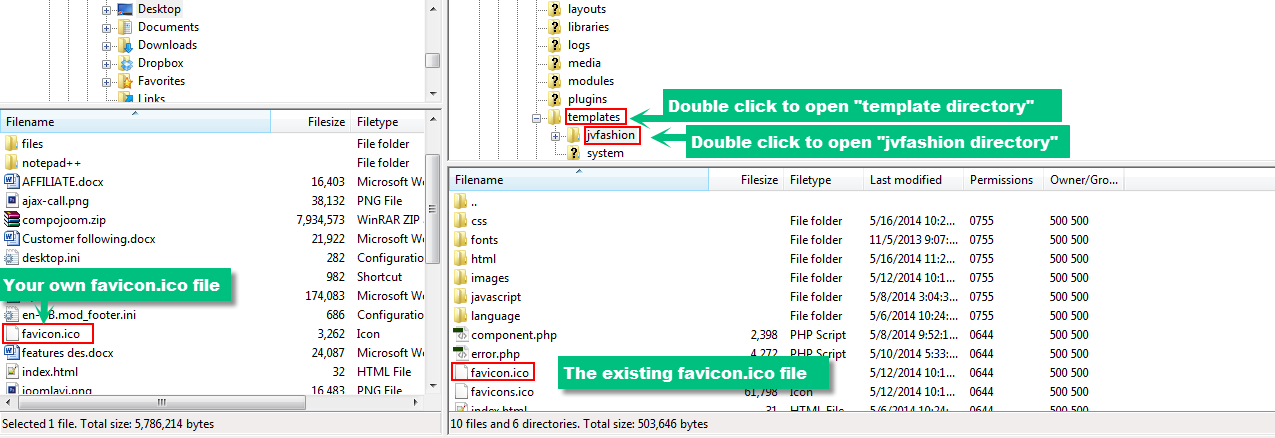
Step 3: Copy the file to /<your joomla>/templates/jvfashion directory .
During this step, you should use FTP application to log into your server. There are number of both free and commercial FTP application. In this example, I choose FileZilla.
On you web server, open htdocs or public_html directory, then select where your Joomla has been previously installed
Scroll down to the template directory, double click to open it,
Continue to open jvfashion directory and copy the favicon.ico file to jvfashion directory
Replace the exsiting favicon.ico file with your own file
extension configuration
If you install JV Fashion by quicstart package, you only need to configure the parameters, change text or images... Because the extensions have already been installed or added.
If you install JV Fashion on your existing Joomla! site, you need to install each extension or add new if they are Joomla! default modules
1. JV Nivo Slide
Please view detailed JV Nivo Slide documentation for Joomla 3.x to know how to configure the parameters in back-end area.
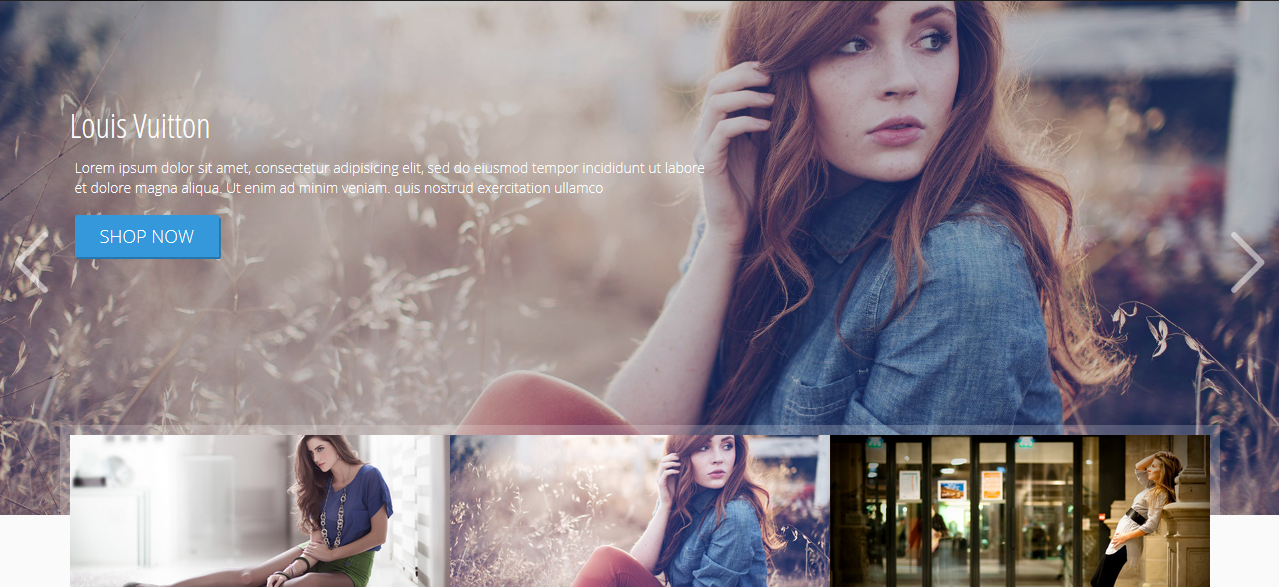
In the demo, the followings are 2 important parameters set for JV Fashion:
- Module position: banner
- Menu assignment: Home page
Module Nivo Slide in Front-end:
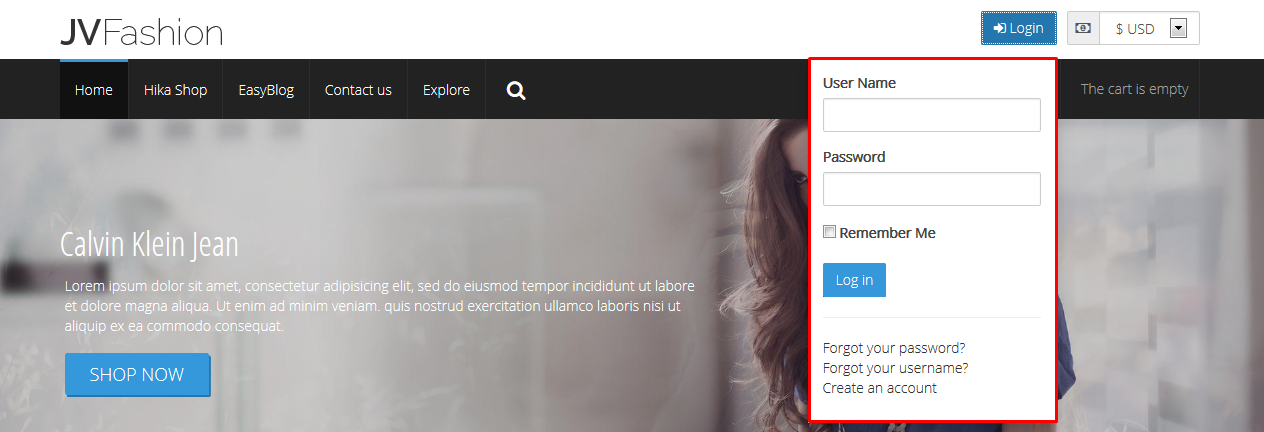
2. Login
This is a default Joomla module displaying a username and password login form. It’s also display a link to retrieve a forgotten password. If the user registration is enable (in User Manager > Options), another link will be shown to enable self-registration for users.
If you install JV Fashion on your Joomla, you need to add this module by navigating to Extensions >> Module Manager >> Click New

You will see a ascending order list of module types, scroll down to select module type "Login"
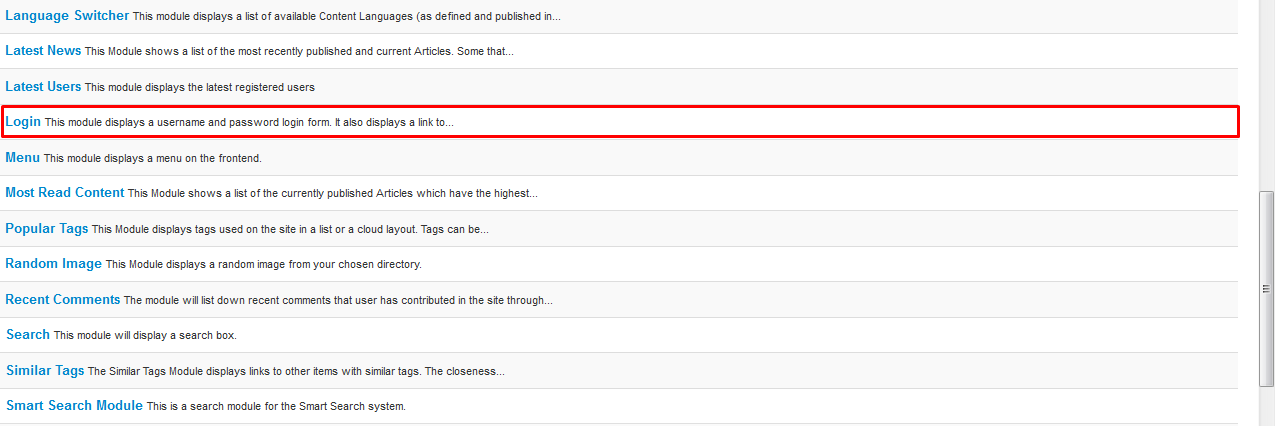
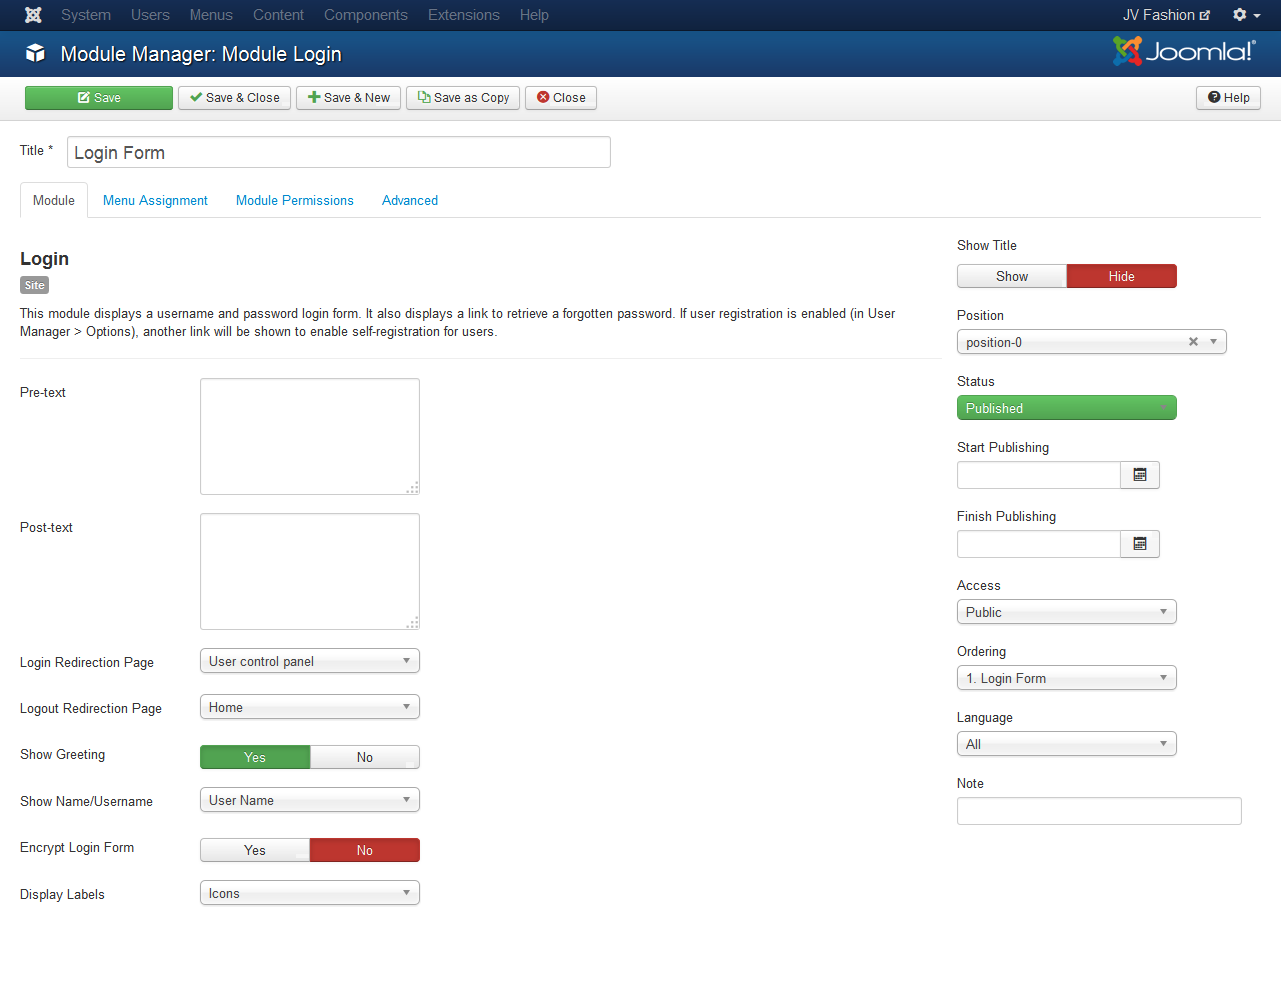
Then configure the parameters in each tabs, notice the following parameters to ensure the module displays on the right place:
- Module position : position-0
- Menu assignment: on all pages
- Module title : Login Form
Backend-settings: Please view the parameter explanations in the back-end (hover over each parameter to see the explanation)
Module Login in Front-end:
3. Menu
This type of default Joomla module helps you display a menu on front-end.
In the demo template, there are 3 menu modules with different names as you will see below. If you install JV Fashion by quickstart package, you only need to configure the parameters. But you need to add new menu modules if you chose the second method of installation.
Like Module Login , to add this type of module, go to Extensions >> Module Manager >> Click New , select type: "Menu" from a list: then configure the parameters of the module.
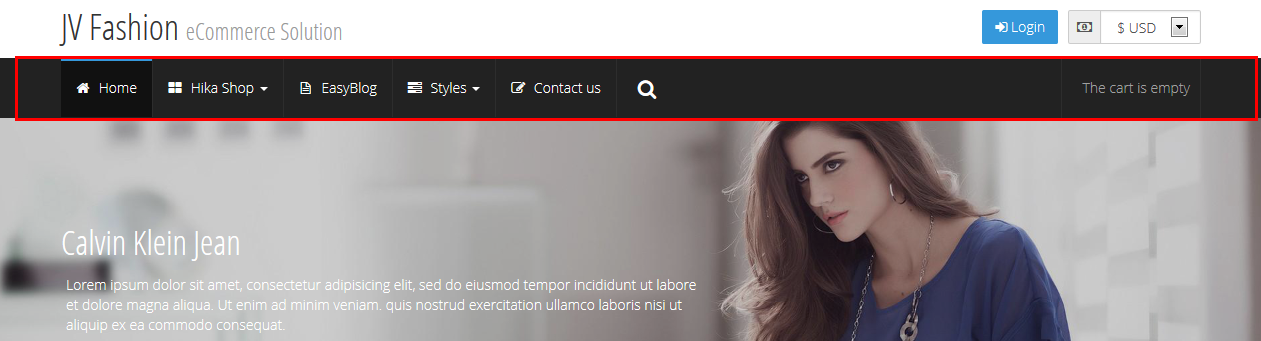
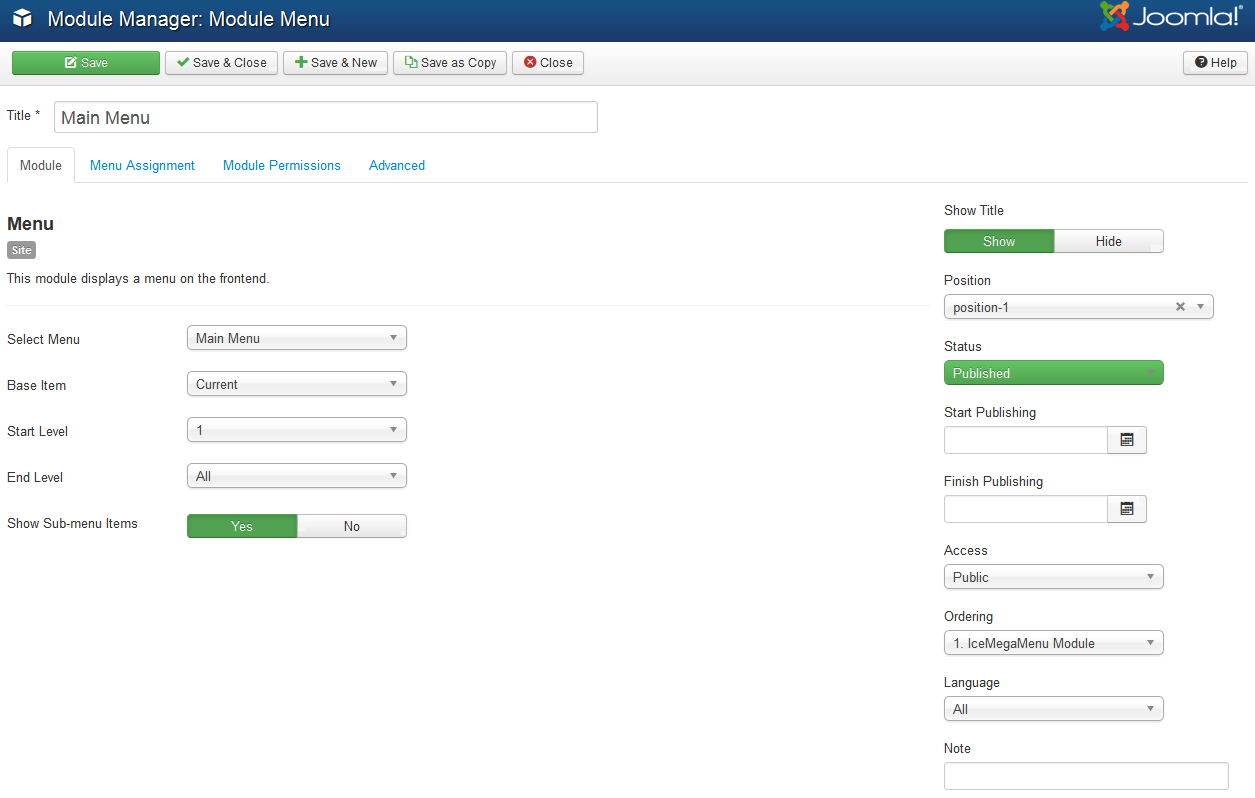
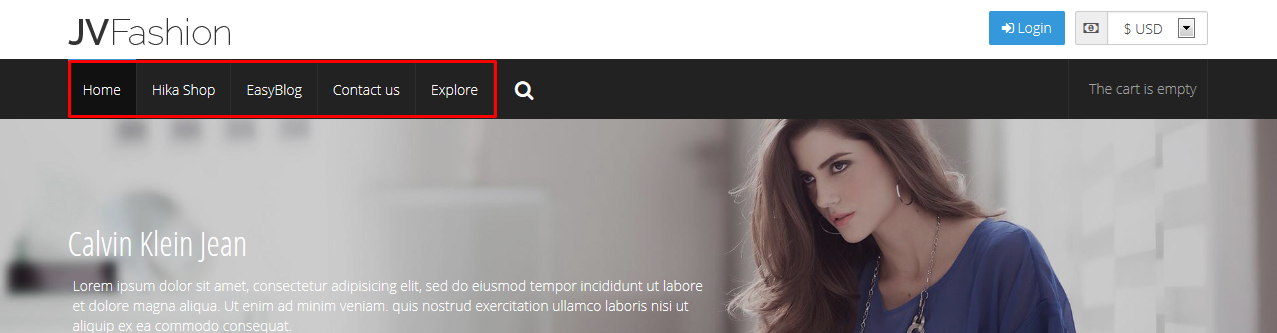
3.1 Main Menu
- Module position : position-1
- Menu assignment: on all pages
- Module title : Main menu
Back-end settings: please view more parameter explanation in the module (hover over each parameter to see explanation)
Module Main menu in Front-end
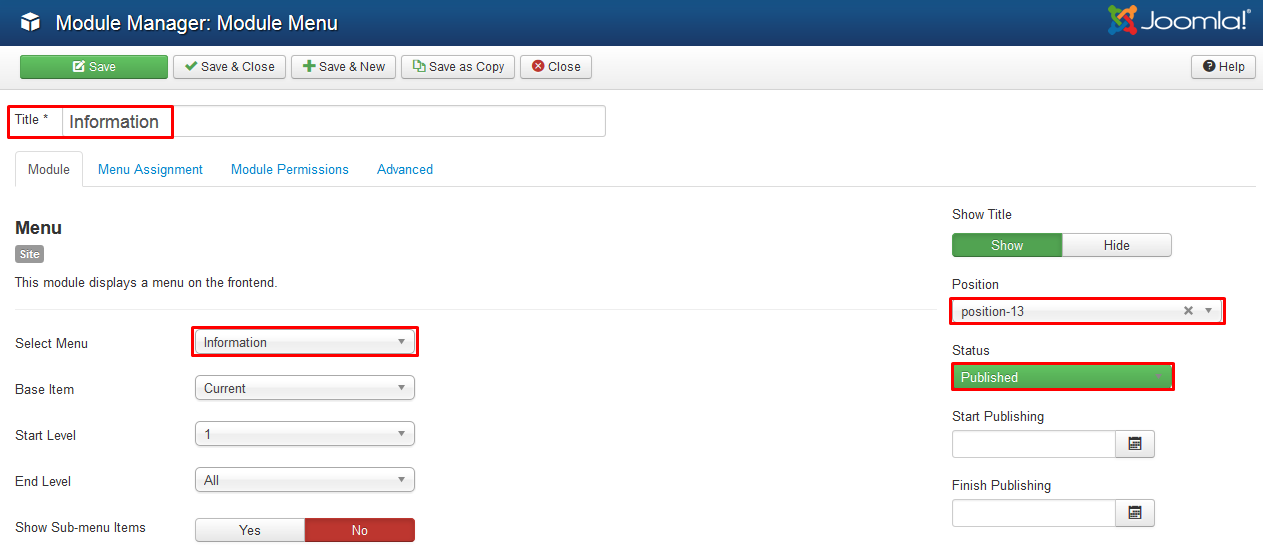
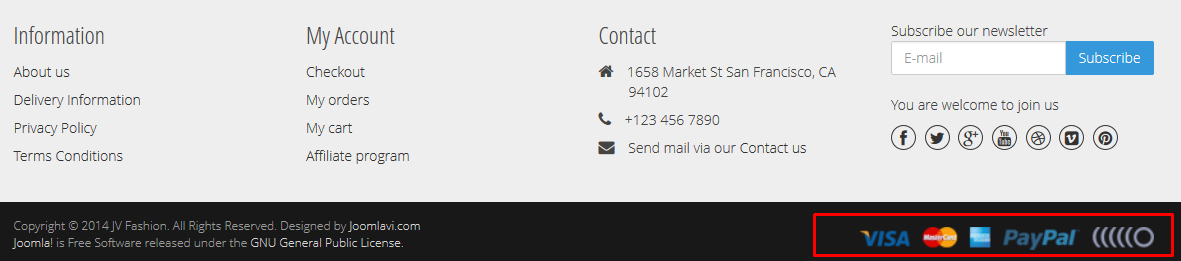
3.2 Information
- Module position : position-13
- Menu assignment: on all pages
- Module title : Information
Back-end settings: please view more parameter explanation in the module (hover over each parameter to see explanation)
Module Information in Front-end:

3.3 My Account
- Module position : Position-14
- Menu assignment: on all pages
- Module title : My Account
Back-end settings: please view more parameter explanation in the module (hover over each parameter to see explanation)
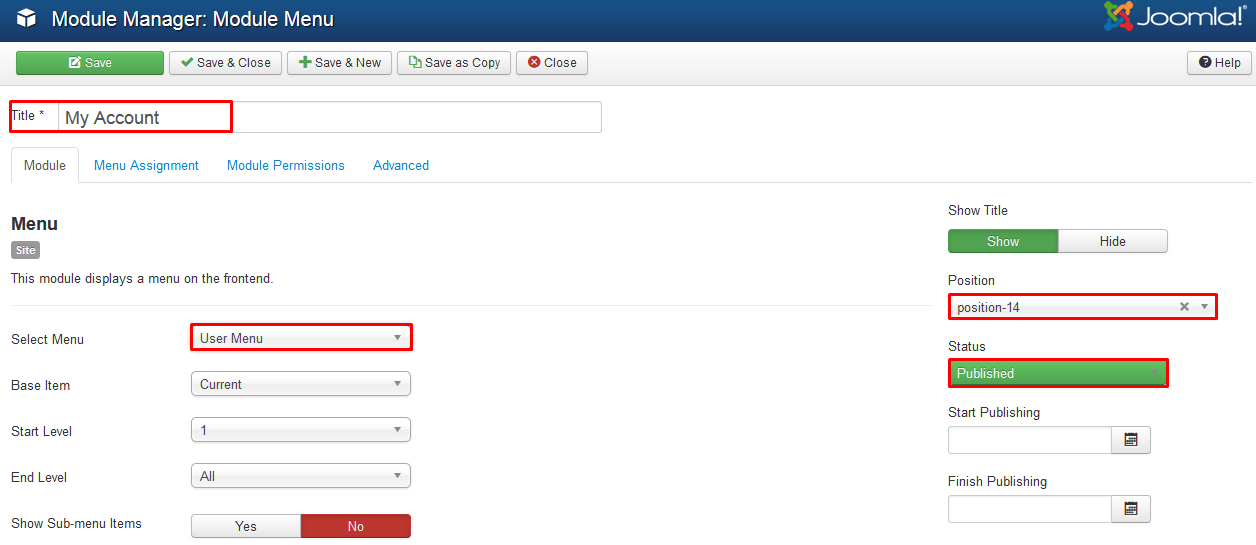
Module My Account in Front-end:

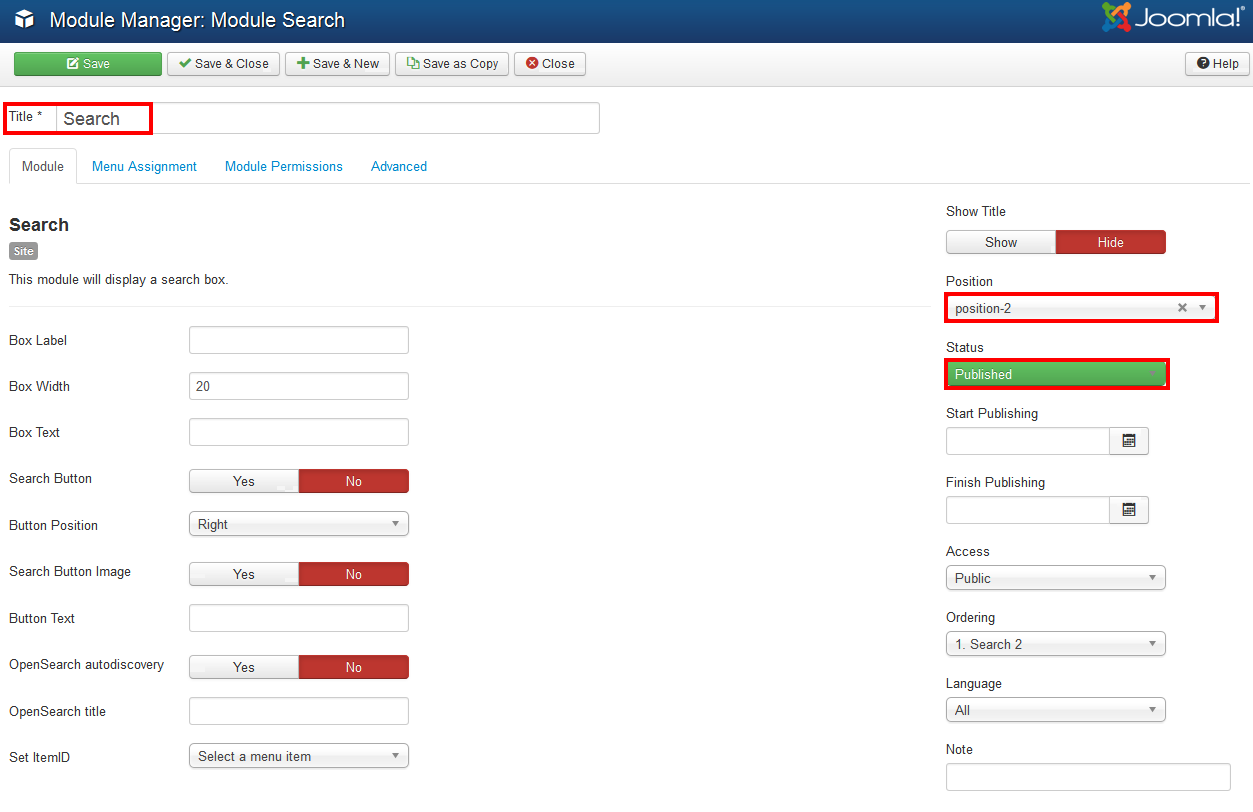
4. Search
This is another default module in Joomla! which helps you to display a search box in front-end
If you install JV Fashion on your current Joomla!, you need to add new Search Module,Go to Extensions >> Module Manager >> Click "New" >> select type: "Search"
Then configure the parameters of the module. In the back-end you can hover over each parameter to view its explanation.
Back-end settings
- Module position: position-2
- Menu assignment: on all pages
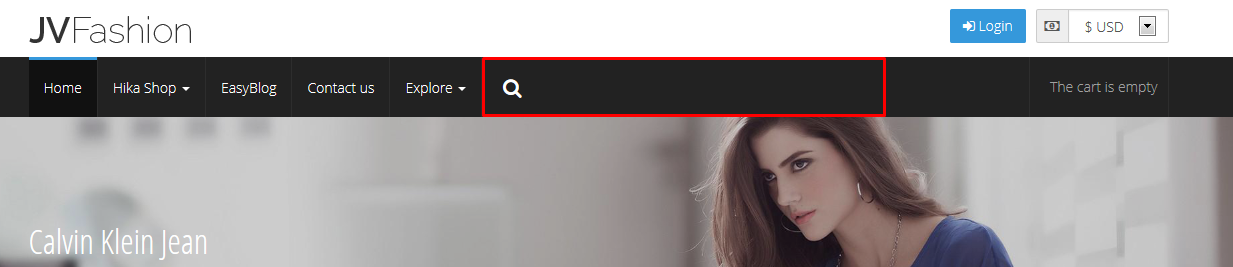
Module search in Front-end
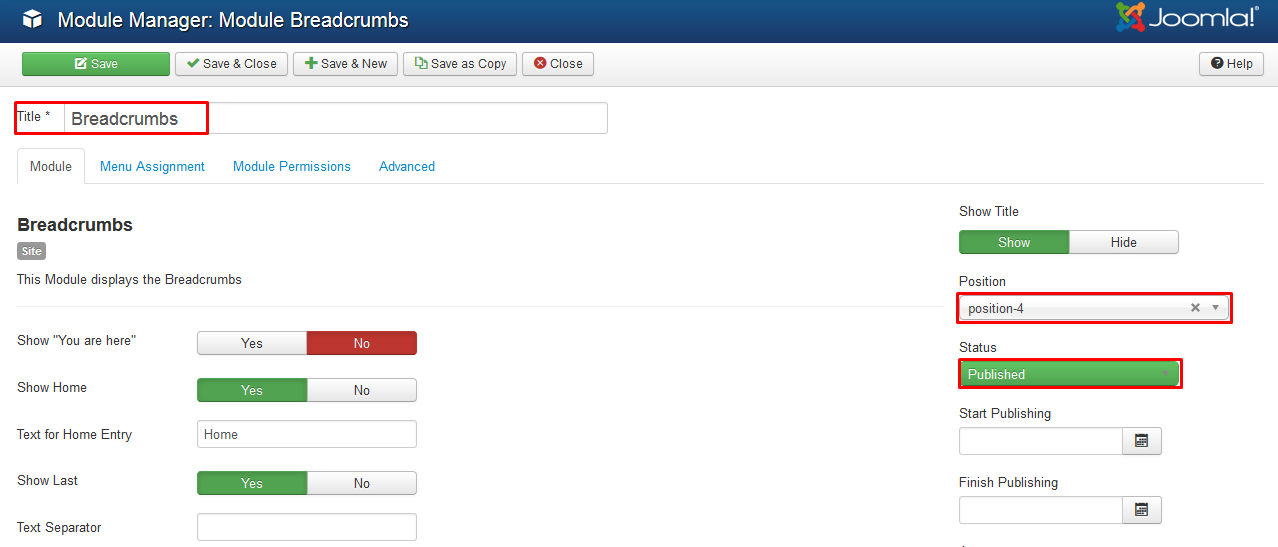
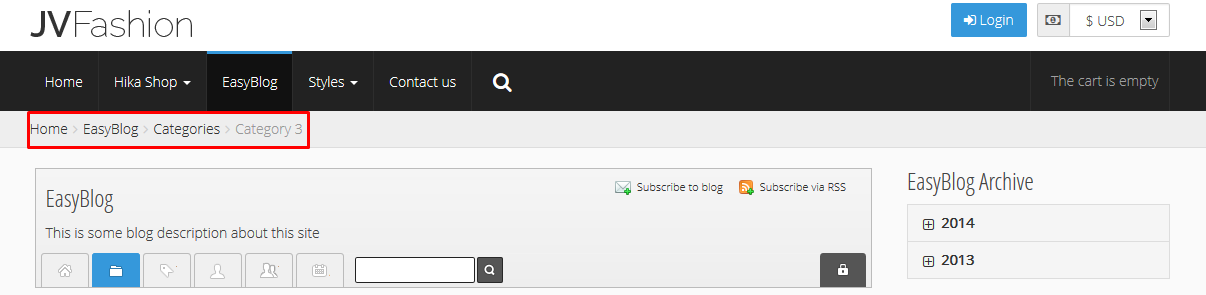
5. Breadcrumbs
This module shows a set of navigation links that illustrates where you are inside the web site and allows you to navigate back.
To 'add' a new Breadcrumbs module or 'edit' an existing Breadcrumbs module, navigate Extensions >> Module Manager
Click the 'New' button and click on Breadcrumbs in the modal popup window.
To 'Edit' an existing Breadcrumbs module, in the Module Manager click on the Breadcrumbs Module's Title or click the Breadcrumbs module's check box and then click the Edit button in the Toolbar.
Back-end settings:
- Module position: position-4
- Menu assignment: all on pages except home page
Breadcrumbs module in Front-end:
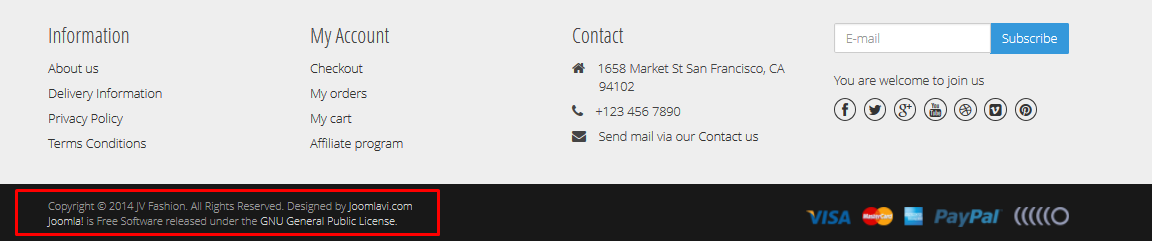
6. Copyright
This module shows the Copyright of the template. You cannot edit the content in back-end like other Joomla! default extension
To edit the copyright of the template, connect your site via FTP,
Then Go to directory JV-Fashion >> Languages >> en-GB >> en-GB.mod_footer.ini, Open the file to edit. Change the red text into your own text as you can see below:
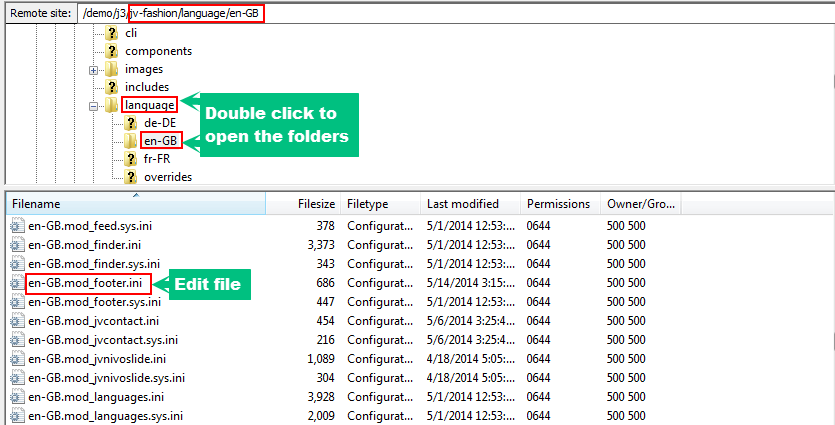
FOOTER=Footer
FOOTER_LINE1= Copyright © %date% %sitename%. All Rights Reserved.
FOOTER_LINE2=<a href="https://www.joomla.org">Joomla!</a> is Free Software released under the <a href="https://www.gnu.org/licenses/gpl-2.0.html">GNU/GPL License.</a>
MOD_FOOTER=<em>mod_footer</em>
THIS MODULE SHOWS THE JOOMLA! COPYRIGHT INFORMATION=This Module shows the Joomla! Copyright information
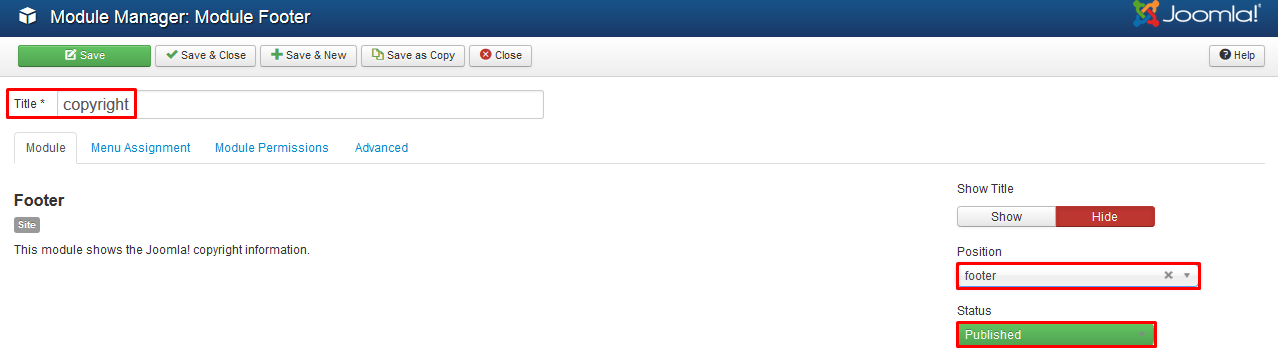
Module Copyright Back-end settings
- Module Position : footer
- Module Type : footer
- Module title : Copyright
- Menu assigned : on all pages
Module Footer in Front-end
Custom HTML Modules
The custom HTML module is one of the default modules for Joomla! It is designed to contain any valid HTML code. There are many cases where you might want to put free-form HTML inside a web page. For example, you might want to create an HTML Image Map or you might want to copy HTML code from PayPal, Amazon, or some other site. The Custom HTML Module allows you to create a self-contained HTML unit and then put it in any valid location on a page.
Note: If are new to Joomla! and HTML, best way for you is to copy and paste the code into the module. Or If you would like to edit the HTML code please notice on each of HTML module below.
How to create or a new Custom HTML module or edit an existing one?
Like the way you create a new Joomla! default module. To 'add' a new Custom HTML module, navigate to Extensions >> Module Manager
Click the 'New' button and click on Custom HTML in the modal popup window.

To 'Edit' an existing Custom HTML module, in the Module Manager click on the Custom HTML Module's Title or click the Custom HTML module's check box and then click the Edit button in the Toolbar.
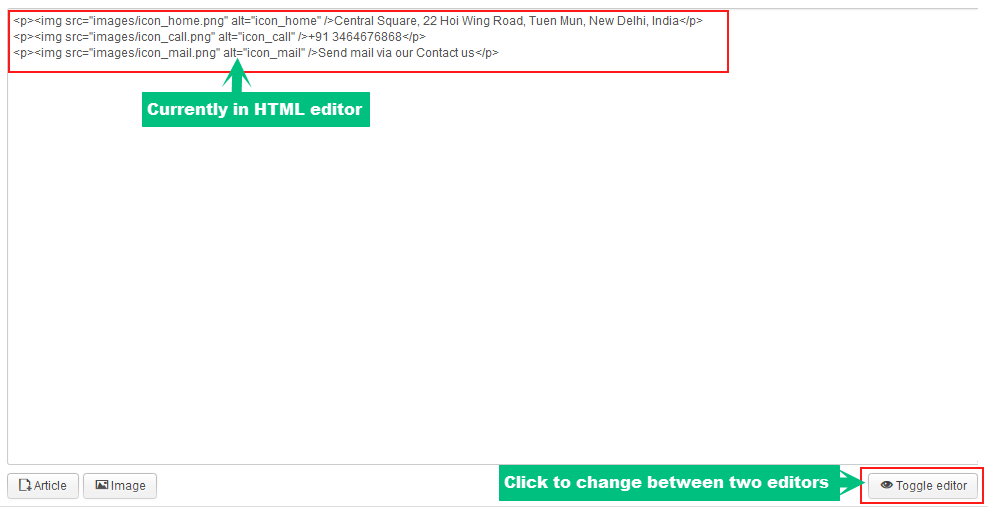
When editing the content you can use "toggle editor" button in the bottom of the editor. A toggle button allows the user to change between two editors: HTML and Plain text.
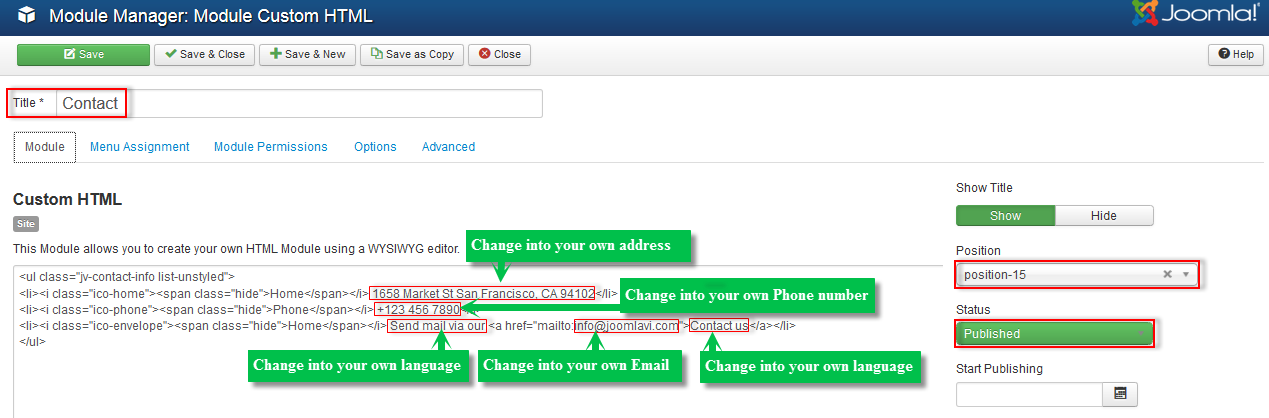
1. Contact
- Module position : position-15
- Module title : Contact
- Menu assignment: on all pages
Module contact back-end setting and editing:
Module contact in front-end:

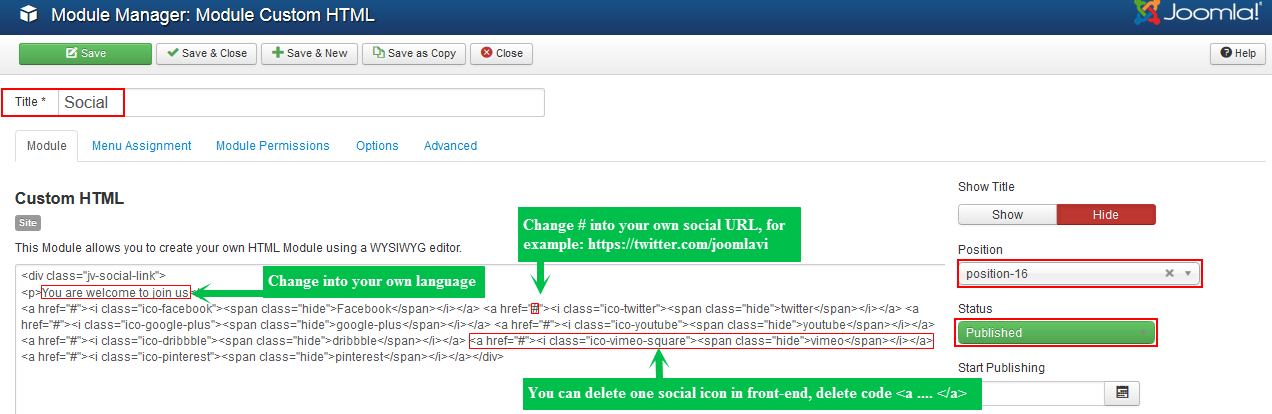
2. Social
- Module position : position-16
- Module title : Social
- Menu assignment : on all pages
Module contact back-end setting and editing:
Module contact in front-end:

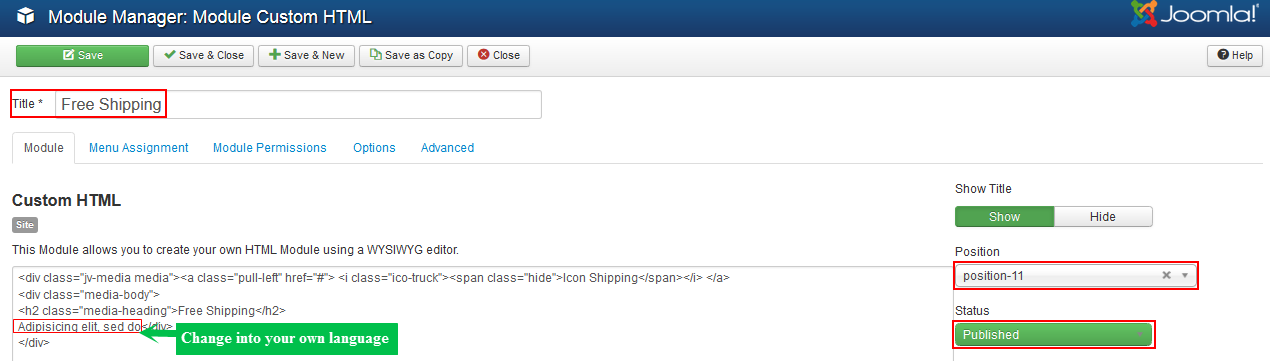
3. Free shipping
- Module position: position-11
- Module title: Free Shipping
- Menu assignment: on all pages
Module Free Shipping Back-end setting and editing:
Module Free Shipping in front-end

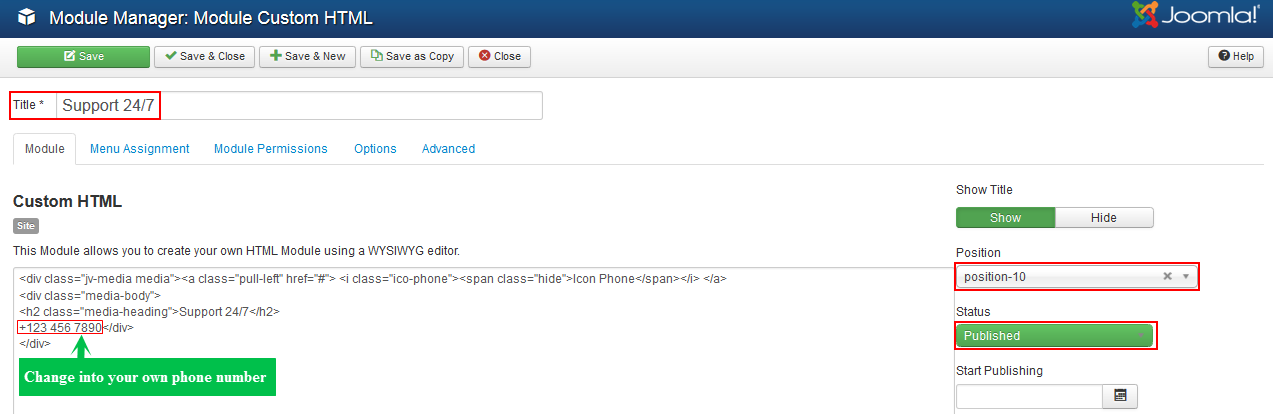
4. Support 24/7
- Module position: position-10
- Module title: Support 24/7
- Menu assignment: on all pages
Module Search 24/7 back-end setting and editing:
Module Support 24/7 in front-end:

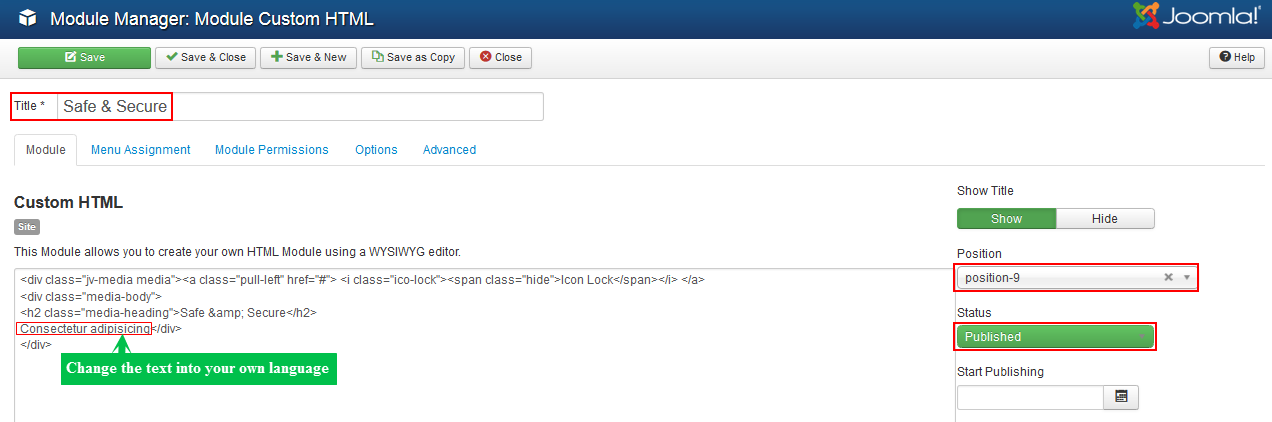
5. Safe & Secure
- Module position: position-9
- Module title: Safe & Secure
- Menu assignment: on all pages
Module Safe & Secure back-end setting and editing:
Module Safe & Secure in front-end

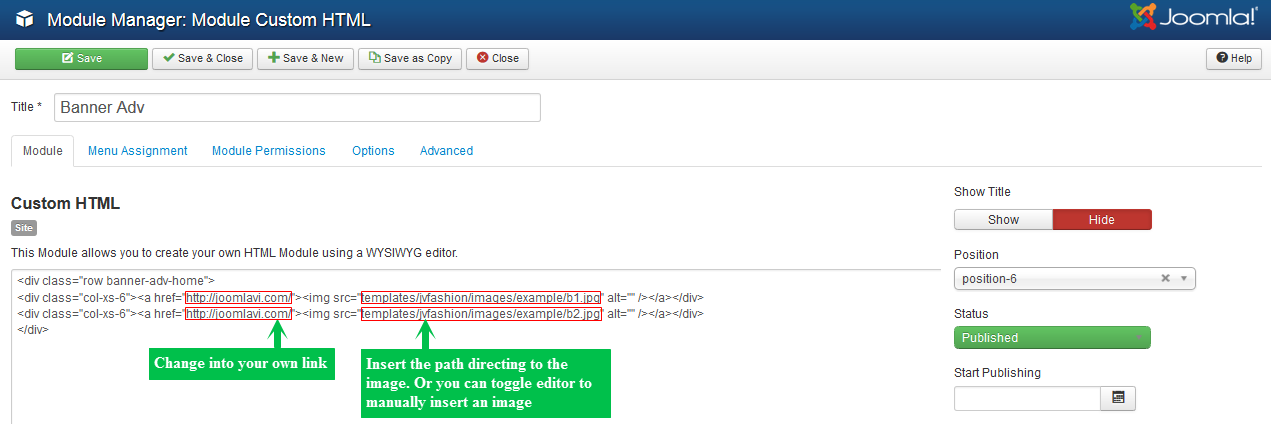
6. Banner Adv
- Module position: position-6
- Module title: Banner Adv
- Menu assignment: on all pages
Module Banner Adv back-end setting and editing:
Module Banner Adv in front-end

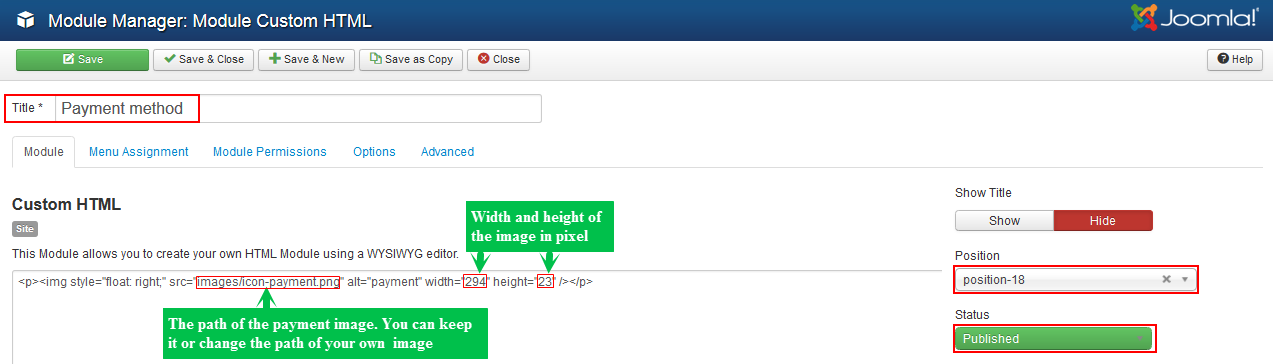
7. Payment Methods
- Module position: position-18
- Module title: Payment Method
- Menu assignment: on all pages
Module Payment Method Back-end settings and editing
Module Payment Method Back-end in frontend
Mega Menu
1. Download & Installation
You can download the Bootstrap Mega Menu Module & Plugin in JV Fashion download page
Then install each like other extensions.
2. Enable Plugin & Module
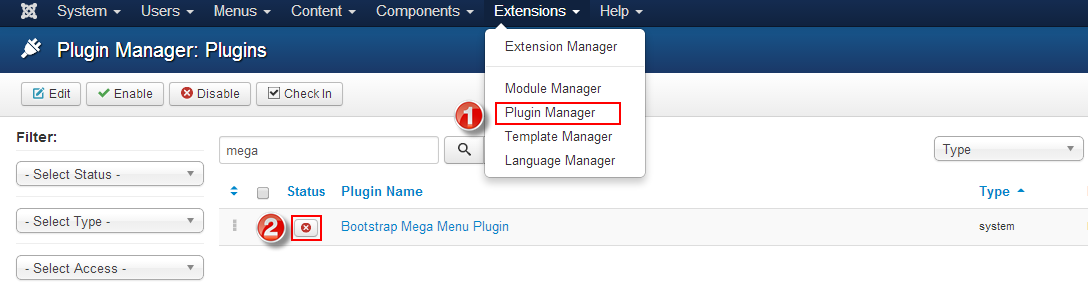
After successful installation, you need to enable the plugin and the module.
To enable the plugin, go to Extensions >> Plugin Manager, search for the plugin and click on the red-cross button beside the plugin title.
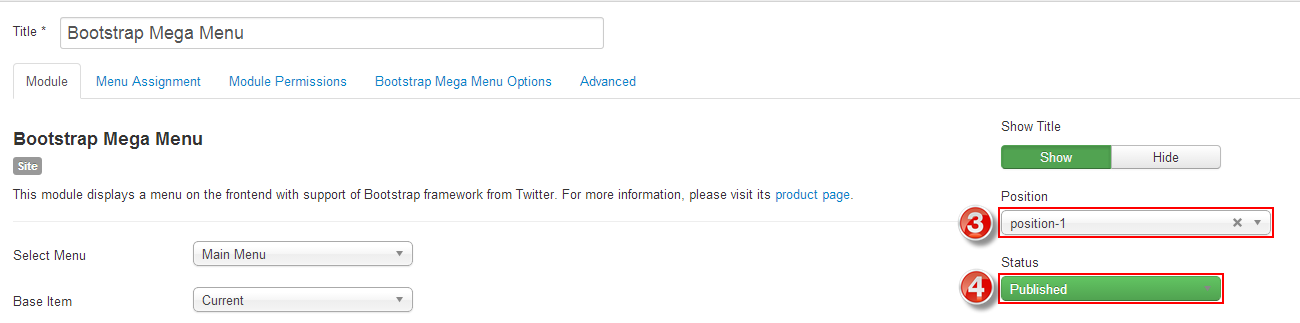
To enable the module: go to Extensions >> Module Manager, search for the Mega Menu module, click on the module to access it

Next, in the tab Module, publish the module and select a position for the module
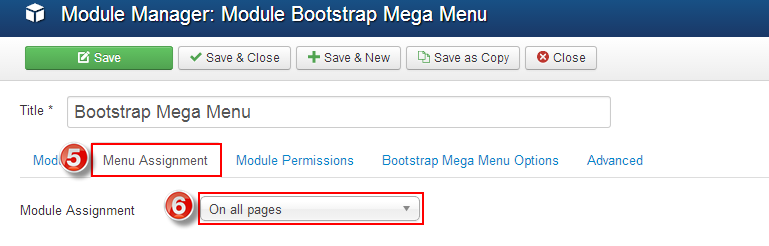
Next, in tab Menu Assignment, assign the module to Menu items.
3. Create your own menu system
First, you need to create your own menu system by adding new menu items. As you know Menu items are the main structure of a Joomla site. Each Menu Item is linked to a webpage. The Menu Item Type determines the type of page that will display when this menu choice is selected by the User. Joomla! provides users 29 different Menu Item types. If you install third-party extensions, these may add more menu types.
To add new menu item, go to Menus >> Menu manager, then select a menu, click on "New" button in the top left corner.
You may need to repeat this step many times to create a menu system as you can see below:
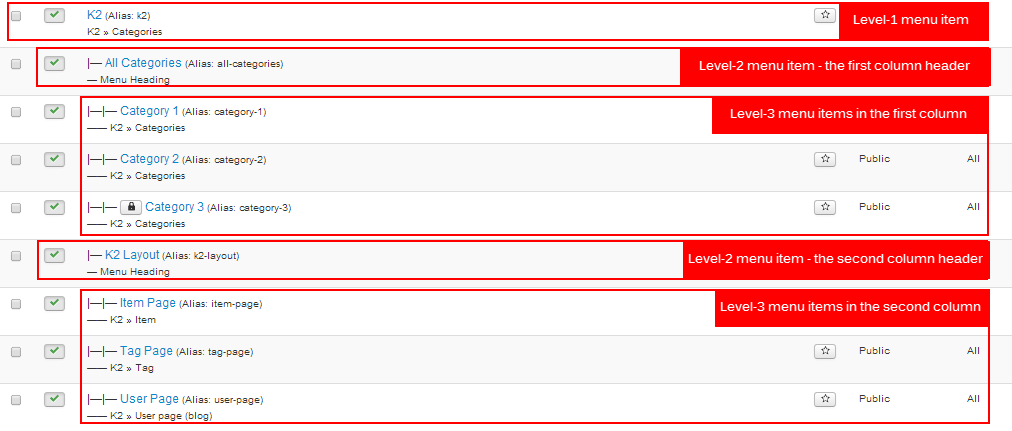
4. Mega Menu Item Configuration
What you need to do next is go to Level-1 menu item, select tab "Bootstrap Mega Menu Parameters" and configure the parameters.
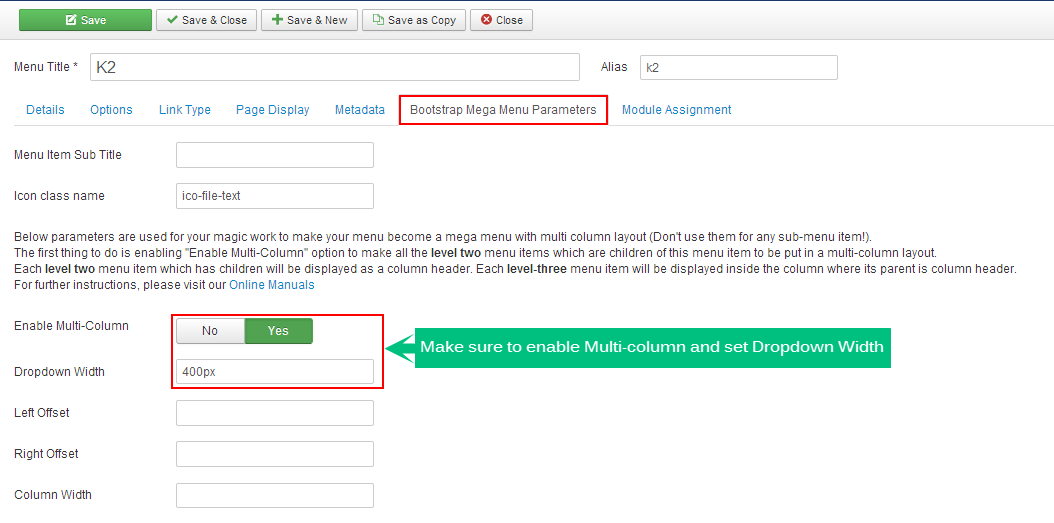
The important things you need to configure are enabling "Multi-Column" and setting "Dropdown Width" in pixel.
You may need to:
-Add an icon to any menu item by entering "Icon Class name"
- Set "Left Offset" and "Left Offset" in pixel or %
5. Mega Menu Module Configuration
The last step you need to do is configure parameter for the Bootstrap Mega Menu Module:
Navigate to Extensions >> Module Manager >> Bootstrap Mega Menu >> Tab Bootstrap Mega Menu Options:
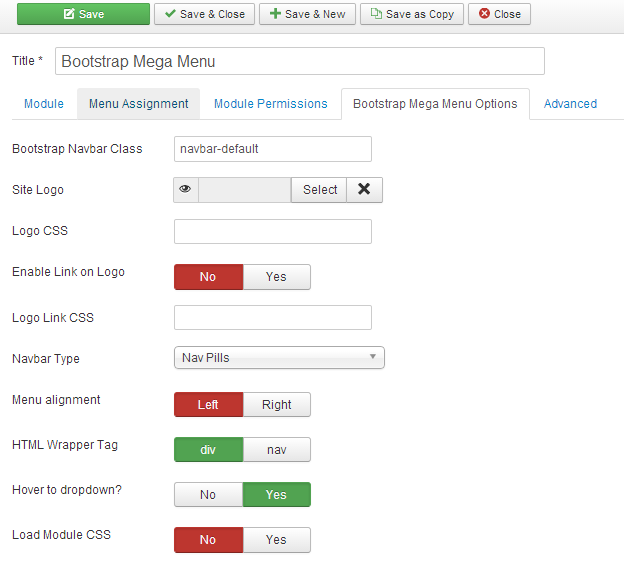
Please hover over each parameters to know more about explanation.
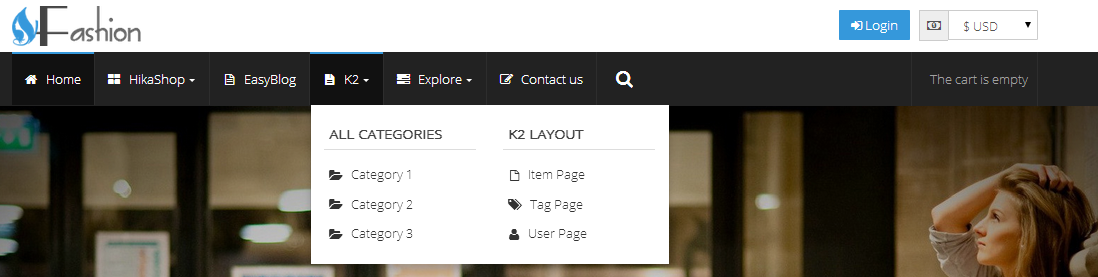
6. Mega menu Front-end.
As I took the example for K2 Menu Item as the level-1 menu item as you can see in the menu system above. So below is the Mega Menu responding for that menu system:
easyblog configuration
This part is not intended to cover everything about EasyBlog Configuration Guide. It only shows you important and fundamental sections. If you would like to view more, please visit EasyBlog Docs. Stackideas is our partner, so enjoy 20% discount when purchasing their extensions.
Go to Components >> EasyBlog, you have many options to modify
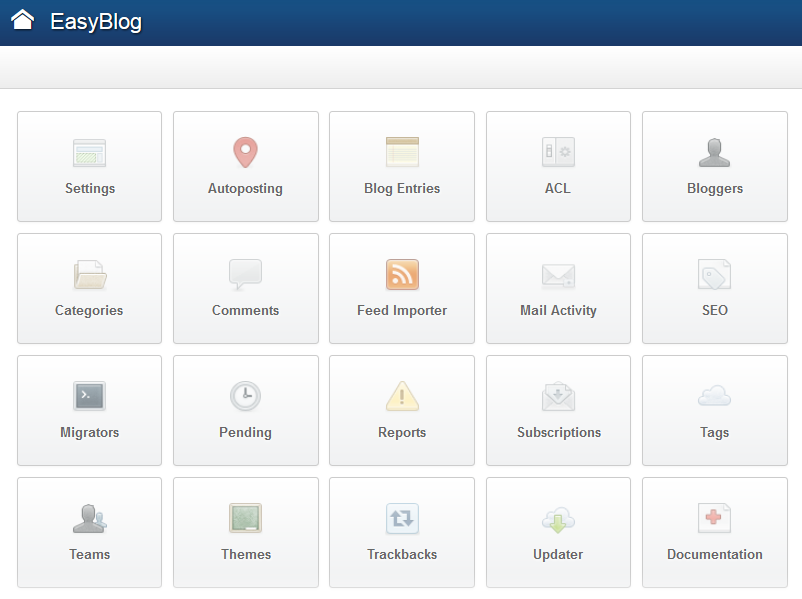
Settings: All of the configuration options are located within this section allowing you to modify settings such as generic blog tittles, comments, features and etc.
Autoposting : This sections allows you to setup autopostings to famose social network sites such as Facebook, Twitter and LinkedIn
BlogEntries: You can add new blog entries or manage existing blog items
ACL: create additional access control that will apply to bloggers or user groups. You can define what a blogger is allowed to do throughout the system
Blogger: Manage all blogger in your site. You can modify their profile in this section
Categories: Manage categories for blogs, you can also create new categories
Comments: Manage or moderate comments
Feed Importer: Import RSS feeds into your blog posts
Mail Activity: Monitor the emails that is scheduled to be sent out to the users
SEO: Configure Meta Tags for blogs, including latest posts, categories, tags, team blogs and blogger page.
Migrators: Help you to migrate articles from other blogging solution to EasyBlog
Pending: Manage blog posts pending for moderation. You can approve the blog posts from here.
Reports: View all reported blog posts by users. It is important to ensure the contents are safe for public consumption
Subscriptions: View and manage all user subscriptions throughout the blogs on the site
Tags: Manage tags for your blog posts in this section
Teams: Team blogs allows you to group bloggers into a specific team or groups. You can create additional team blog for your site and assign specific bloggers into a group
Themes: Select default theme for EasyBlog
Trackbacks : Manage or moderate trackbacks made on the blog entries. If there are any trackbacks moderated, you can find them in this section
Updater: Access to update the latest version
Documentation: You can find EasyBlog docs in this section
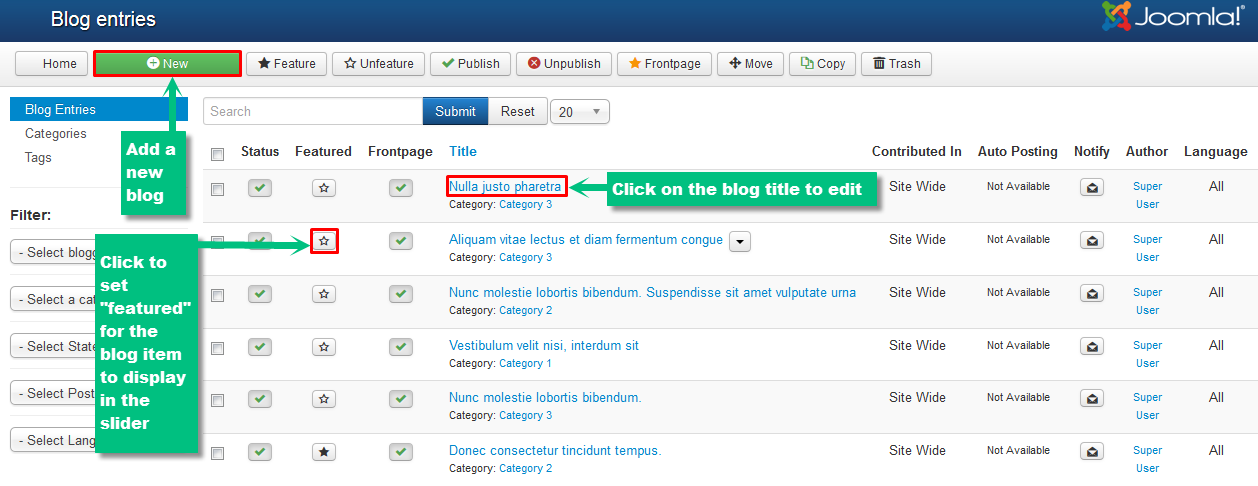
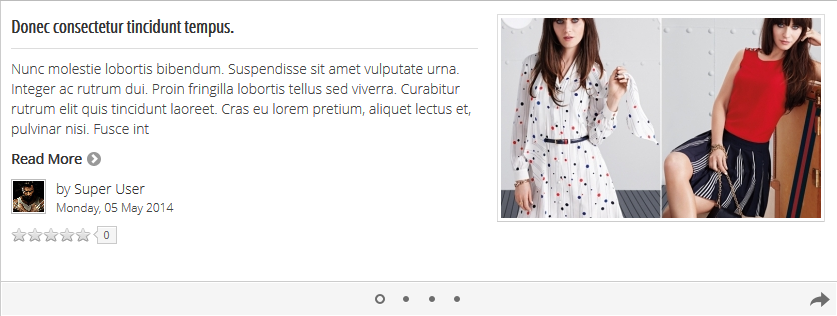
1. Featured posts slider
This slider shows featured blogs only. To get them displayed in front-end, You have to set the blog item to "Featured".
Go toComponents >> Easyblog >> Blogs.In this page you can manage all existing blogs or add new
Featured Blog slider in front-end:
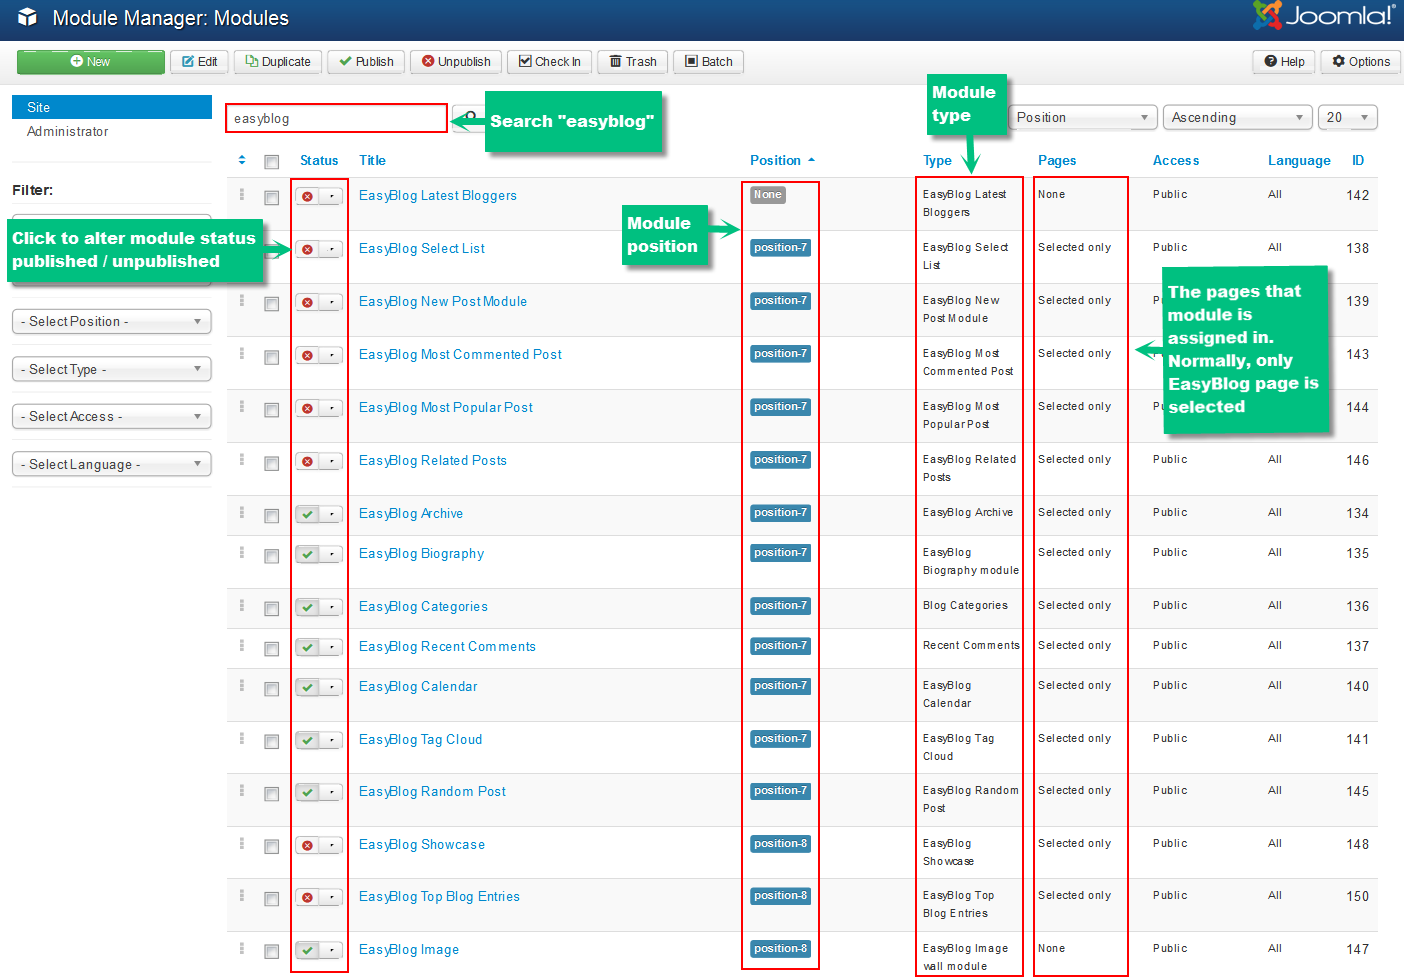
2. Easeblog Modules
Below is a list of modules provided by EasyBlog to meet your taste. You can select to display them in front-end.
EasyBlog Latest Bloggers
EasyBlog Select List
EasyBlog New Post
EasyBlog Most Commented Post
EasyBlog Most Popular Post
EasyBlog Related post
EasyBlog Archive
EasyBlog Biography
Blog Categories
Recent Comments
EasyBlog Calendar
EasyBlog Tag Cloud
EasyBlog Random Post
Team Blog
EasyBlog Showcase
EasyBlog Top Blog Entries
EasyBlog Image Wall
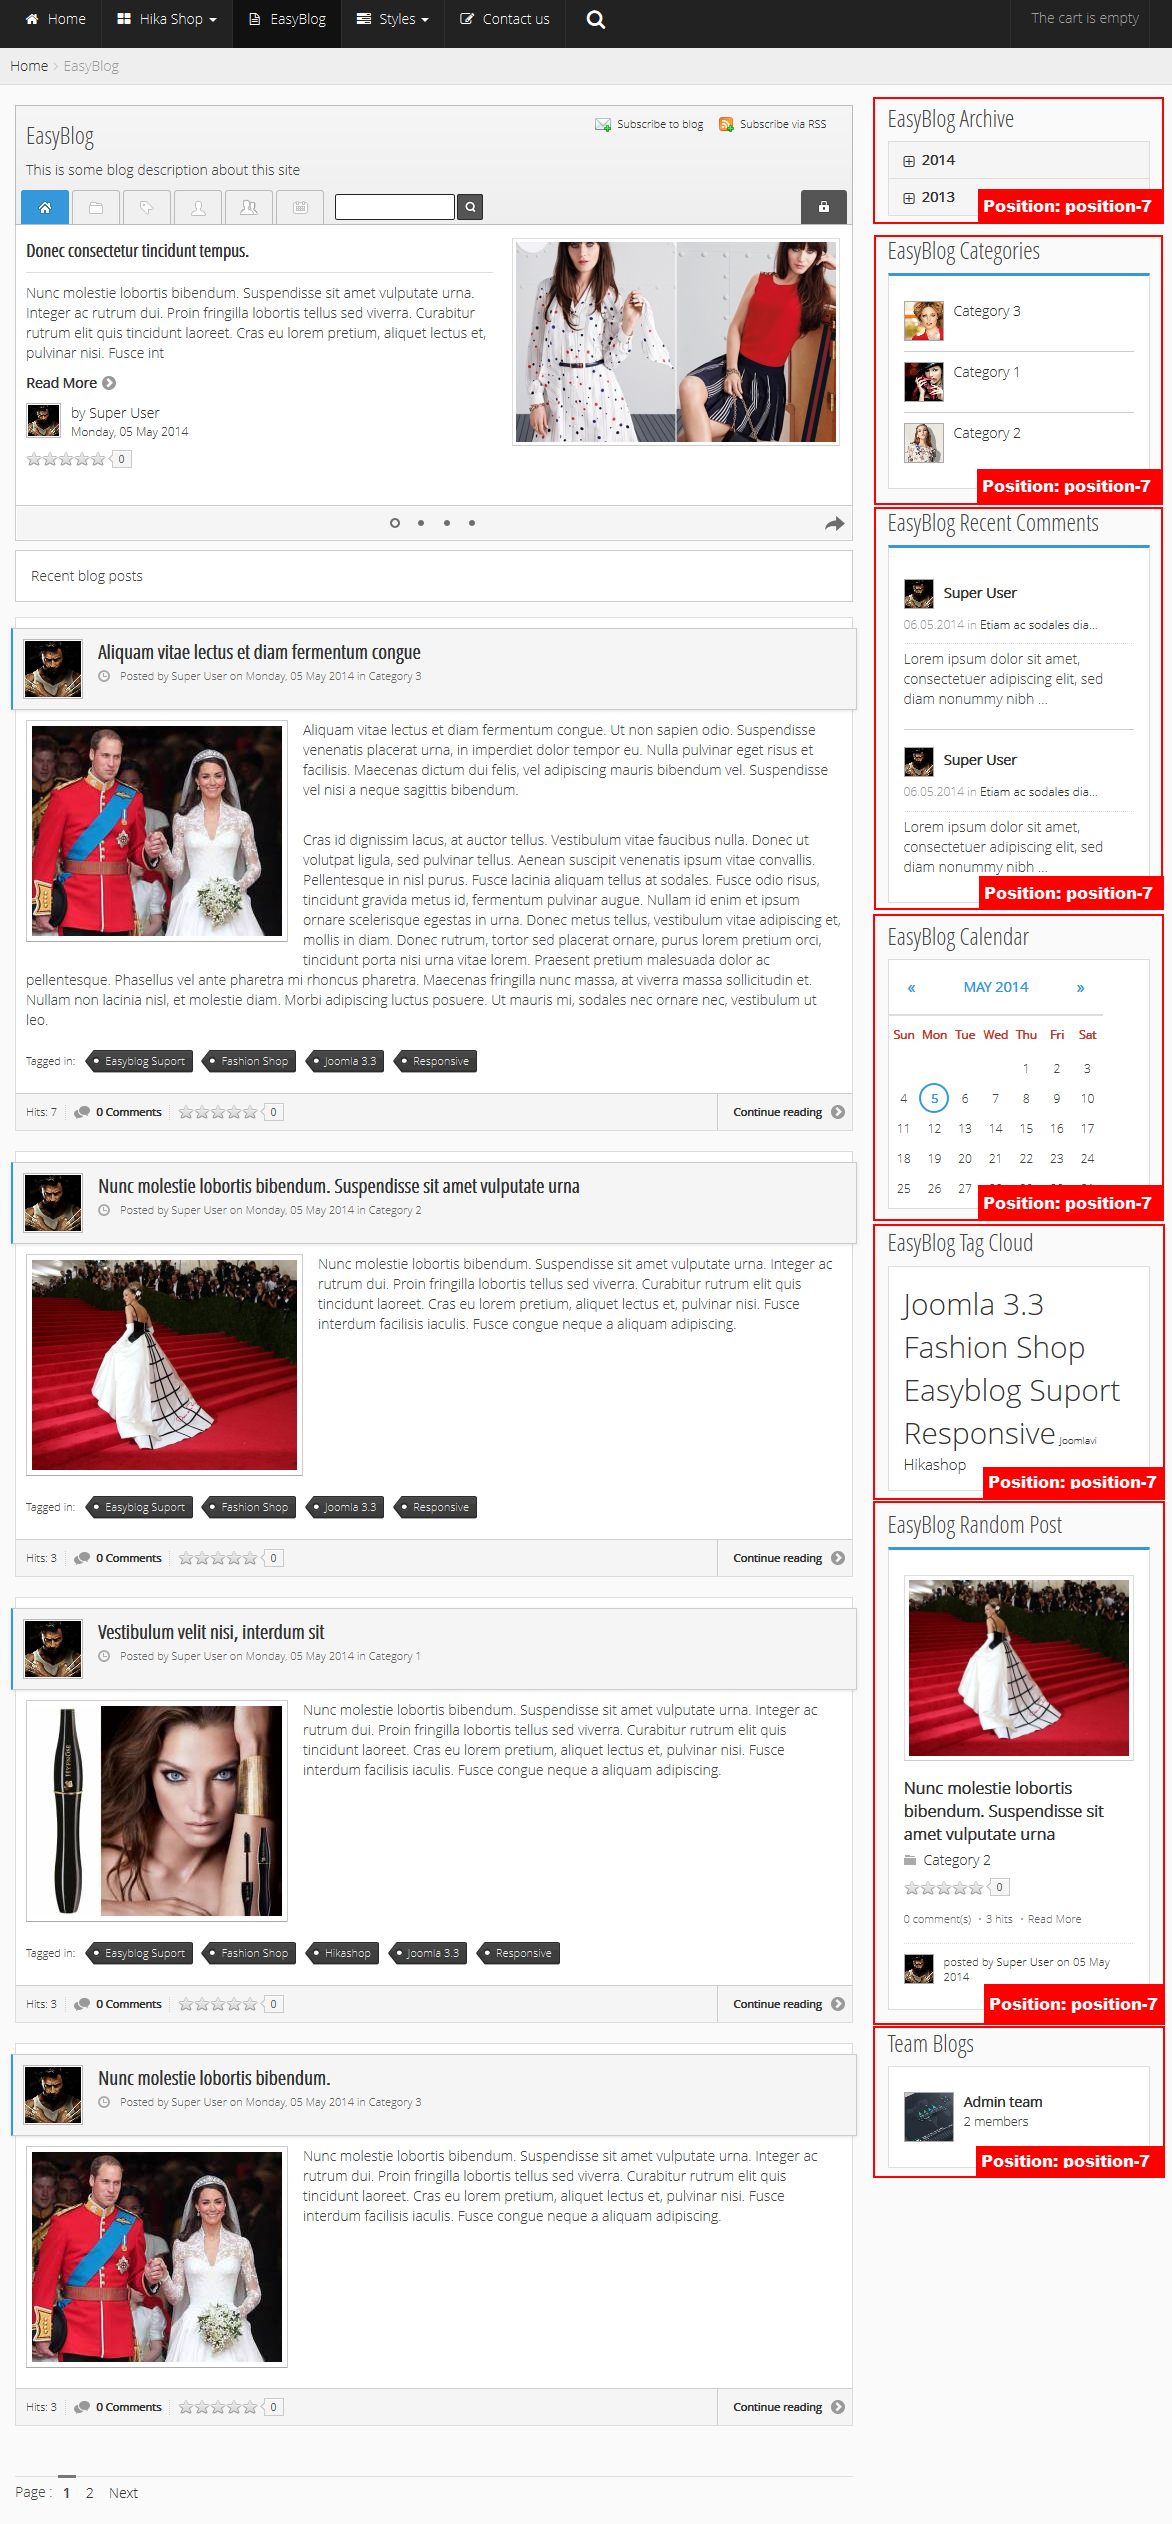
In the Demo, we publish 7/17 modules only. You can check by going to Extensions >> Module Manager,search "easyblog" as you can see below
Easyblog Module in front-end:
hikashop configuration
This section only covers important configuration parts of Hikashop to make sure that you can build your own online store in an easiest way. Visit Hikashop to download the extension. Hikashop is one of Joomlavi's partners, you can get 20% discount purchasing their products.
1. Installation
HikaShop is a Joomla Component and like any other Joomla extensions, it can be installed easily within no more 2 clicks!
You don't have to extract the package first, HikaShop will automatically install some plugins and modules.
Log on to the Joomla Administrator Section and go to Extensions >> Extension Manager
Browse for your HikaShop package and then click "Upload File & Install". The installation process may take about 1 minute

HikaShop will automatically install its modules and plugins and default categories so that you can directly add your products to your store.
2. Hikashop dashboard
The dashboard is the place you come to when you open HikaShop via the administrator joomla menu Components >> HikaShop. It is composed of two parts: a statistics part at the top, where you can see information about your sales and customers, and a menu part with a list of the main parts of HikaShop.
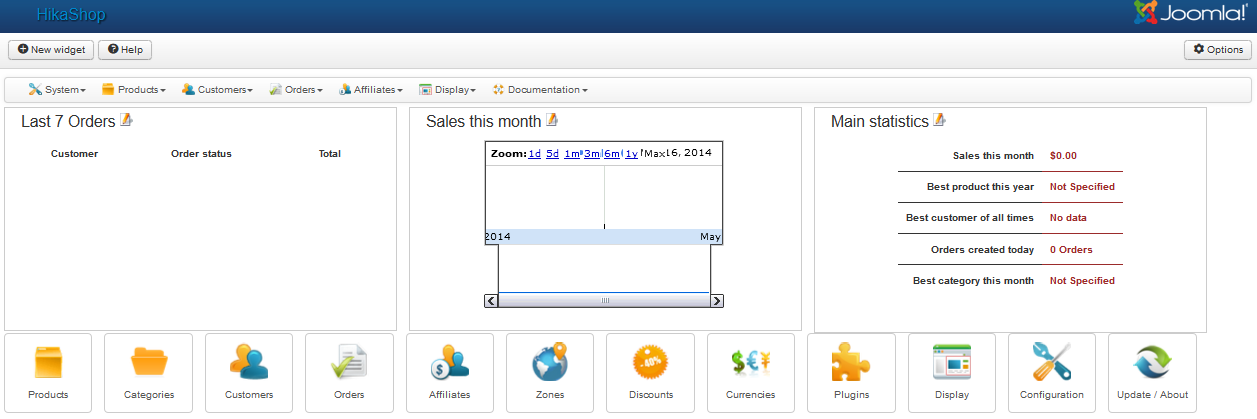
The statistics part will greatly help you in administering your shop. By default, you can see a list of your latest orders, your latest customers and a chart graph of your sales over a month period. This way, you can easily follow the success of your shop and access to the latest sales for more details.
On the bottom of the page, you should see a list of the main features available in HikaShop and a small description of the purpose of the corresponding area.You can also use the horizontal menu under the title of the page in order to quickly access all the important areas of the backend of HikaShop.
Products: This area allows you to manager all of your products. You can create, edit, delete, your products; handle images, files, prices, related products, information, etc.
Categories: You can create, edit, delete categories of your products
Customers: You can edit/manage customer information
Orders: Manage your customers order; create/edit/delete orders
Affiliates:Manage your affiliates and affiliate sales; create/edit/delete banners
Zone: Manage your store zone; manage taxes and tax categories for your products
Discounts: Manage discounts and coupon codes; handle restrictions on them
Currencies: Manage currencies available in your store; update currency rates
Plugins: Manage payment and shipping plugins
Display: Edit any view in Hikashop; config your Hikashop content menus & modules; custom fields configuration
Update/about: View Hikashop Documentation
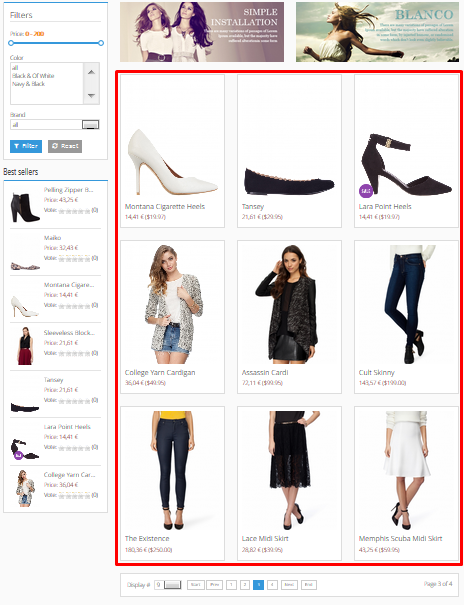
3. product listing on front-end
Assigning a product listing to any specific menu will help the user see list of products in the front-end when they click on a specific menu. For example when the user is in menu "Home" he can see all products if you set its appropriate parameters. As you can see in the front-end picture below:
To assign product listing to a specific menu, Go to Menus >> Menu Manager >> Select a menus >> Select a menu item. You will have to click on the menu Item Type HikaShop in order to display the list of menu types of HikaShop. Then, click on the Product "Products listing" link. For example, I select menu item "Home"
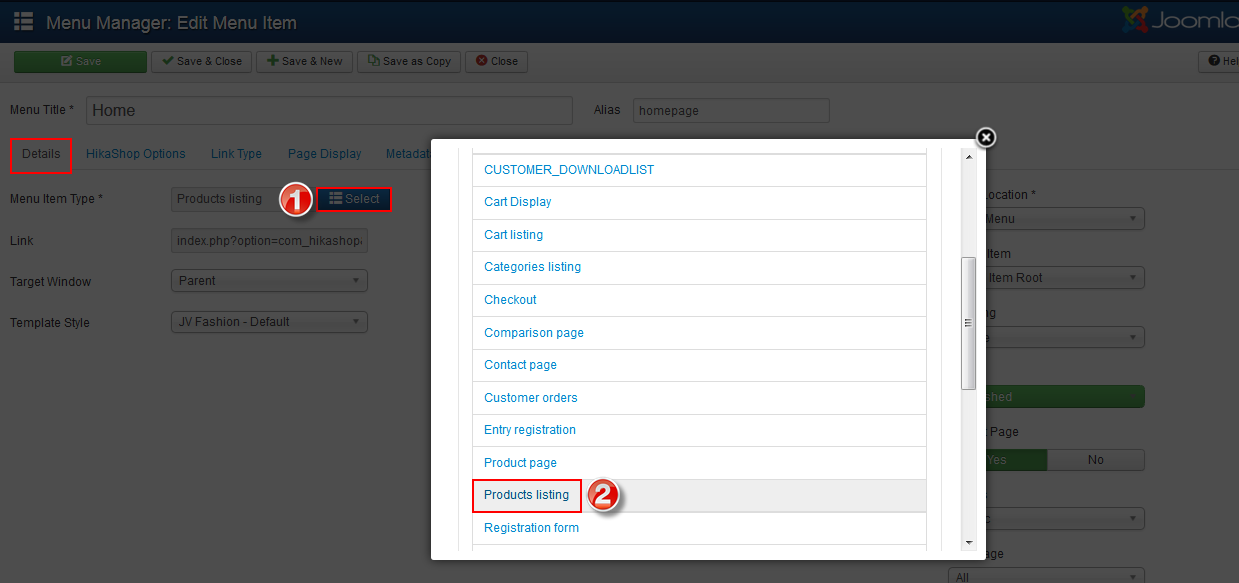
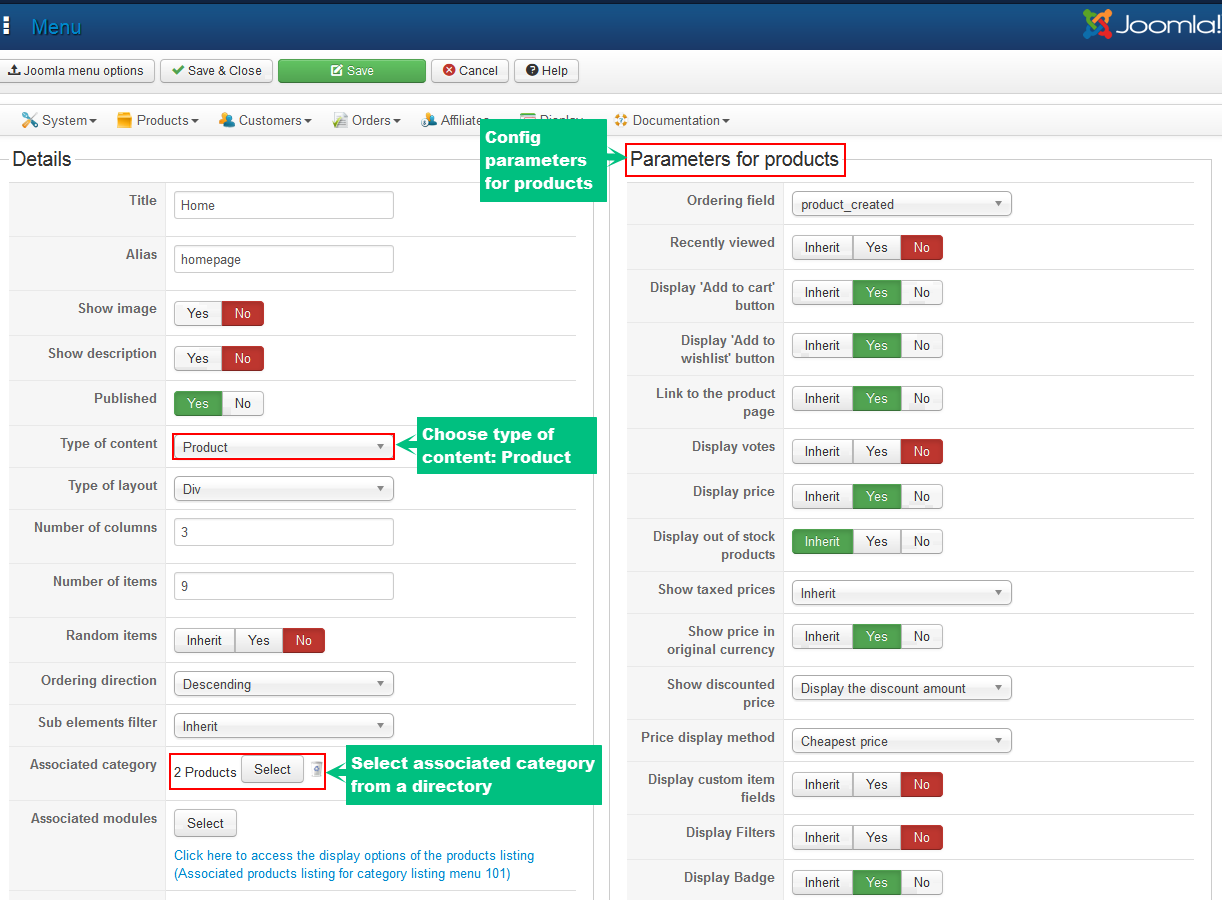
Next, we will config parameter for the Hikashop product listing, Choose tab
Do not forget to choose type of content as "product" and associated categories to display all the products in the selected category and its sub-categories. For example, we choose associated category "products" to show all of the products.
You can assign product listing for any menu, for example if you choose menu item "dresses", you need to select associated category "dresses" to make sure it shows the right products
4. Hikashop modules
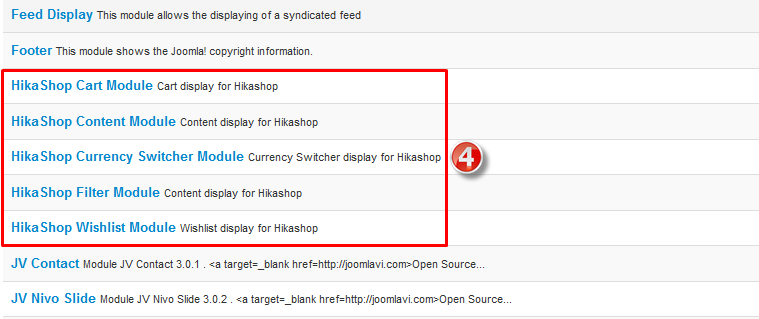
During installation process, Hikashop will automatically install its modules in your Joomla! The modules types:
- HikaShop Cart Module
- HikaShop Content Module
- HikaShop Currency Switcher Module
- HikaShop Filtering module
- HikaShop Wishlist Module
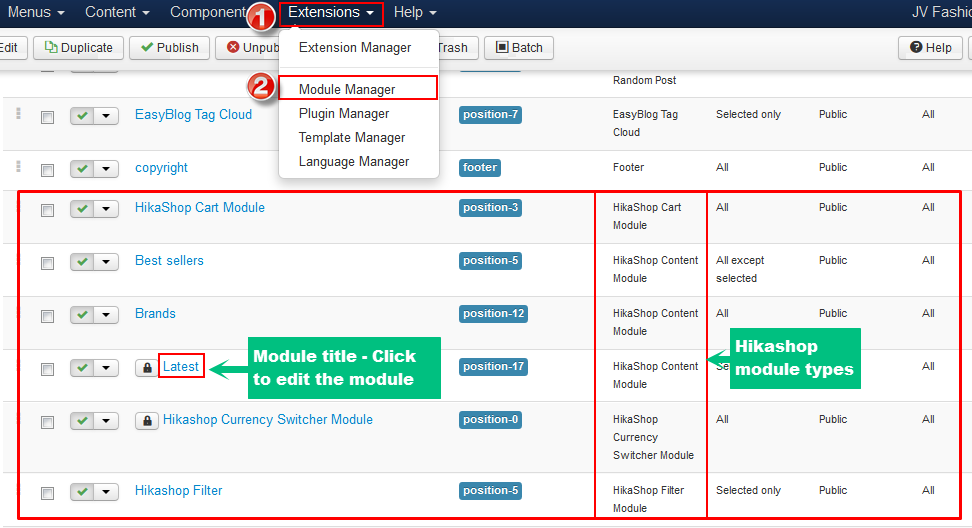
To manage Hikashop module, go to Extensions >> Module Manager in Joomla administrator area. Click on the title of the module you want to config.
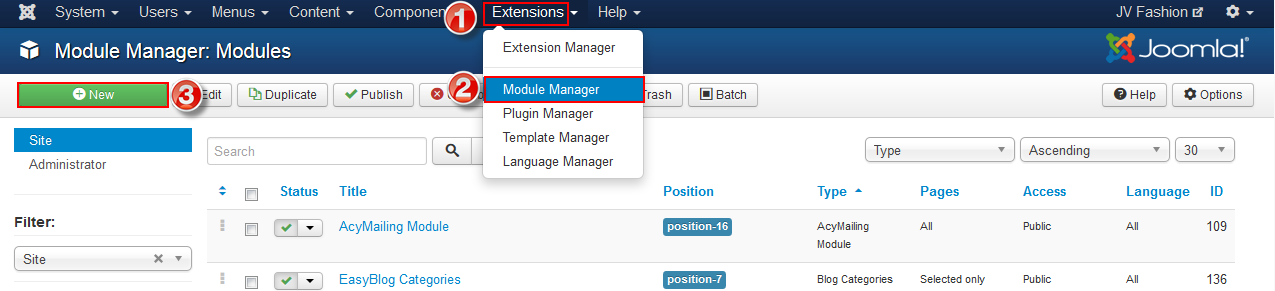
If you install JV Fashion on your Joomla, you need to add new modules by going to Extensions >> Module Manager >> New ,then choose a Hikashop module type from a list:
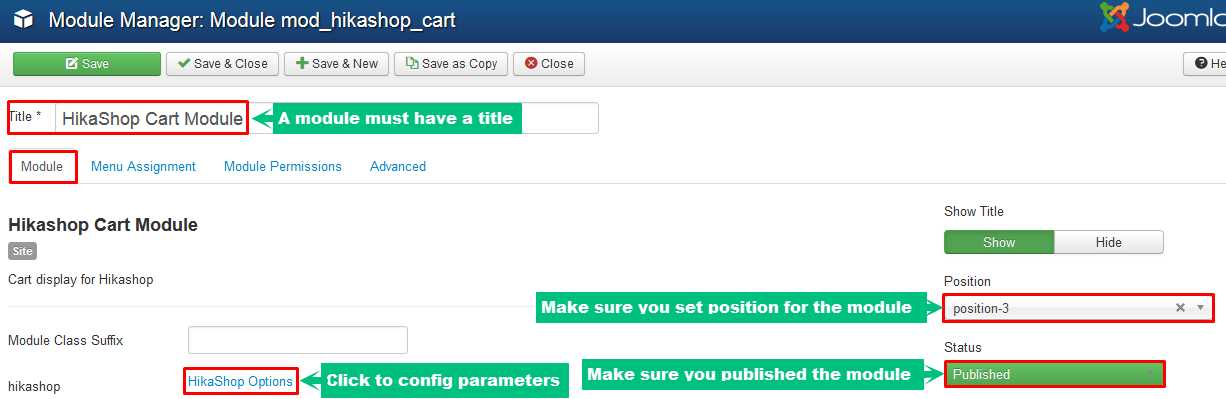
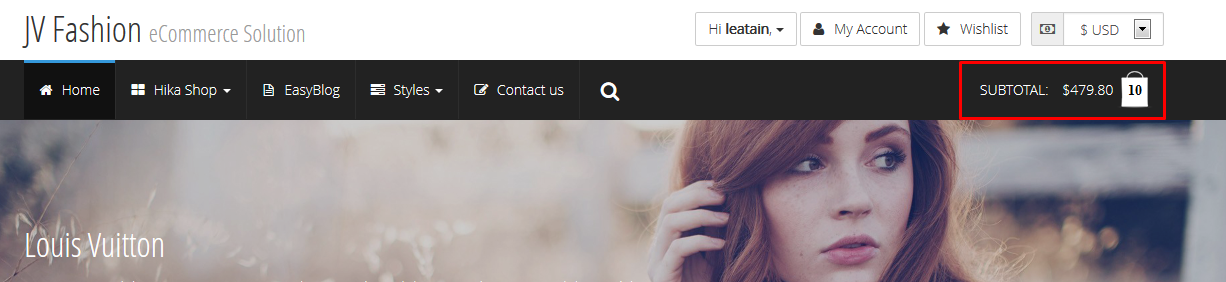
4.1. Hikashop Cart module
This module shows shopping cart, subtotal, checkout button...
- Module position: position-3
- Assigned: on all pages
- Tittle: Hikashop cart module
To config this module, click on the title of the module. In the tab module, click on Hikashop Options
The module in front-end:
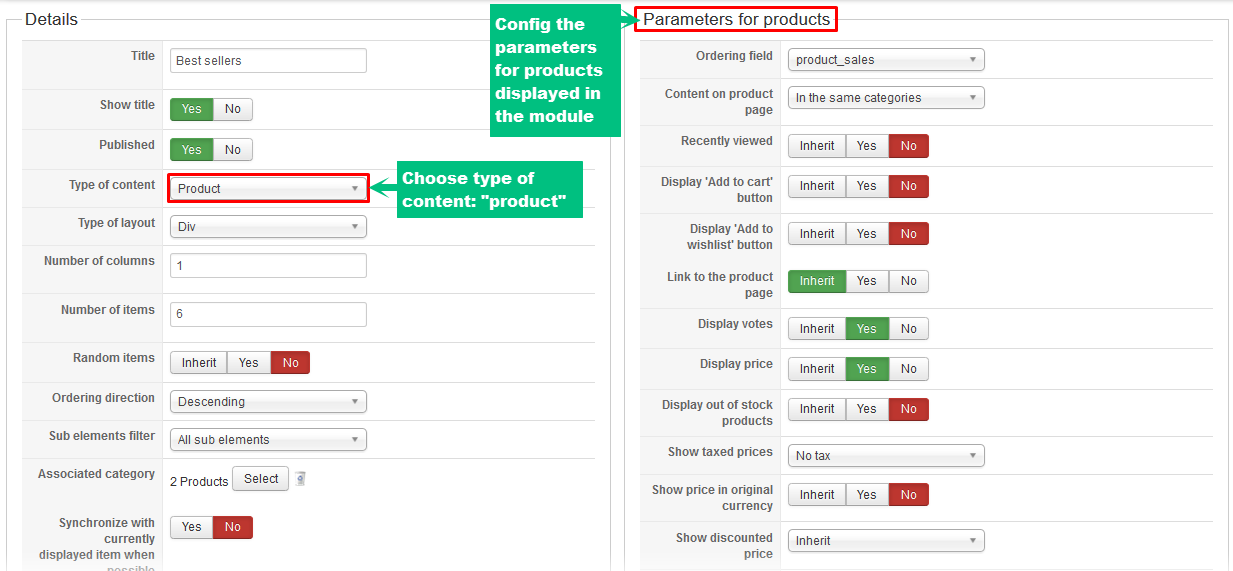
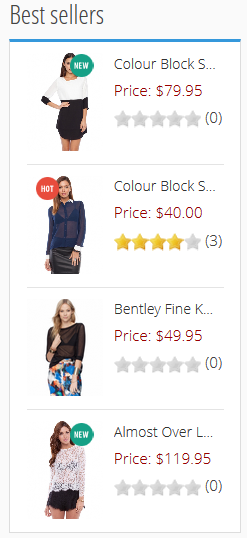
4.2. Best seller module
As the name implied, this module shows best selling products.
- Position: position-5
- Title: Best sellers
- Module type: Hikashop content Module
Back-end settings: After clicking Hikashop Options as you can see in the image above
The module in front-end:
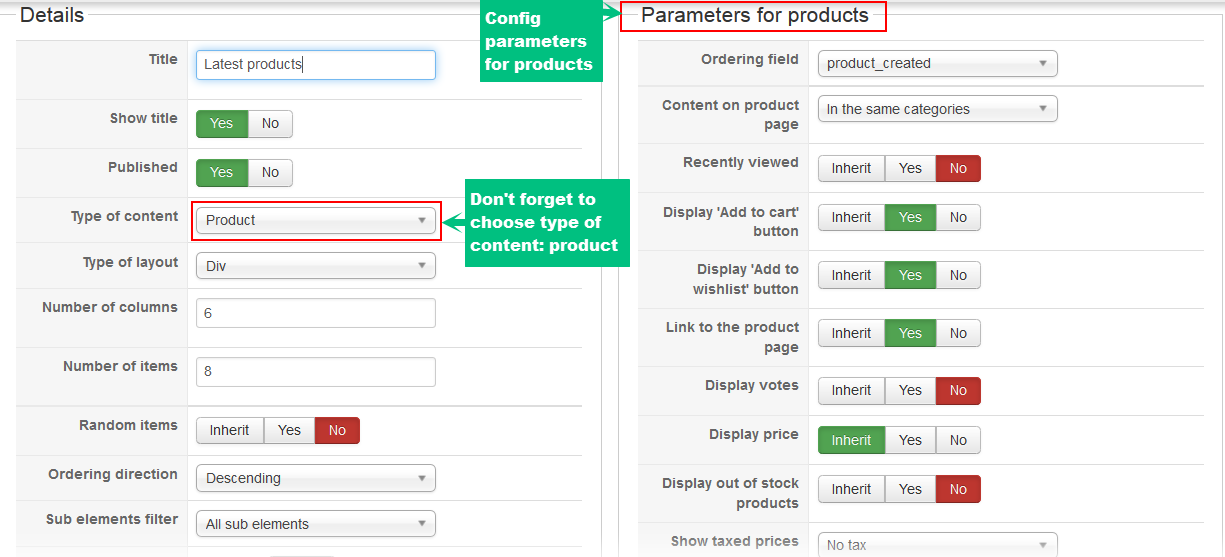
4.3. Latest products module
This modules show latest products in front-end. This is type of module is Hikashop Content Module the same with Best sellers module. But it look different because the parameters settings for the products are different
Main settings
- Position: position-17
- Title: Latest products
- Type: Hikashop Content Module
The module in front-end with position marked:

4.4. Hikashop Filtering module
When you have lots of products and the user only wants to see products with specific attributes, he can choose some filters and reduce the products listing to only the ones he is interested in. You can also display your filters as a module by configuring the HikaShop Filter module via the Joomla module manager
Main settings
- Position: position-5
- Title: Filter
- Hikashop Filtering Module
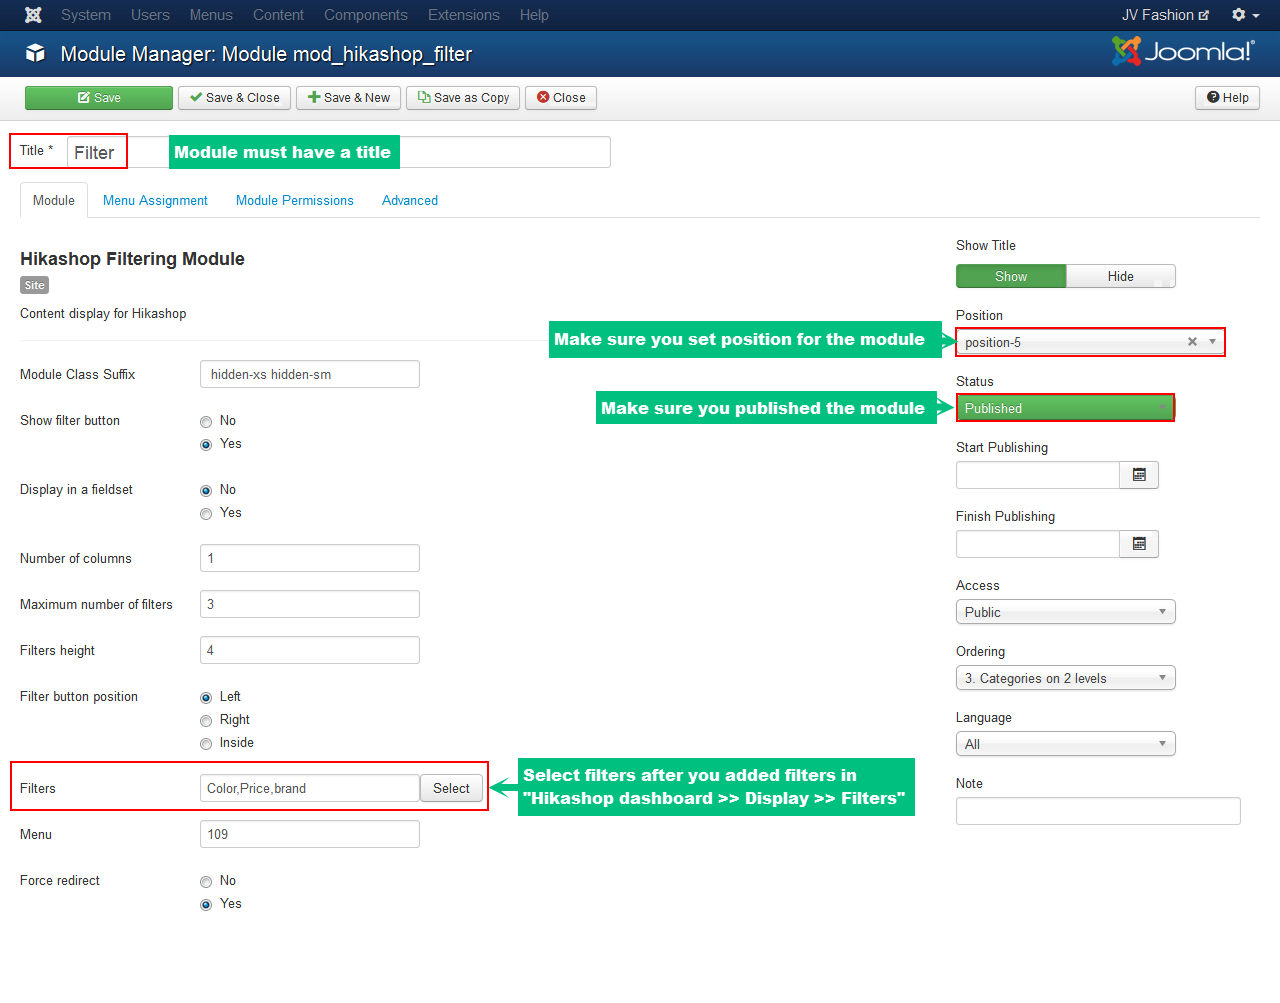
To add new filters, go to Hikashop dashboard >> Display >> Filter. Then, add new filters.
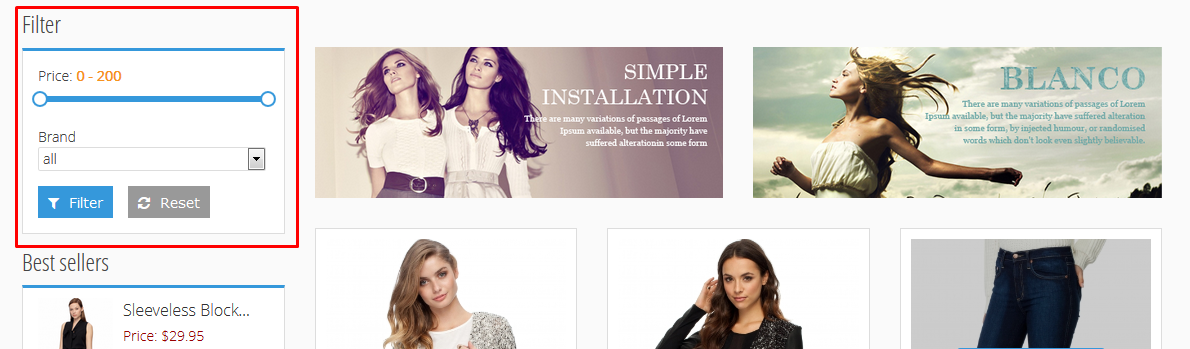
The module in front-end:
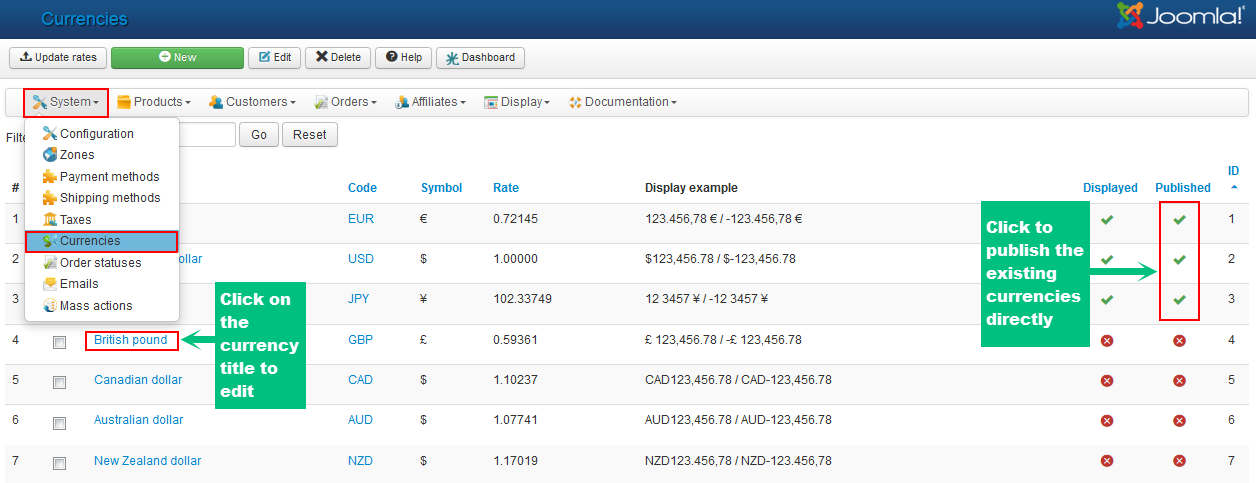
4.5. Hikashop currency switcher module
This module allows the user to switch among currencies.
To manage currencies, go to Hikashop Dashboard >> Currencies, you will access to currencies manager page. From the page, you can add new currency, publish, edit existing currencies ...
Main settings:
- Position: position-0
- Title: Hikashop currency switcher module
- Type: Hikashop currency switcher module
- Assigned: on all pages
The module in front-end:
acymailing configuration
This component allows you to maintain real communication with your contacts via e-mail marketing, newsletters...
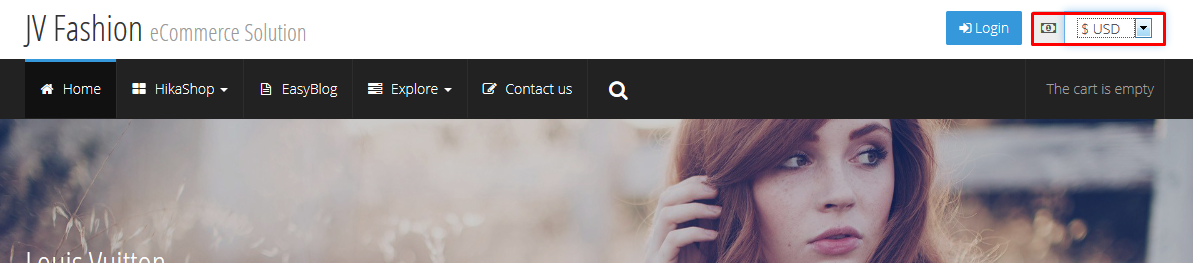
1. Acymailing module
Position: position 16
Assign: on all pages
Acymailing on front-end:

2. Acymailing Dashboard
To access acymailing Dashboard and its tabs, navigate to Components >> Acymailing
The tabs within Acymailing Dashboard:
Users - this is a list of the users that AcyMailing is able to send to.
Lists - there can be multiple lists stored within AcyMailing in order to allow you to send a different newsletter to different users.
Newsletters - this is where you create, manage and send newsletters.
Templates - this is where the templates are stored. A template is assigned to a list.
Queue - this is used in the case that your newsletter sending process gets interrupted.
Statistics - this is used to view how many users are opening your newsletters and how many are going unread.
Configuration - these are settings configured by Argonyx upon setup of the site.
2.1 User
Within the Users tab, you can:
- Click on an E-mail address in order to view the user's subscription, change their name, email and which list they're subscribed to.
If the tickbox for the column 'Enabled' is set to a red cross (click on the icon to toggle), the user will no longer receive emails from AcyMailing.
The icons in the top right of the page allow you to import a list of subscribers and create new subscribers using the new button.
- Click on "New" button to go to the New subscriber page. Fill in the user's details and choose which list to subscribe the user to, then press Save.
- Import a list of subscribers using Microsoft Excel.

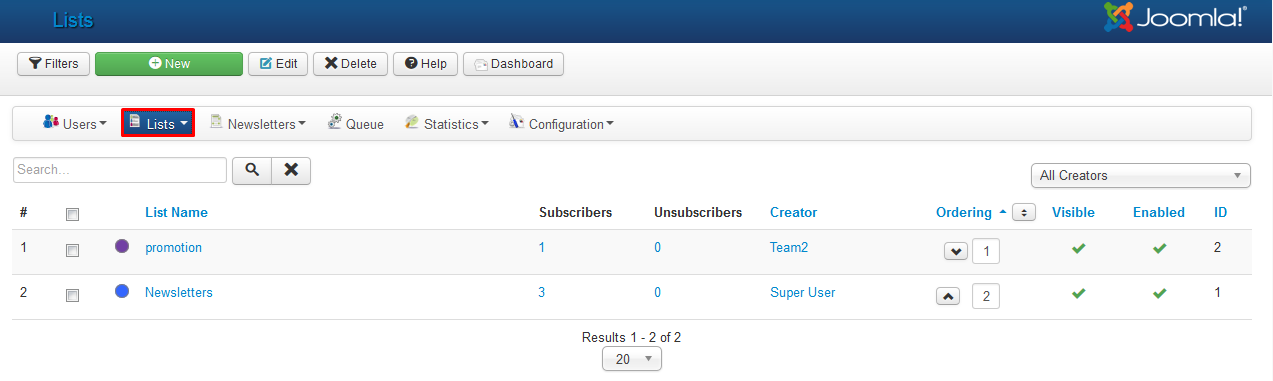
2.2 List
Within the Lists tab, you have the following options:
The list of lists - this displays all current lists. Click on a list name to edit that list.
New - create a new list using the New button in order to assign different users to different lists.
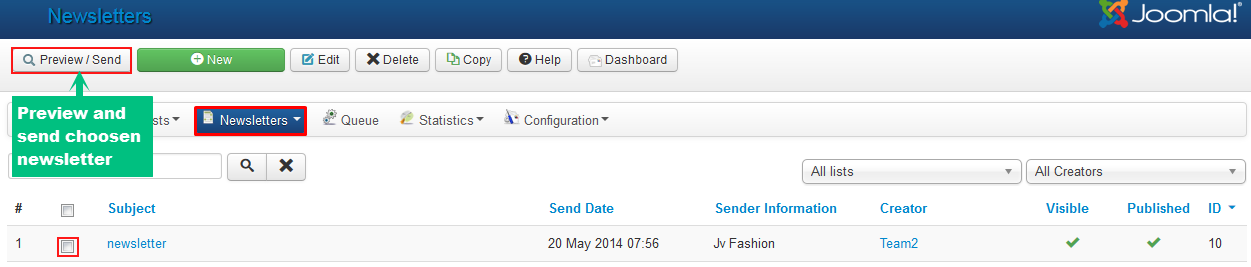
2.3 Newsletter
Within the Newsletters tab, you can do the following:
- Create a new newsletter using the New button.
- Edit/review previous newsletters.
- Preview / send Newsletters.
When you are creating a new newsletter, be sure to fill out the Subject, and which lists the newsletter is being sent to on the right hand side. You may also add attachments using the right hand side bar.
You may then click Preview/Send to have a look at the final copy of the newsletter and send a test to yourself to double check. Once ready, press send.
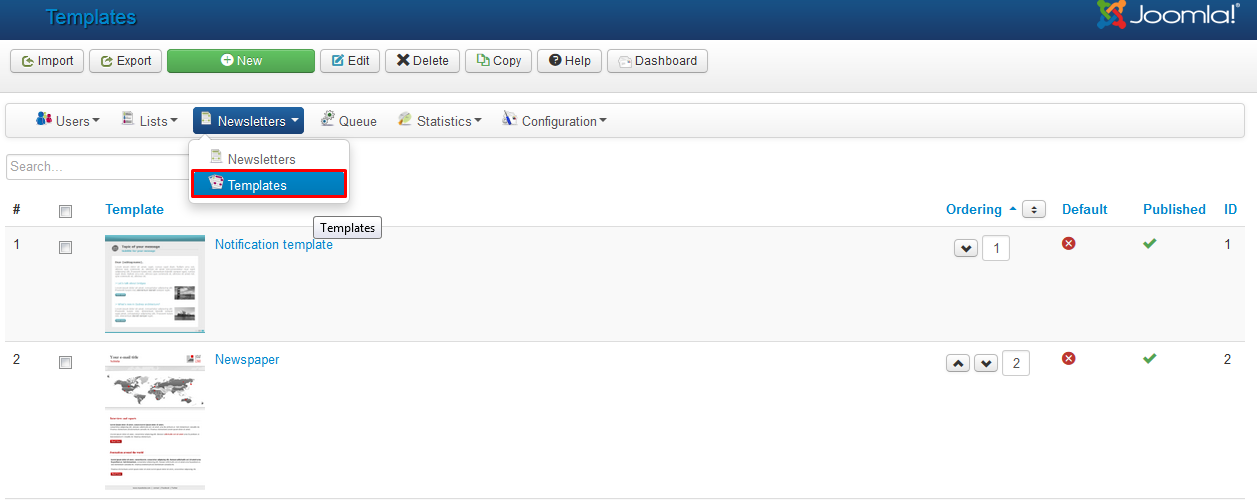
2.4 Templates
Within this tab, you can
- Create a Newsletter template
- Edit existing Newsletter-template
2.5 Queue
When the newsletter is sending, the window will need to be left open. If this is interrupted for any reason, go to the Queue tab, and press Process.

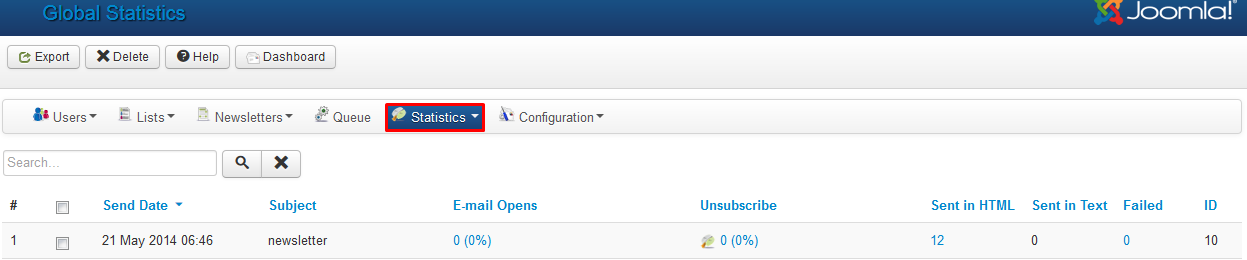
2.6 Statistics
This will show you a straightforward set of information on how each newsletter has performed.
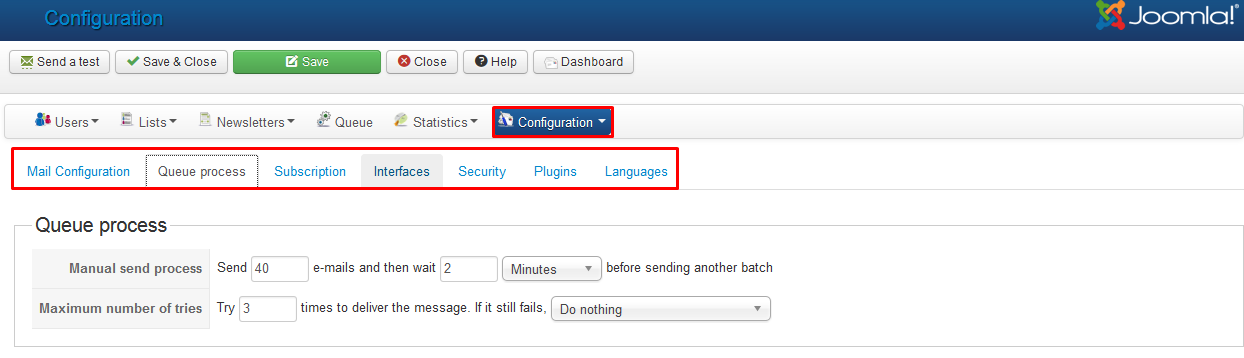
2.7 Configuration
This tab enables you to configure AcyMailing. This tab contains sub-tabs: Main configuration, Queue process, Subscription, Interfaces, Security, Plugins, Languages.
During the install process, AcyMailing will be automatically configured using your Joomla Configuration but you can modify it at any time.
You will also find a tool to easily publish/unpublish the AcyMailing plugins and add/modify the AcyMailing languages files.
K2 configuration
K2 component is a very popular and free component which helps you to control and manage site content easily. Let's view what can you do with this great extension and how to config. This part covers important and common facts you may use frequently with K2. If you need full detailed K2 document, please check our References part.
1. Installation
K2 can be easily installed on Joomla like other extension. If you are new,you may need to view the guide below
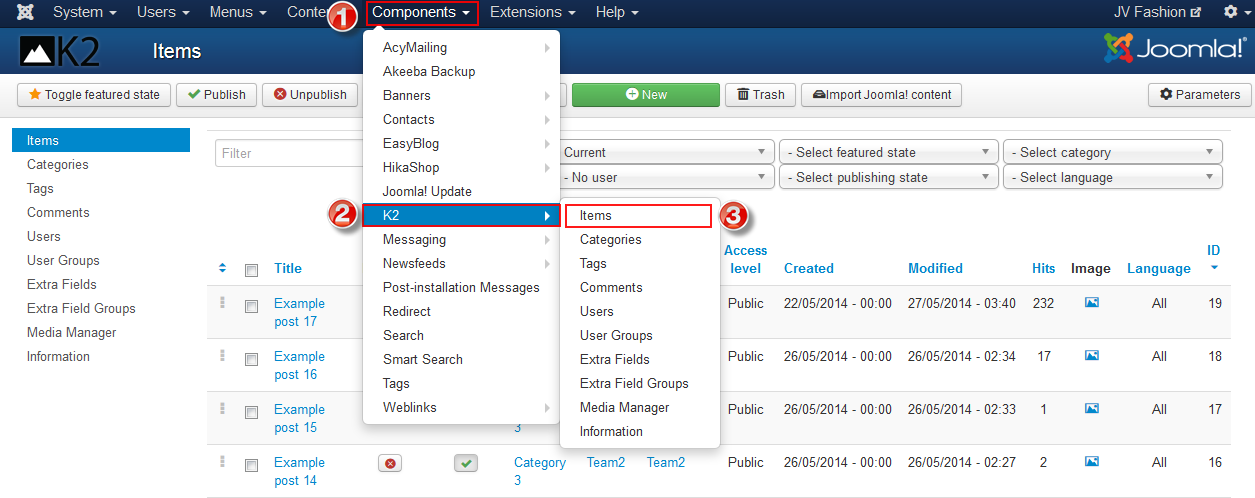
2. Manage Items with K2
From the backend area, navigate to Components >> K2 >> Items
Within K2 Items you can do the followings:
- Create new K2 item: Click on "New" button in the toolbar to ad a new item
- Edit existing K2 item: Click on the item to edit that item
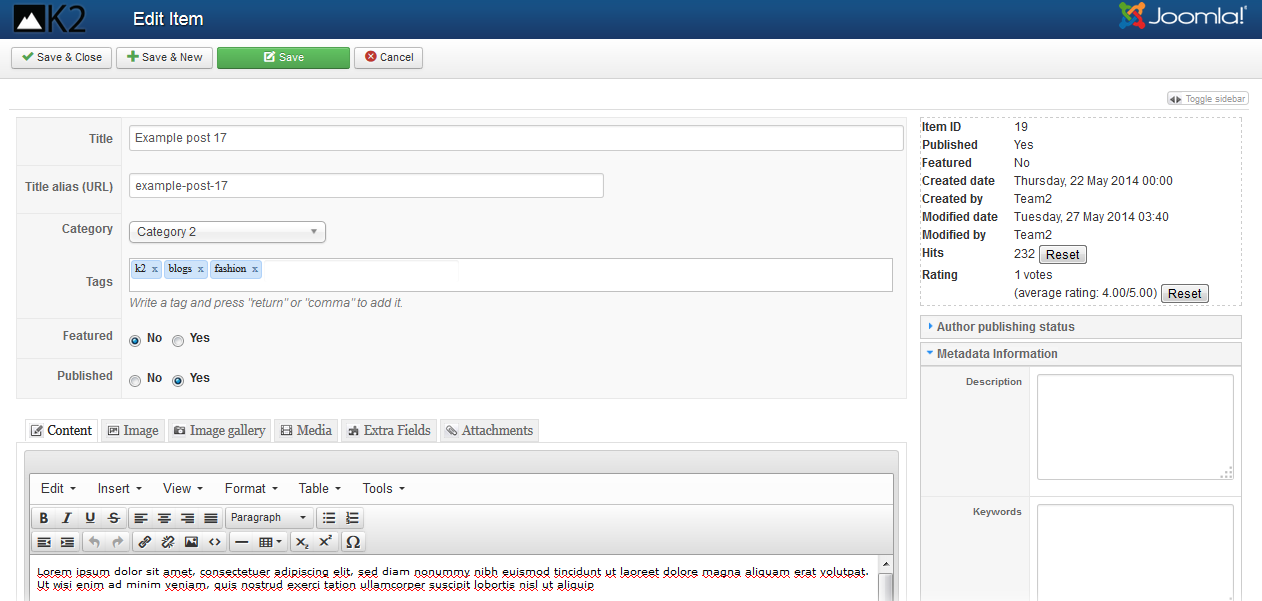
In the edit/add item page you can do important things:
- Change/add title of the item
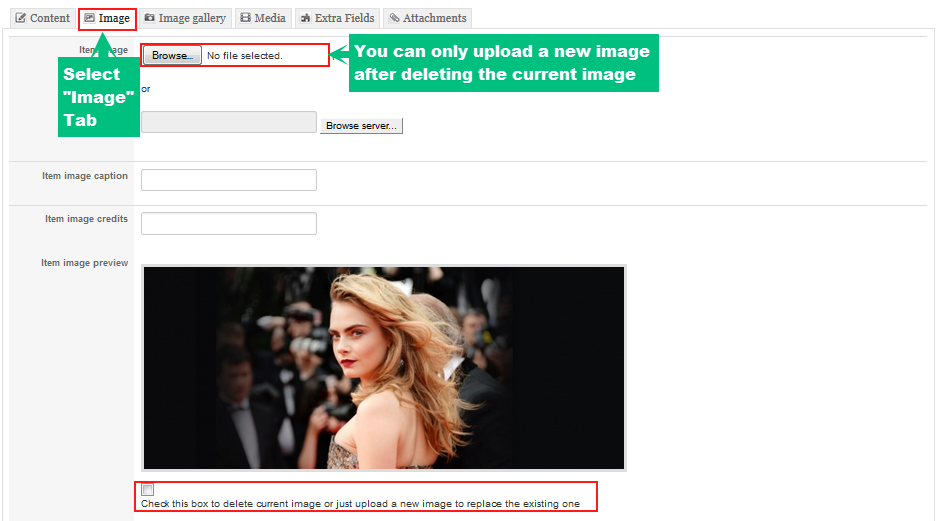
- Upload images: you can upload an image via "Image" tab
- Edit your Author publishing status: Under the "Author publishing status" drop menu in the right side of the page, you can edit many publishing features
- Optimize item for Search Engine: Under the "Meta information" drop menu in the right side of the page, you can add/edit meta description, keywords, robots, author
3. Manage images with K2
In this section you need to distinguish between Media Manager and Image Tab.
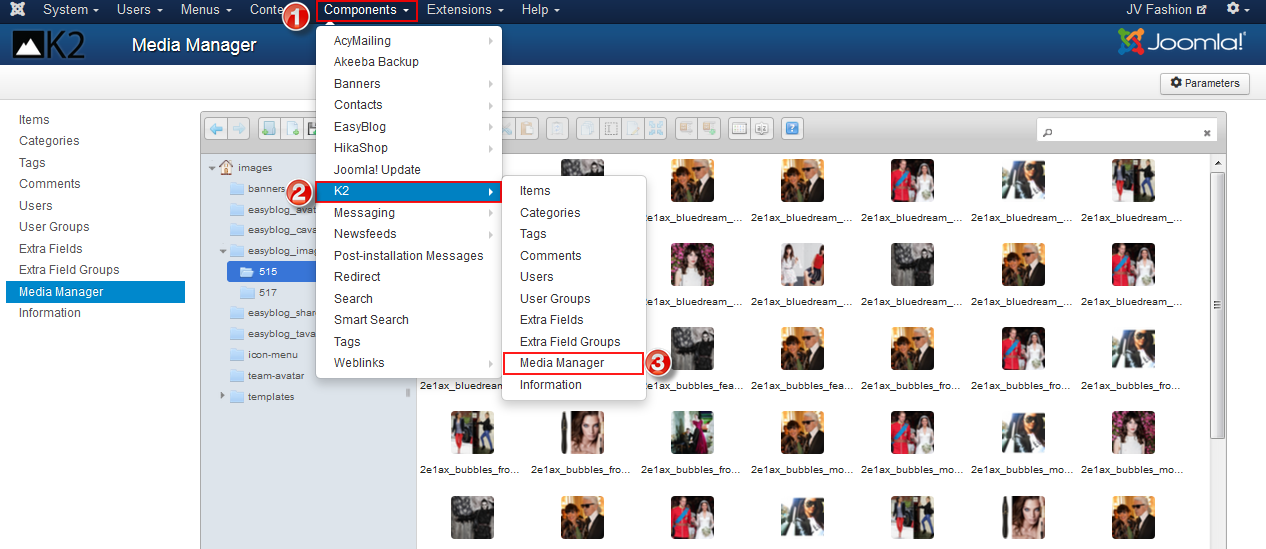
- Media Manager is used when you want to insert image into the text of items or categories. Before inserting the images directly into text filed, you need to upload the images to Media Manager by navigating to Components >> K2 >> Media Manager, in Media Manager you can create new folder to contains images, then upload images
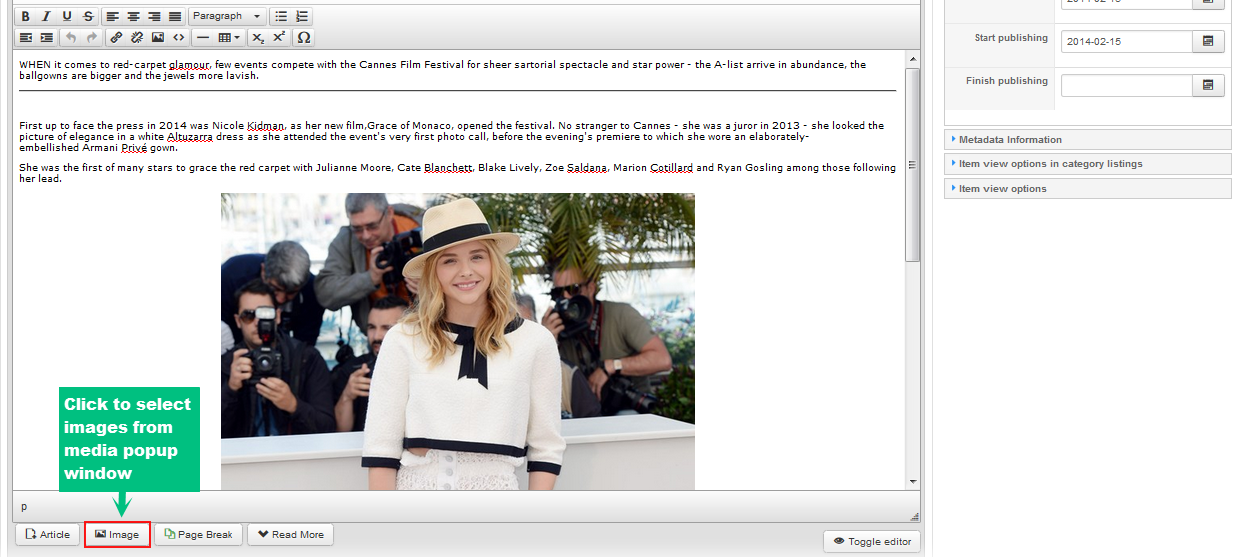
Now you can insert the images directly into text field when you edit/add any item category. Simply click on "Image" in the bottom of the editor as shown in the picture below:
- Image Tab: as I mentioned above, Images uploaded via "Image" Tab usually represent as a main image for item or category. When uploading images via the Image Tab, you can upload directly from your computer without having to store it in any sort of Media Manager
4. Manage Categories with K2
In the administration area, go to Component >> K2 >> Categories , such like how to access to K2 Items.
You can do the followings in K2 Categories:
- Create a new categories
- Edit existing categories
- During editing/creating a categories you can change/add title, upload images into categories, etc. similar to what you've done with K2 Item
5. Global configuration
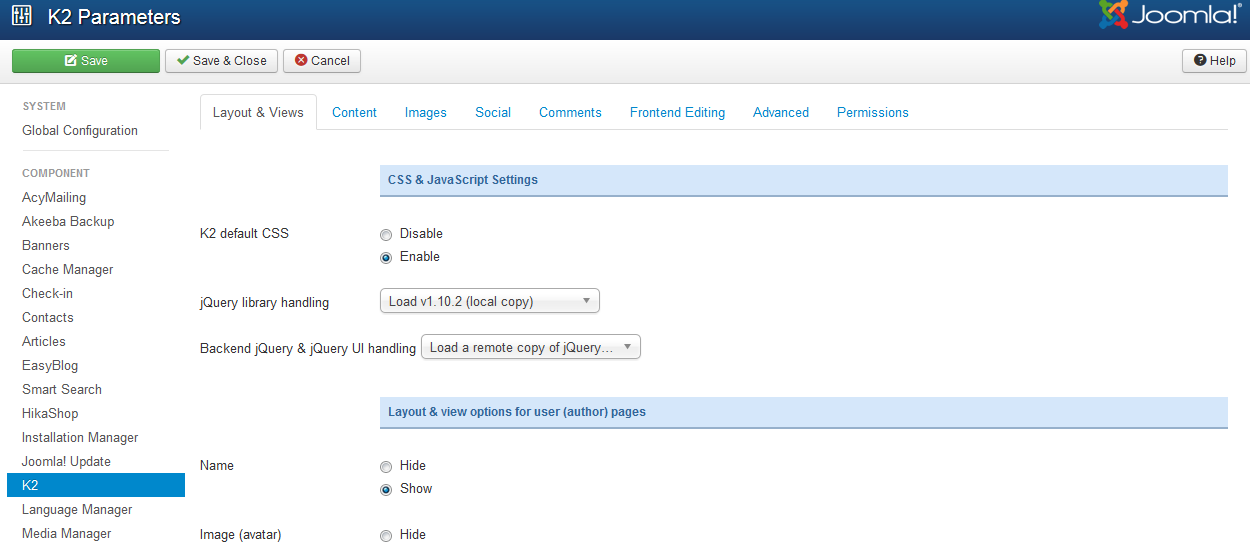
Go to System >> Global Configuration >> K2
In this section, you can see 8 tabs as you can see below
In each tab you can configure its parameters. There are so many parameters, I do not want to make you confused and tired by explaining all parameters, take it easy and find out by yourself.
Recommendation
This guide is not intended to cover everything about third party extension, it focuses on main parts only. If you need know further configuration. Please view References.
If you are new and confused, we recommend installing quicstart on your localhost before loading to real host. View our resources above to configure each part of the template. If you have any idea, suggestion or question, do not hesitate to let us . Thank you for reading!