Downloading
JV Nivo is completely free for everyone. To download the module, you need to register for a free membership package or have a paid membership account
Log-in to your account and go to JV Nivo Slide overview page, from there you can view the features, and general information of the modules and especially, you can link to download area by clicking on the download button.

We always update the latest version of JV Nivo Slide after fixing new bugs or updating. If you find out any bugs, please let us know!
Installation
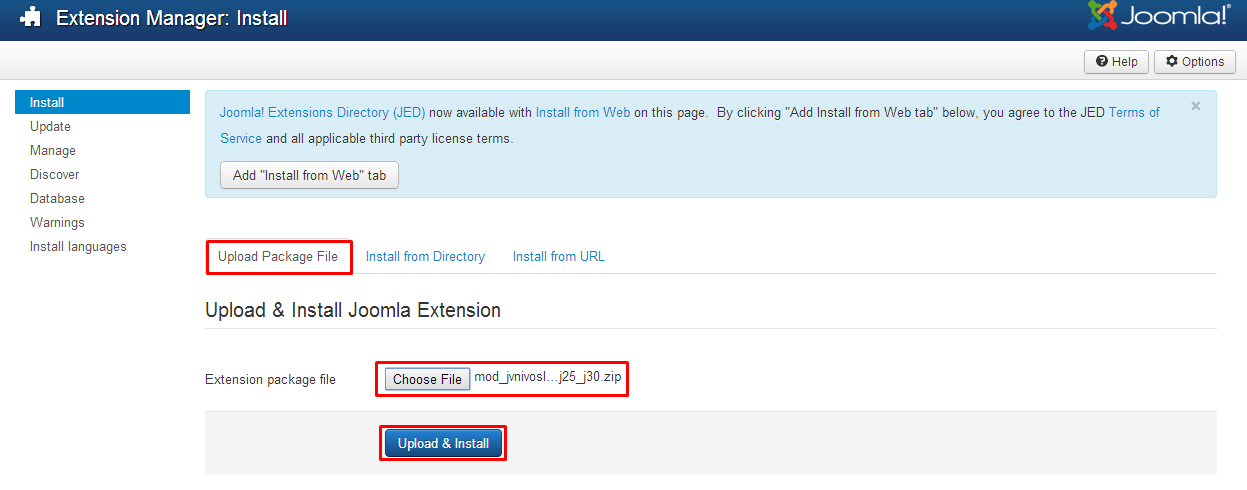
Once you have JV Nivo Slide zip file downloaded on your computer. Now it's time to install it on Joomla. There are three ways of installation in Joomla, each way is a little bit different. I will be showing you 2 popular ways in this section.
If you upload & install from package file, please extract the JV Nivo Slide zip file, you will get a single folder. Enter to the single folder, select all the files and add to archive with zip format. Now you will have a zip file for installation. Browse that zip file and click "upload an install".
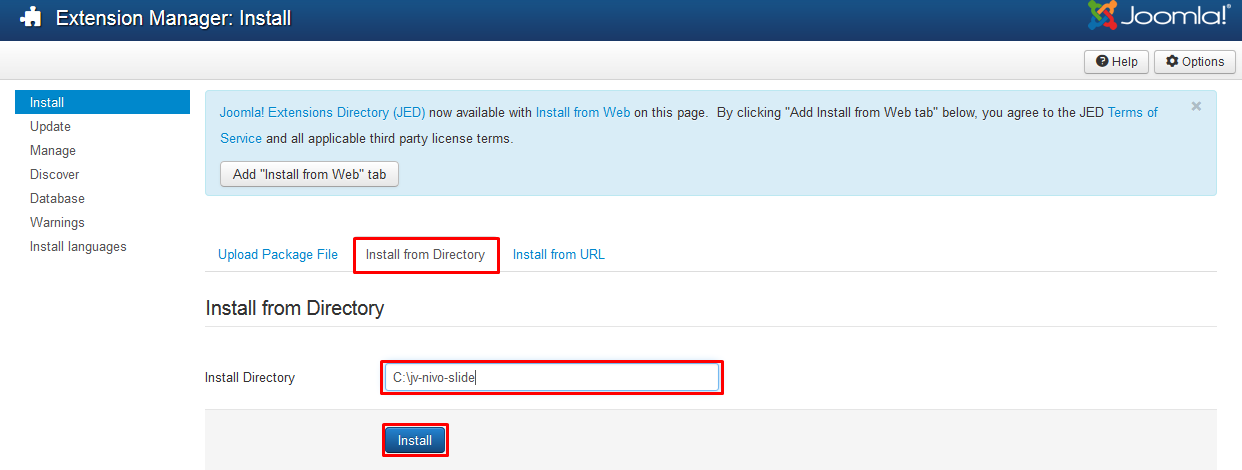
If you install from directory, just extract the JV Nivo Slide zip file and enter the path, then click install. For example, you copy the extracted folder to C driver, then insert the path C:\jv-touch-slider as you can see in the picture below:
If you are not familiar with Extensions (templates, modules, plugins and components) Installation, please view the following guide:
Configuration
After successful installation, next step you need to do is activate this module and configure the module
Navigate to Extensions => Module Manager, you will see a list of modules install in your Joomla!
If your site has lots of modules, you can use filter to search for the module.
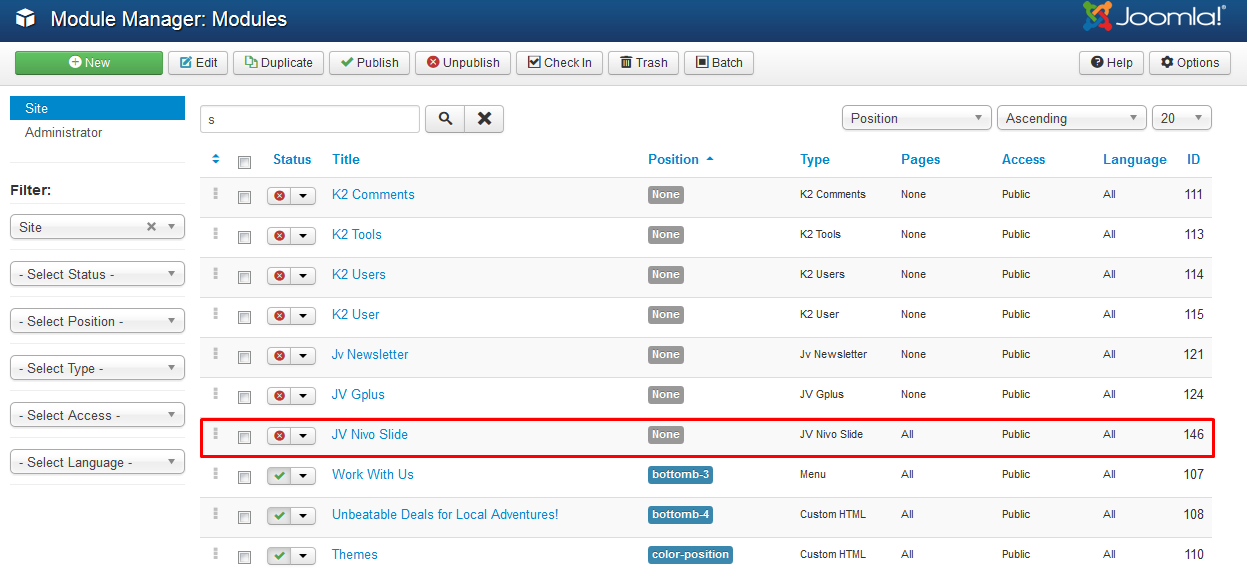
As you can see in the picture above: JV Nivo Slide has not been published and set position, title is JV Touch Slider assigned on all pages...
Click on JV Nivo Slide to manage the module: there are 6 tabs in the module. You will land on the first tab "module" when you first access JV Nivo Slide manager . This is the most important tab, as you can see in the picture below:
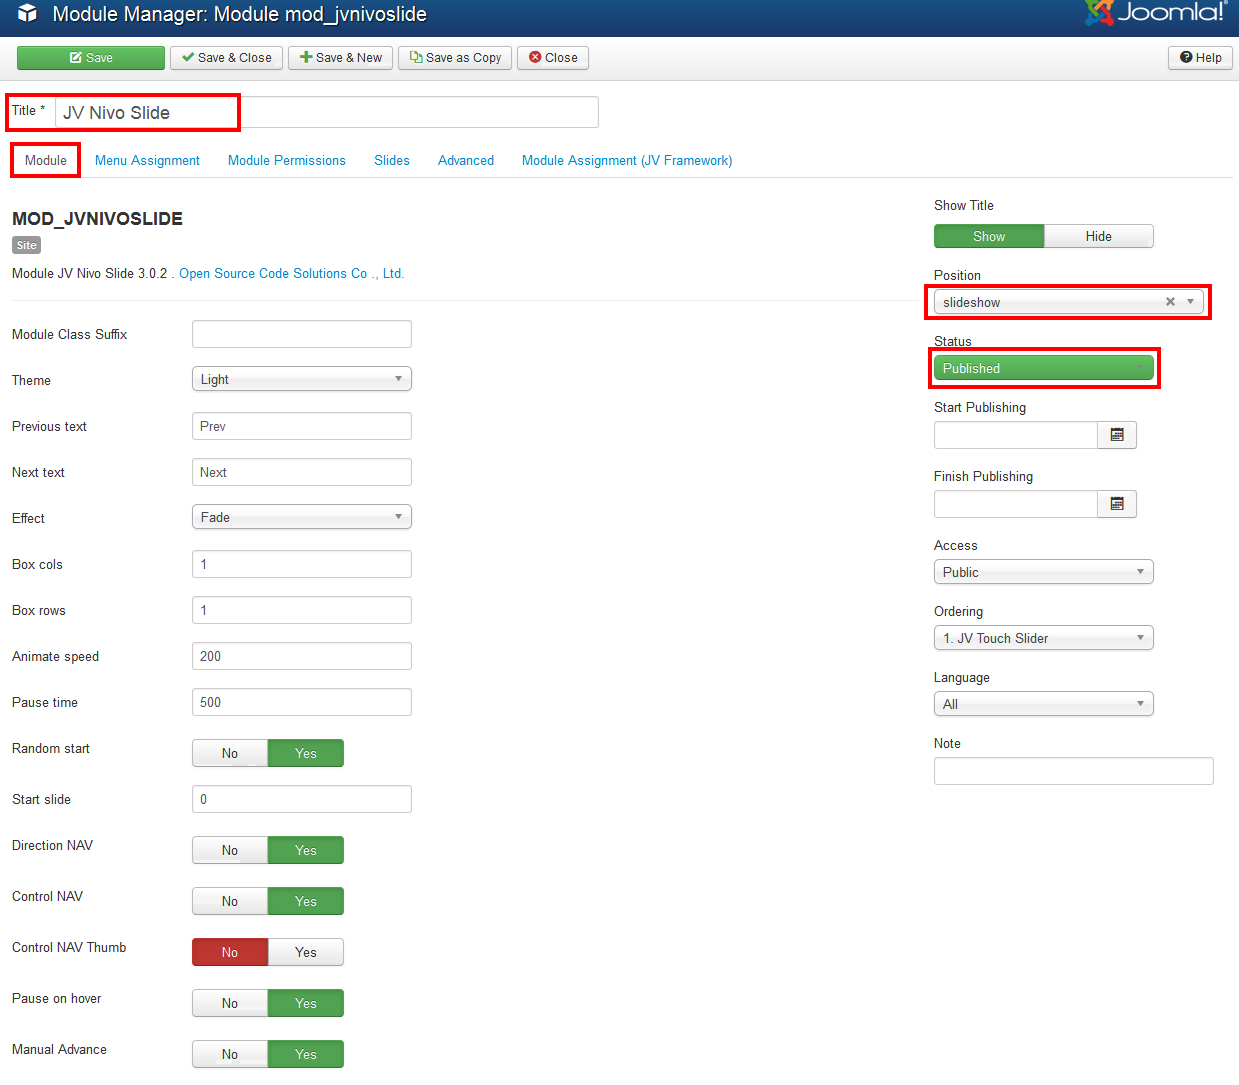
In this tab, there are must pass 3 section you need configure to make JV Nivo Slide display on your site:
- Tittle: a module must have a tittle, if not you can not save your settings
- Position: It's very essential to set the position for this module, If you do not set position for JV Nivo Slide, It can not appear on front-end. Here I choose position right, but you can select your own position.
- Status: Remember to select published, some people usually forget this section and wonder why their module do not display on front-end.
Other parameters:
- Module class suffix : Setting this parameter causes Joomla! to either add a new CSS class or modify the existing CSS class for the div element for this specific module. Actually this parameter is not important if you are new to Joomla or programming!
- Theme: choose a theme for the module
- Previous text: add text
- Next text : add text
- Effect: choose 1 of 16 transition effects or random
- Box cols: add a number of box columns
- Box rows: add a number of box rows
- Animate speed: add a value for animation speed in millisecond
- Pause time: add a value for slide pause time
- Random start (Yes/No): select random start of slide
- Direction NAV (Yes/No): select direction navigation
- Control NAV (Yes/No): display control navigation
- Control NAV thumb (Yes/No): display control navigation thumbnails
- Pause on hover (Yes/No): pause when hover over a slide
- Manual advance (Yes/No): allow manual advance
Tab Module Assignment
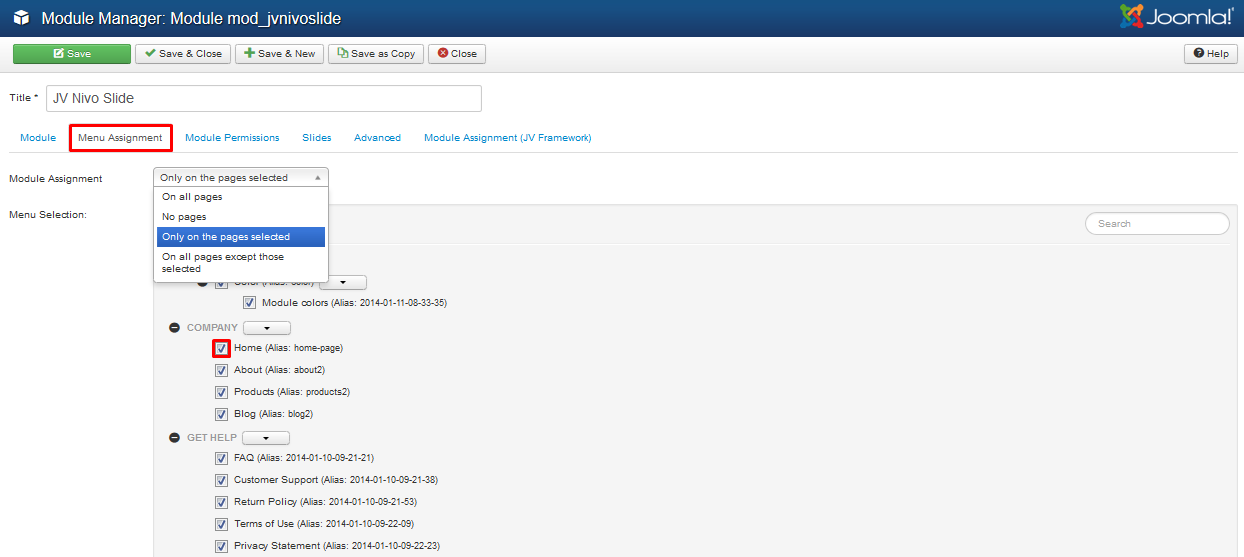
This tab is also a must pass section, it allows you to assign the module on pages. You can assign on all pages, no pages, only on the pages selected or on all pages except those selected. 4 choices for you convenience.
- On all pages: the module will be shown on all pages
- No pages: the module will be shown on no pages
- Only the pages selected: the module will be shown on the pages selected by ticking in the box(es)
- On all pages except those selected: the module will be shown on all pages except those selected by ticking the box(es)
Tab Module Permission
This tab helps you to set permission for groups to delete/edit/change state any content of the extension
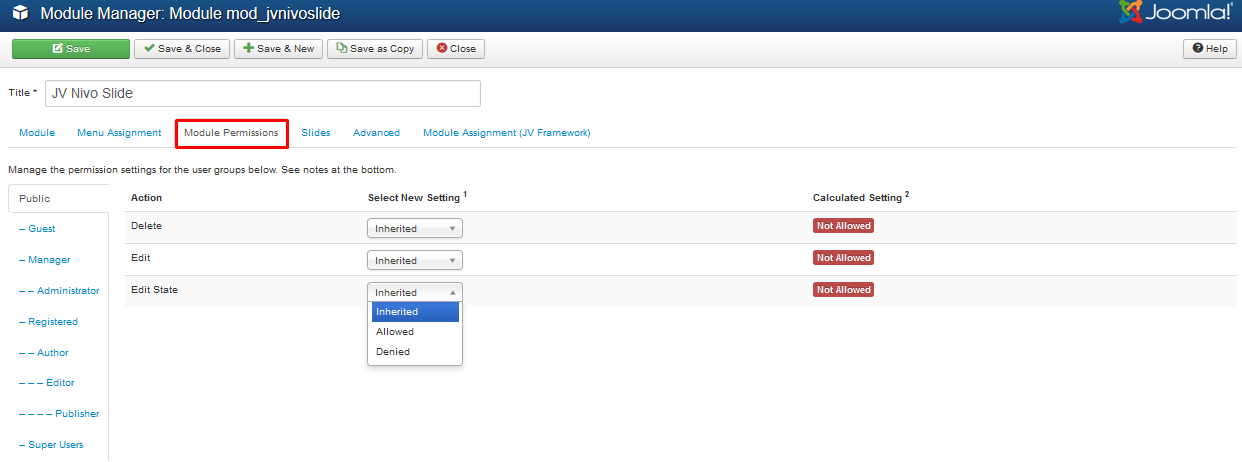
Delete: (Inherited/Allowed/Denied). Allow or deny Delete for users in the Public group. Delete Allows users in the group to delete any content in this extension.
Edit: (Inherited/Allowed/Denied). Allow or deny Edit for users in the Public group. Edit Allows users in the group to edit any content in this extension.
Edit State: (Inherited/Allowed/Denied). Allow or deny Edit State for users in the Public group. Edit State Allows users in the group to change the state of any content in this extension.
Tab Slides
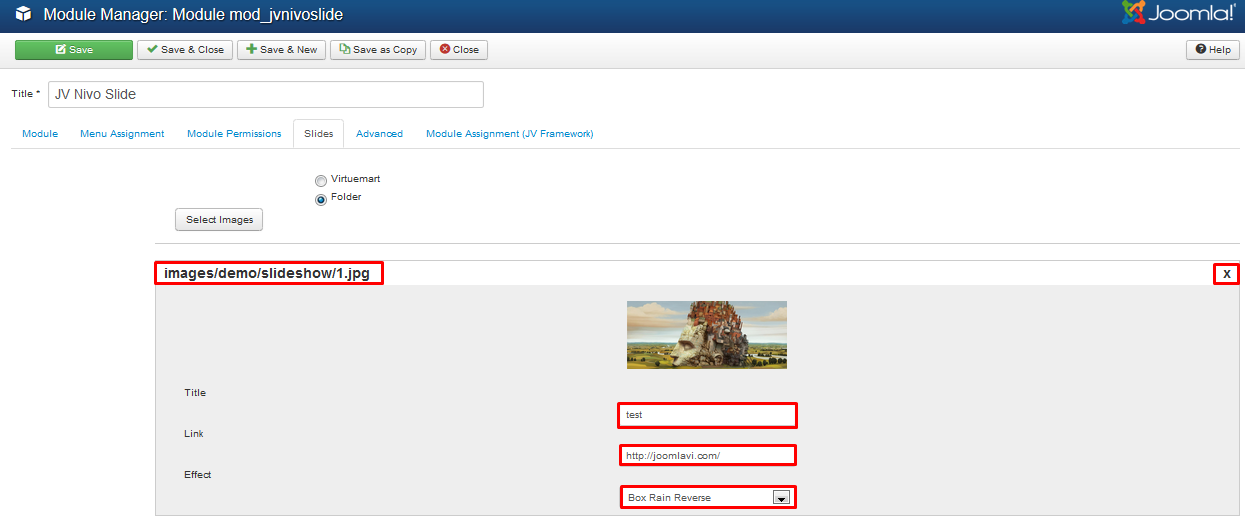
This tab allow you to select image from folder. Choose folder, click Select Image, a popup will appear, select an image by clicking on it, the image will be listed as the picture below

After the images have been listed, Click to each image to add title, link, and choose an effect
Tab Advanced

Parameter explanation:
- Module Tag. The HTML tag for the module to be placed in. By default this is a div tag but other HTML5 elements can also be used.
- Bootstrap Size. (Values 0 to 12) This allows you to choose the width of the module via the span element built into bootstrap. For more information see the bootstrap documentation.
- Header Tag. The HTML tag to use for the modules header or title this can be either a h1-h6 tag or a p tag.
- Header Class. Here you can add optional CSS classes to add to the modules header or title element.
- Module Style. You can use this option to override the templates style for its position.
Front-end appearance:

