
Introduction
Jv Modern is an Elegantly and Luxuriously Designed for any fashion with the most popular colors. We stand behind it with top -notch support team. It has been released with a lot of excitement of our developer and team tester. Jv Modern is the best choice for you and the only thing you will ever need. This template is built on JV Framework 3.3, compatible with Joomla 3x, characterized by pure simplicity and packed with a lot of high quality features such as theme options, sliders, RLT, responsive.... It is the perfect solution for business site.
1. Features
 Fully responsive
100% table-less design, HTML5 & CSS3
Bootstrap 3 integration
Joomla 3 support
RTL support
4 Preset colors
Typography and various module variations
Mega Menu
Fonts icomon
Retina Ready
Ecommerce template with Hikashop
2. JV and third party extensions supported
JV Slide Pro
JV Contact
JV Gallery
JV Facelinker
JV Latest News
JV Twitter
K2
EasyBlog
3. Module positions
As you know, each Joomla module is placed in a module position. All module positions are specified by the template structure. It's very useful to understand the structure of the template. Also, you can visit module position page in JV Modern demo.
View: Module Positions
References
You may find the following links very helpful if you are new to the world of Joomla.
Joomla FAQs
Video Tutorials
Joomla! Forum
Joomla! 3.x Installation guide
Joomla! default Modules
Technical requirements
Menu management in Joomla 3.x
K2 Documentation
System requirements
1. Browser compatibility
JV Friendly was tested to be ready for seamless display on the following web browsers
Firefox 4+
IE (Internet Explorer) 8+
Google Chrome 14+
Opera 12+
Safari 5+
2. Joomla 3 requirements
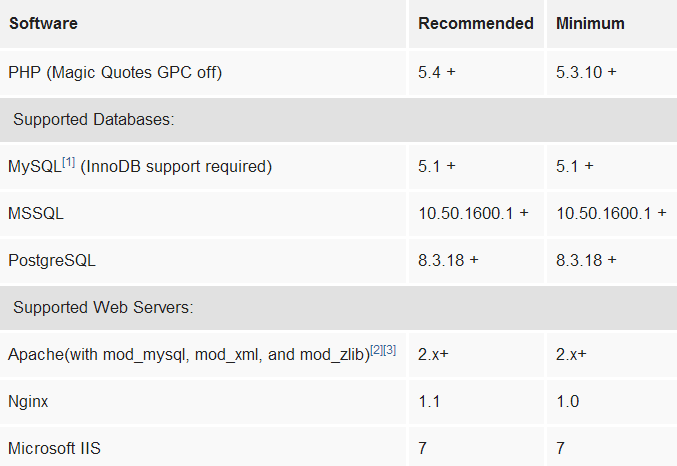
3. Development requirement
We recommend you using Localhost for development process. The following servers are preferred:
Windows:
WAMP
XAMPP for windows
Linux:
LAMP Buddle
XAMPP for Linux
Download & Installation
To get privilege to download this premium template, firstly you need to sign up for a membership account.
Log into your account and go to JV Modern download area where you can see zip files including quickstart, template, source, extensions.
Select suitable files and click download.
If you are new to Joomla! or planing to create a completely new Joomla! Site which looks like JV Modern Demo, Quickstart Installation is the way to go.
If you've already had an existing Joomla!, site or experienced in Joomla!, choose the second method of installation.
1. Quickstart Installation
Choosing quickstart package to install helps you create an entire Joomla site which includes Joomla! CSM, JV Modern templates, JV extensions, sample articles, default Joomla! modules. This installation procedure is a perfect choice for those who are new to Joomla, or who want to quickly start up an entirely new site. Following our guide can help you create your own site without any coding skill!
After finishing this quickstart installation, you only need to edit content, text, logo, product images and information, menu,.. in the back-end administrative area.
In this article, we will show you how to perform the default quickstart installation using simple, easy - to - follow steps:
2. Install JV Friendly on your existing Joomla site
Another way to build JV Modern is installing each separate part: JV Framework 3.3, JV Modern template, Extensions, and then add new default Joomla! and custom HTML modules to your site.
Note: Please view the next section to know how to configure the default Joomla! And custom HTML modules.
To install JV Modern on your Joomla, please taking the following steps:
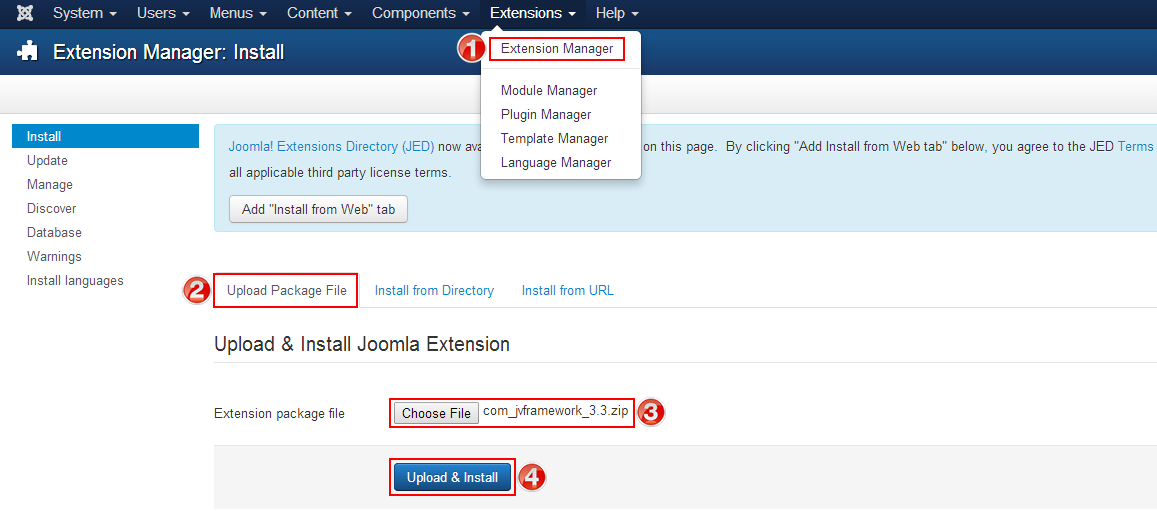
✔ Step 1: Install JV Framework 3.3 component by selecting Extensions >> Extension Manager, browse JV Framework 3.3 zip package and click upload and install as shown in the picture below:
✔ Step 2: By the same way, install JV Modern template and other extensions on your Joomla!
Please view the following guide to know how to install new extensions (template, components, module, plugin) on your current Joomla site.
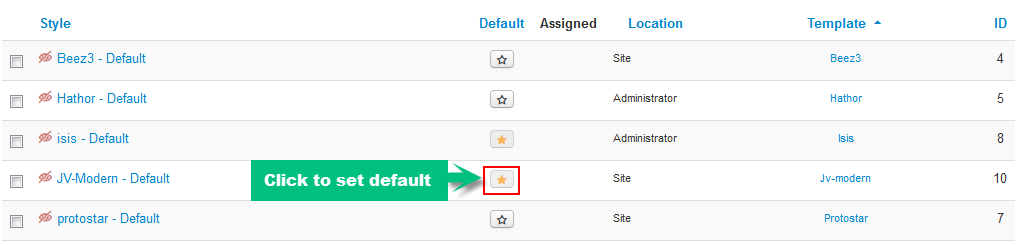
✔ Step 3 Once you have JV Modern Template installed. Go to Extensions >> Template Manager, set JV Modern as default for front-end
Template Customization
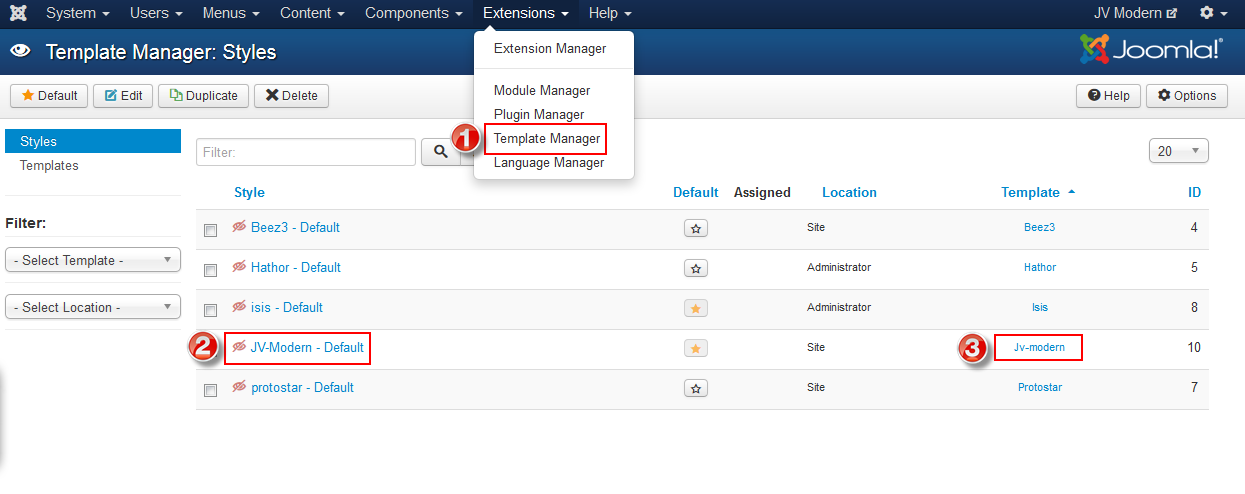
You can manage the template by navigating to Extensions >> Template Manager (1)
Click on the name of the template in the Style column to edit style with our powerful JV Framework 3.3
Click on the name of the template in the Template column to edit core files
Styles column refers to changing the available parameters of a template, such as color, font-color, logo, etc (2). These are dependent on the parameters a template maker made available and are a convenience for quick changes. Template - column refers to editing the actual template files (3).
1. Edit Style via JV Framework 3.3
Accessing to Edit Style you can edit JV Modern style with JV Framework. This area includes 11 tabs: Overview, Global, Google Fonts, Style, Megamenu, Grid Layout, Extension, Custom JS, Related Article, Assign, Scrolling Effect. You can reset all settings to default by click on "Reset to default" in the top right corner. Now we will go to each tab to find out more.
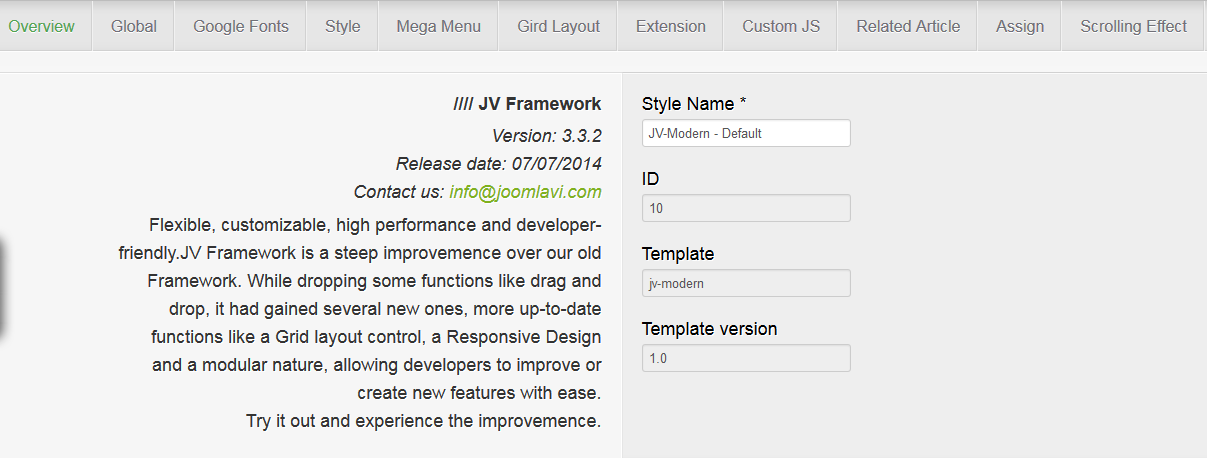
1.1. OVERVIEW:
This tab contains general information of JV Framework.
1.2. GLOBAL
This tab contains a collection of general parameters that affect the entire site.
The sets of parameters that can be found in this tab are:
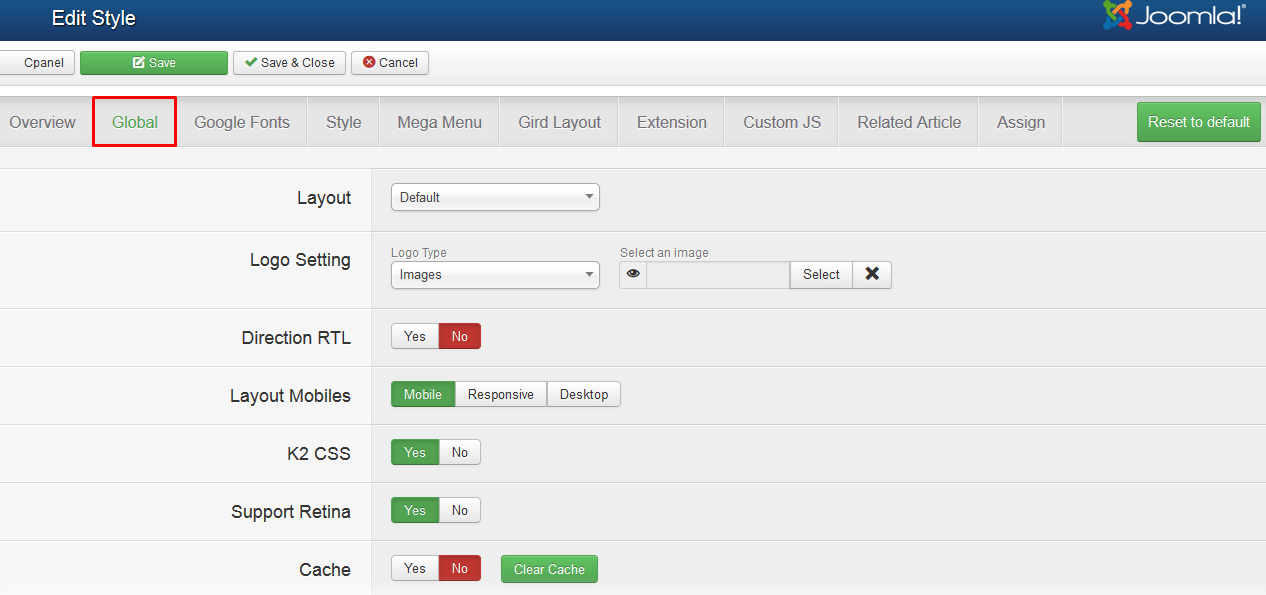
- Layout: Select layout for the template ( default/Left-Right-Main/Main-Left-Right/Mobile).
- Logo Setting: choose logo type (images/type). You can upload your own logo, add Logo text, slogan
- Direction RTL: enable/disable RTL mode
- Layout Mobiles: Allow you to select the type of layout that will be used when accessed from a mobile device
- Full HD: Enable/disable Full HD mode.
- Cache: This is where you enable/disable the cache function for JV Framework’s extensions or clear the cache.
- Compression: Allow you to optimize the site performance by utilizing various types of compression.
- Go to top: Enable/disable Go to top button
- Copyright: Allow you to enable/disable and modify copyright information.
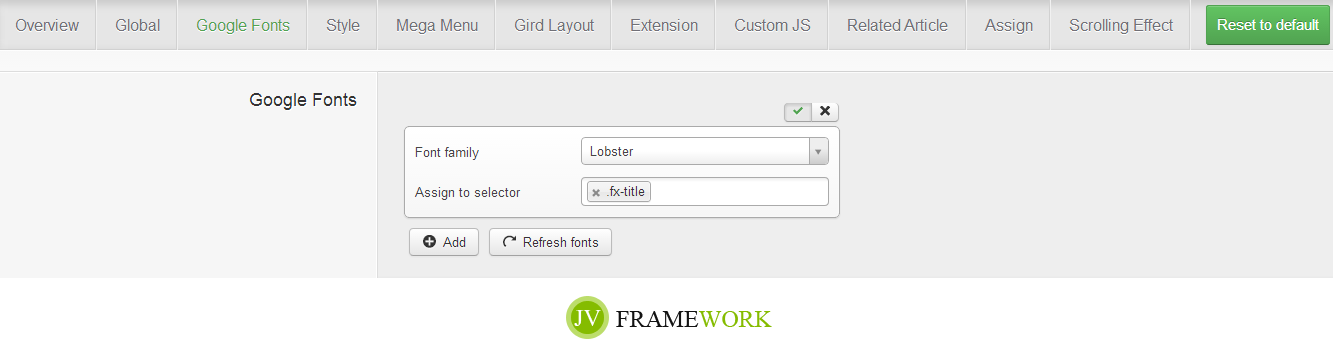
1.3. GOOGLE FONT
In this tab, you can easily apply google font to your contents.
Click add, the choose a font type, then assign the font type to heading or paragraph tags as you can see below:
1.4. STYLE
This tab allows you to edit template color
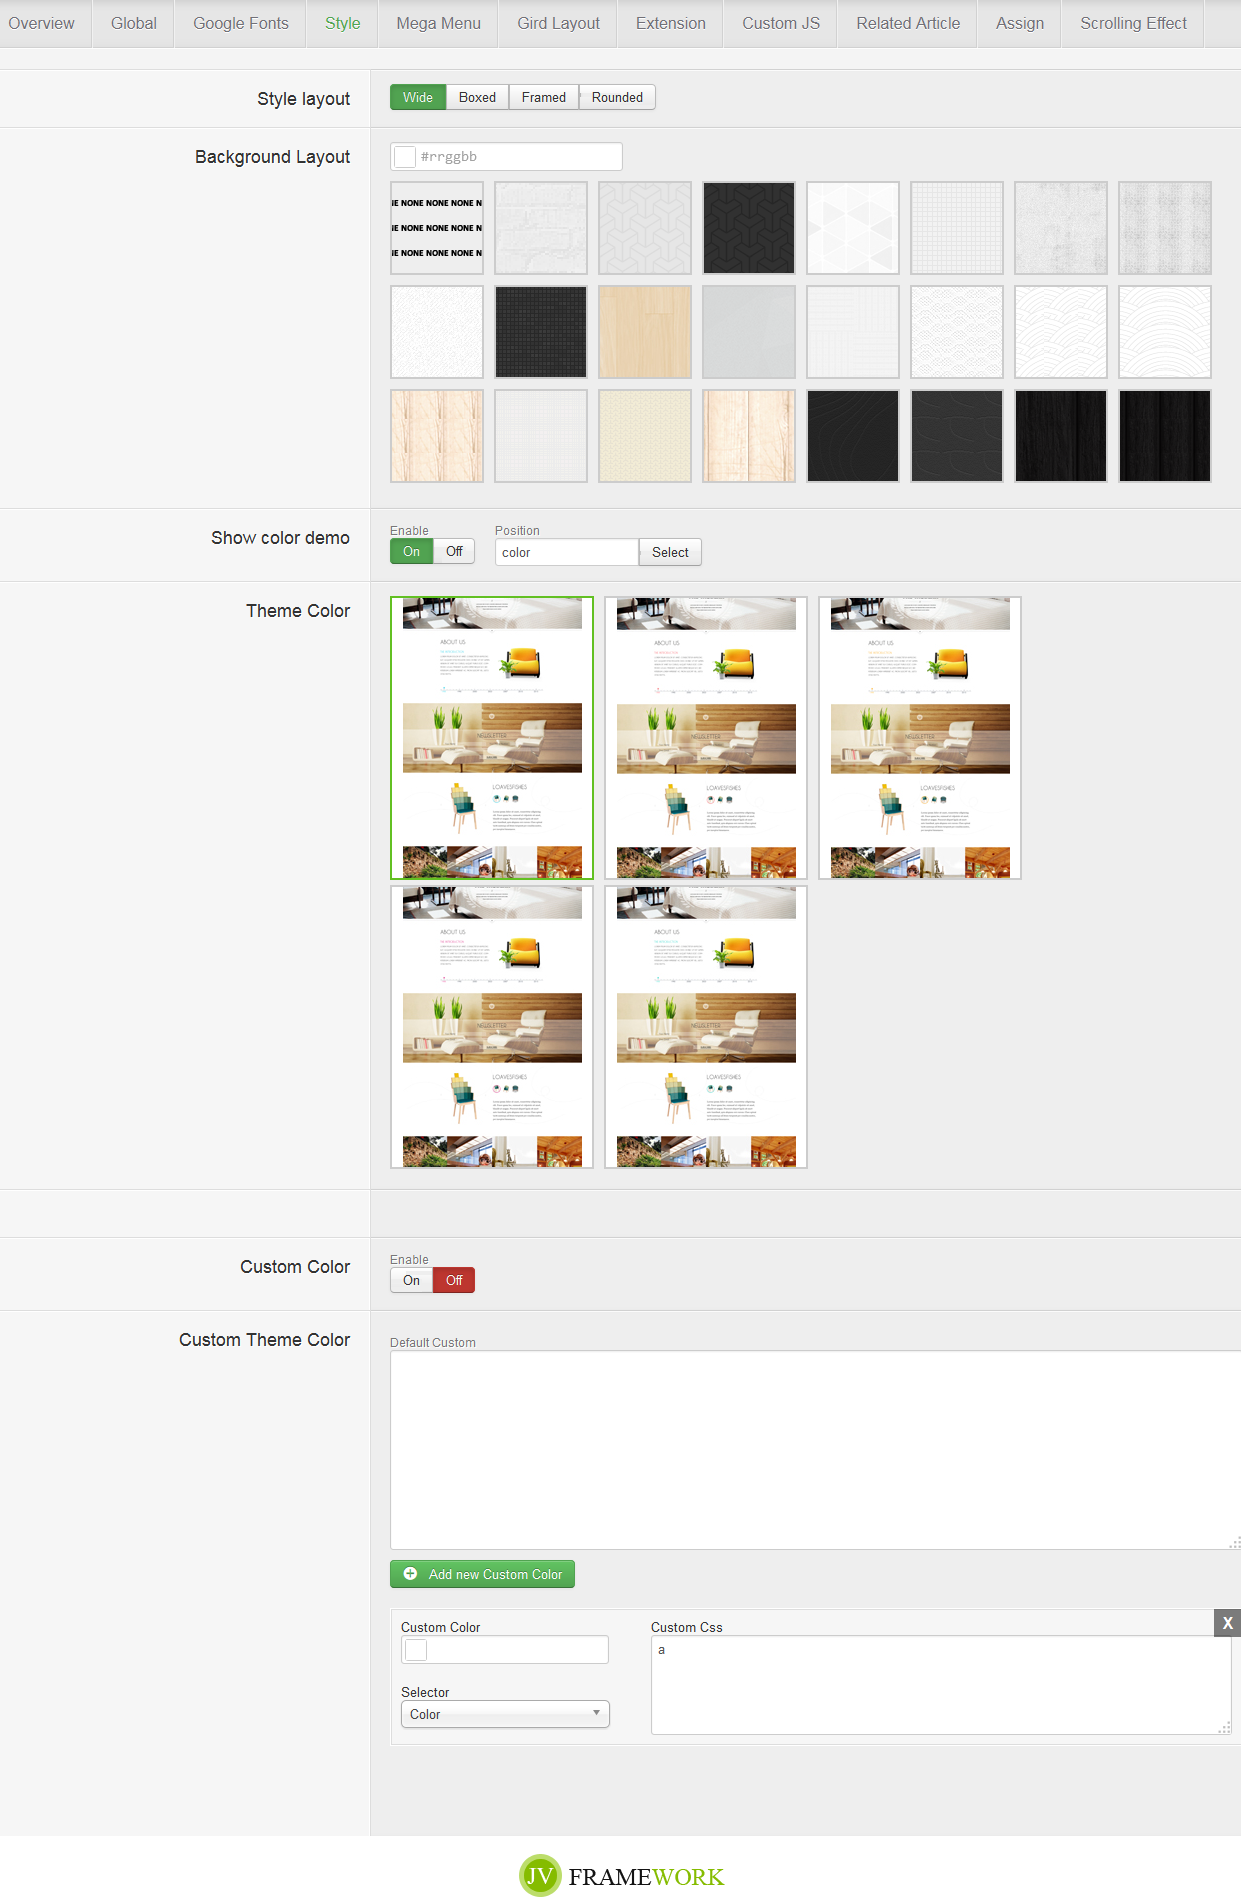
- Module color: you can select whether to show 4 preset colors in specific for front-end user to choose (you should turn it off this mode because you should be the only one to preset the entire theme color)
- Theme color: simply select a theme color
- Custom color: enable/disable custom theme color mode
- Custom theme color:
If enabled, you can easily add your own color to classes, ids, heading, paragraph... Simply edit colors with color box and assign selector: background or border or color. You can also edit classes, ids... in the Custom Css box
Click "on add new Custom color" to add and style new classes, ids...
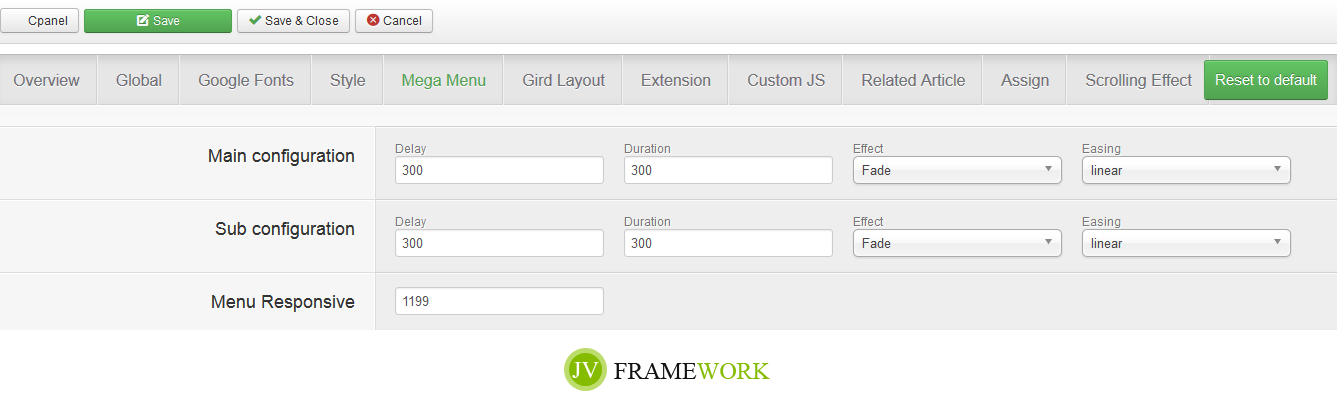
1.5. MEGA MENU
This tab allows the user to configure the Megamenus and their sub-menus used in JV Modern, as well as the menu responsive
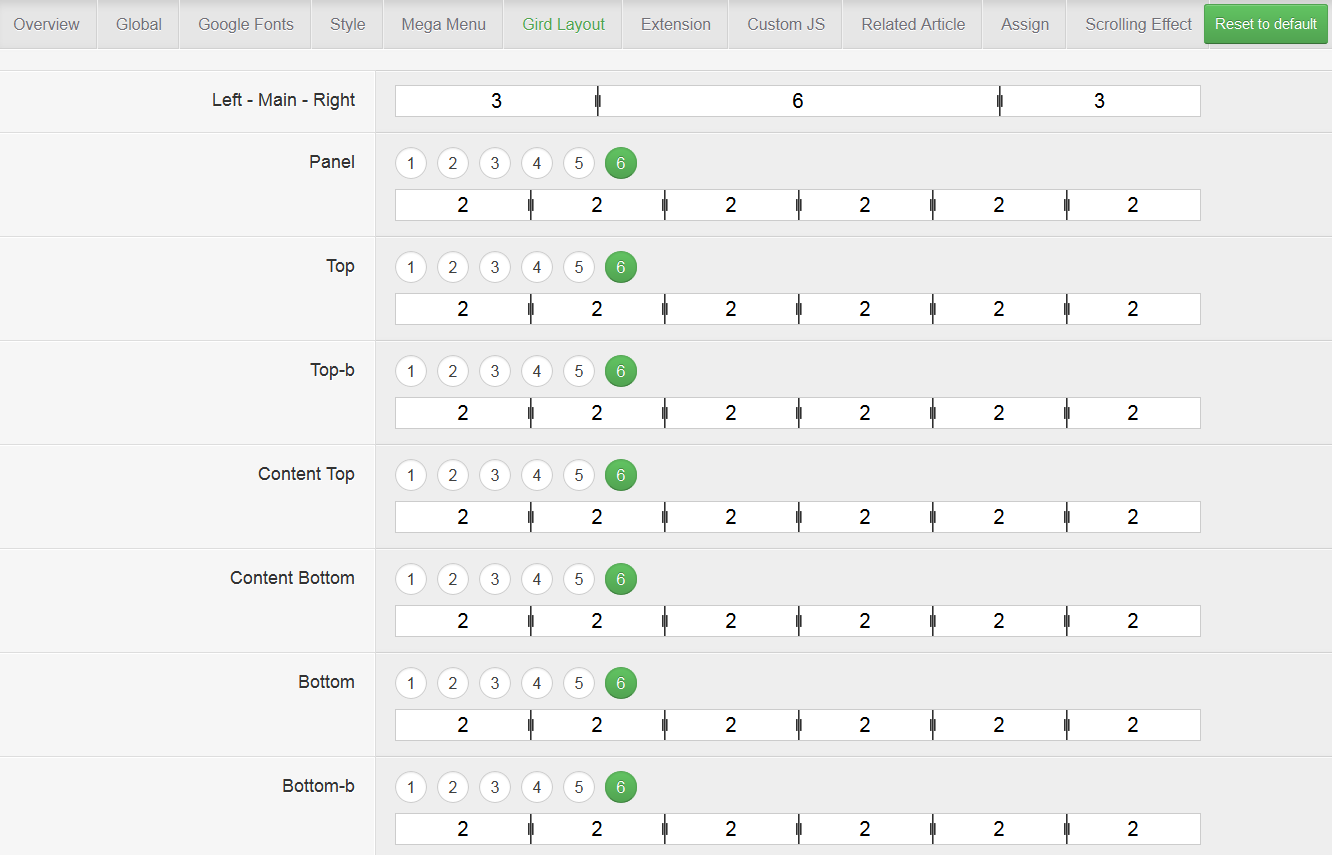
1.6. GRID LAYOUT
This tab allows you to adjust the size ratio of the grid layout.
1.7. EXTENSION
This tabs contains several sets of parameters that enhance or support the Framework .
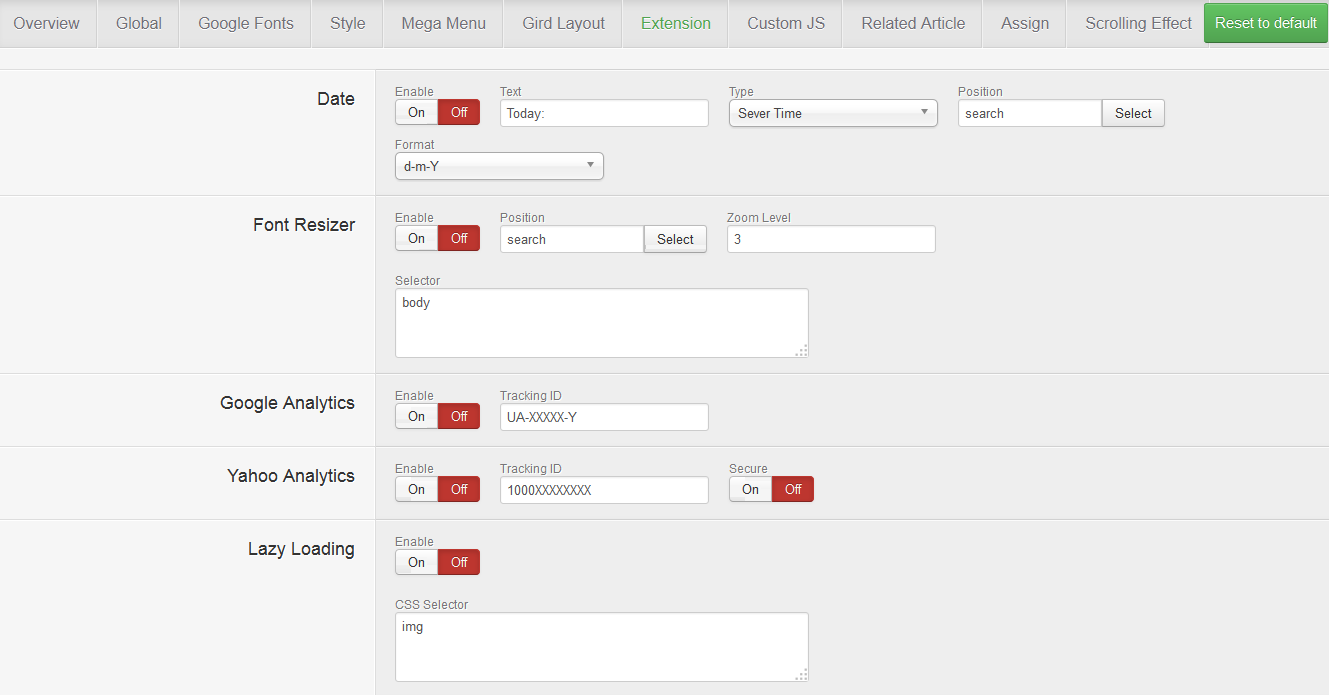
- Date: enable/disable the date indicator, as well as configure it.
- Font Resizer: enable/disable the font resizer.
- Google Analytics: enable/disable Google Analytic.
- Yahoo Analytics: enable/disable Yahoo Analytic.
- Lazy Loading: enable/disable lazy loading mode.
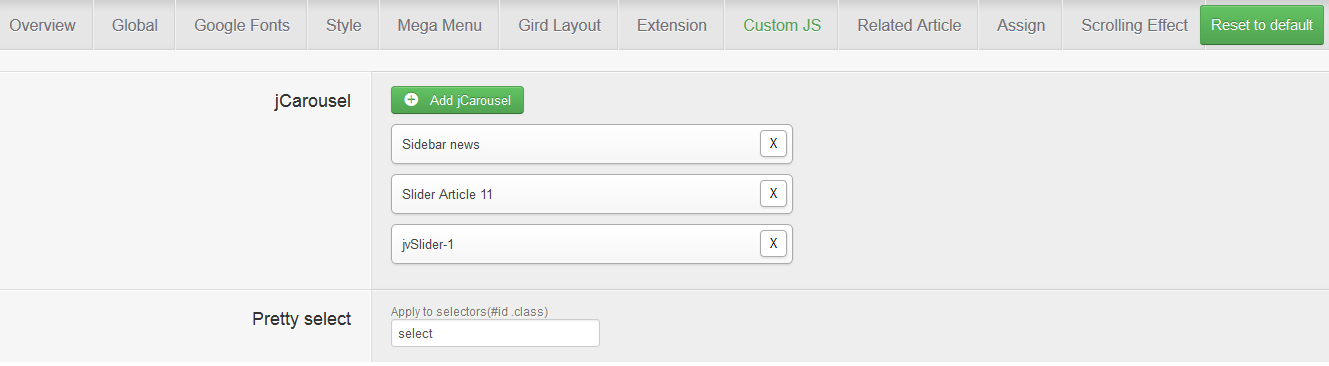
1.8. CUSTOM JS
This is where you can add custom JS to certain part of the site using class or id.
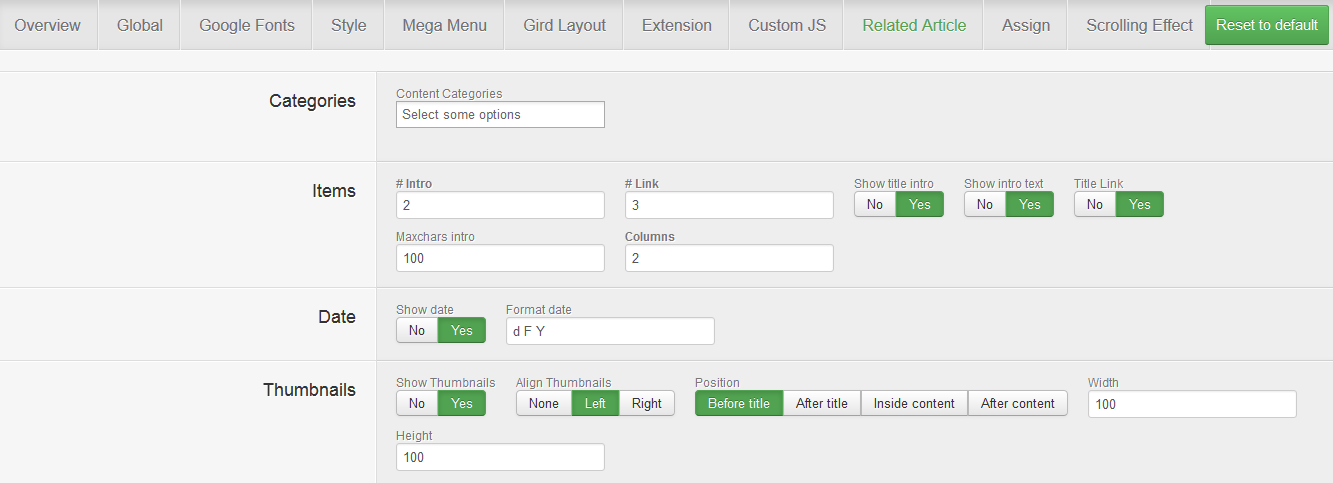
1.9. RELATED ARTICLE
This tab allows you to configure the Related Article features (show related article underneath the one being read).
1.10. ASSIGN
In this tab, you can assign template to specific menu items. But you can't assign for the default template, current JV Modern is set as default, so you can't assign it to menu items any more.

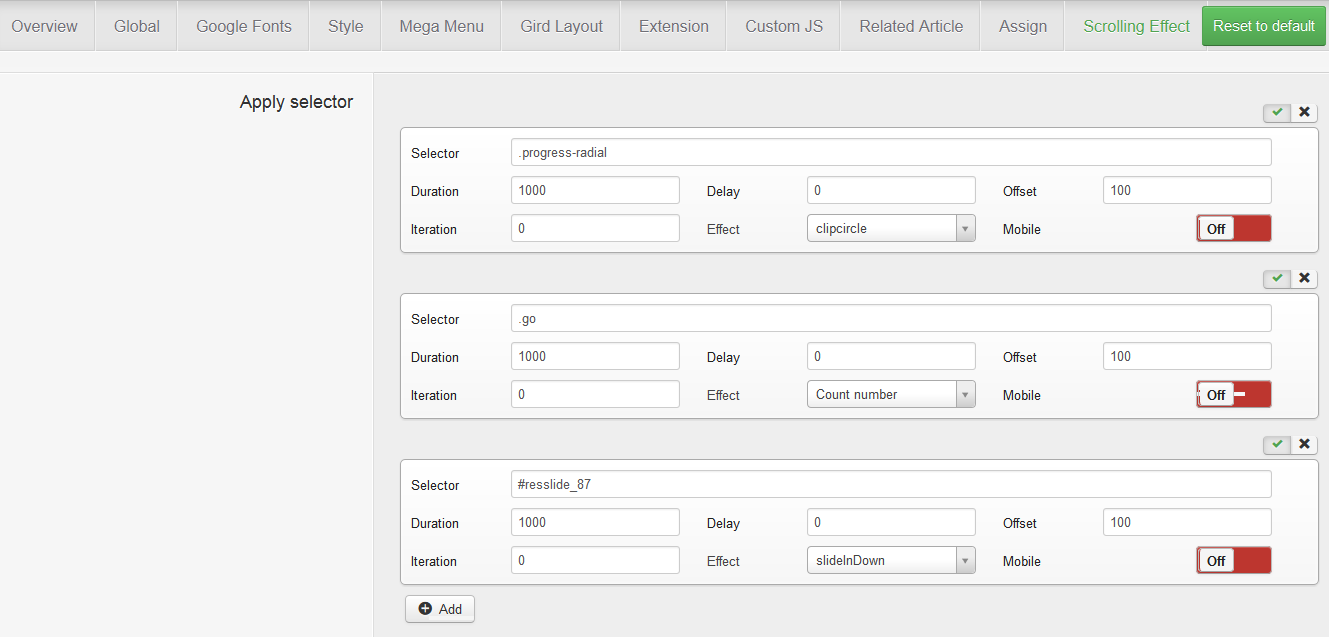
1.11. scrolling effect
This is the newest feature included in JV Framework 3.3, with this tab, you can easily create a scrolling effect on any page. Simply add selector(s) and config effect parameters. You can select among lots of effect for selector(s).
2. Customize template by editing core files
You can edit files of the template directly on web browser by navigating to Extensions >> Template Manager. Click any on Jv-modern in the template column (3).
You will access to customise template area, where you can edit files, just select a file and edit it in the right side, click save when you have done.
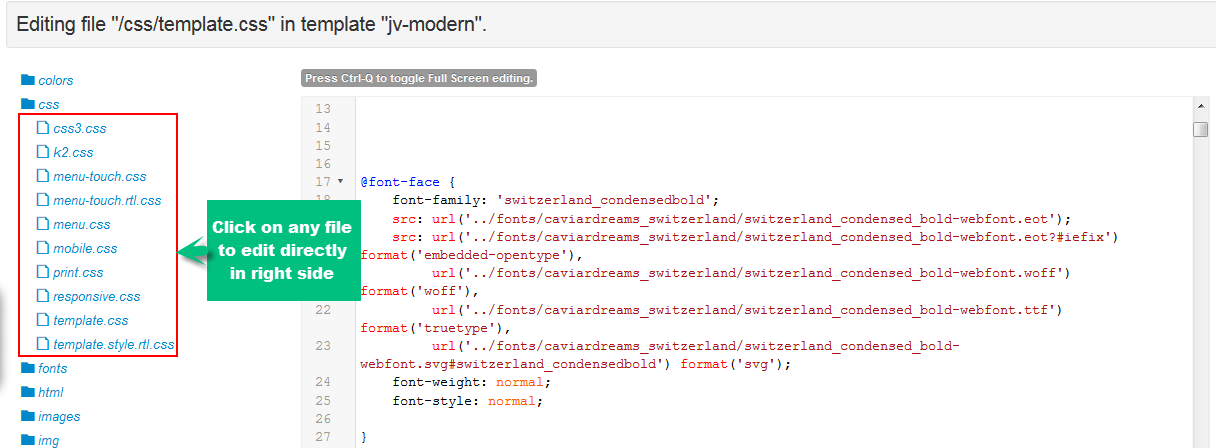
There are many folders and files that you can edit, each file or folder has a specific name that you can image how is each file used.
Normally, template.css file is an important file that contains entire template styling. This is the biggest css file containing all the template styling. For you easy to find and edit code quickly, the file is arranged into the main segments:
3. Website/page title configuration
You also need to change website or page titles of your site, these are important and critical things for SEO

In order to change website/page/menu item title, take the following steps:
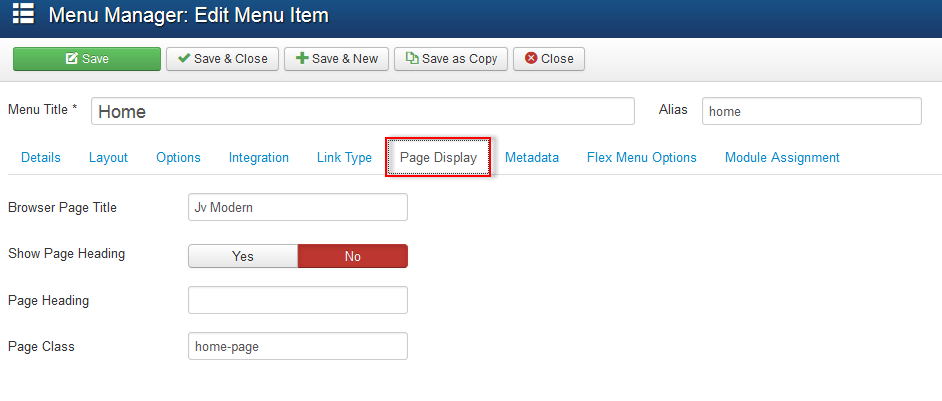
Step 1: Go go Menus >> Menu Managerin back-end admin panel, then select a menu (in this example I choose Main Menu)
Step 2: In Menu Item Manager, Click on any Menu Item representing for specific page that you would like to change the title. ( In this example I choose the Menu Item Home, which stands for the website)
Step 3: In the Edit Menu Item page, choose tab Page Display, then add title for the Menu Item
4 Changing Favicon
If you install JV Modern quickstart package, you may need to change the favicon.

To change favicon, take the following steps:
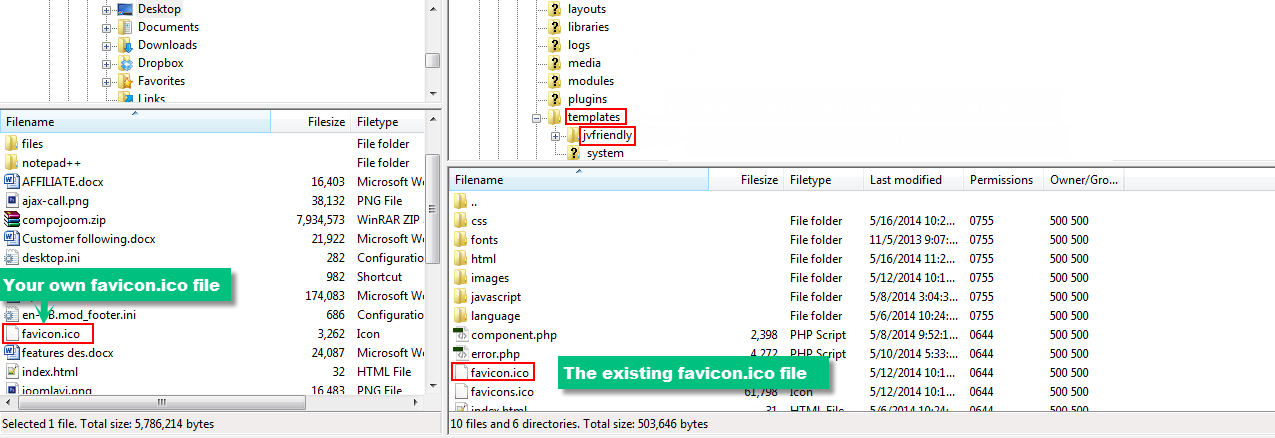
Step 1: Create a 16x16 pixel image
Step 2: Name the image favicon.ico , now you have your own favicon
Step 3: Copy the file to /<your joomla>/templates/jvmodern directory .
During this step, you should use FTP application to log into your server. There are number of both free and commercial FTP applications. In this example, I choose FileZilla.
On you web server, open htdocs or public_html directory, then select where your Joomla has been previously installed
Scroll down to the template directory, double click to open it,
Continue to open jvmodern directory
Replace the exsiting favicon.ico file in jvmodern directory with your own file
JV Extensions
JV Modern is beautified by many popular extensions designed by Joomlavi including : JV Slidepro, JV Latest News, JV Login, JV Gallery, JV Facelinker, JV Twitter.
If you install JV Modern with quicstart package, you only need to configure the parameters, change text or images... Because the extensions had already been installed or added.
If you install JV Modern on your existing Joomla site, you need to install each extension and then configure them. You can download our extensions at JV Modern download area
1. JV Slide Pro Module
JV Slide Pro is an exclusive and professional extension designed by Joomlavi. It's not a free extension but will be included when you download JV Modern.
- Setting up JV Slide Pro:
You need to install JV Slide Pro extension and jvjquerylib plug-in.
To configure the module, Navigate to Extensions >> Module Manager click on module Slide Pro. You will access to Module Manager: Module mod_slidepro
Important! When you configure JV Slide Pro or any module, to make sure the module display on front-end, do not forget to:
- Select position for the module (in Module Manager: Module mod_slidepro, tab Module)
- Publish the module (in Module Manager: Module mod_slidepro, tab Module)
- Assign the module to specific pages/menu items.
Slide source Settings:
1.1. JV Slide Pro
Click on "Add" in the bottom to add new slide
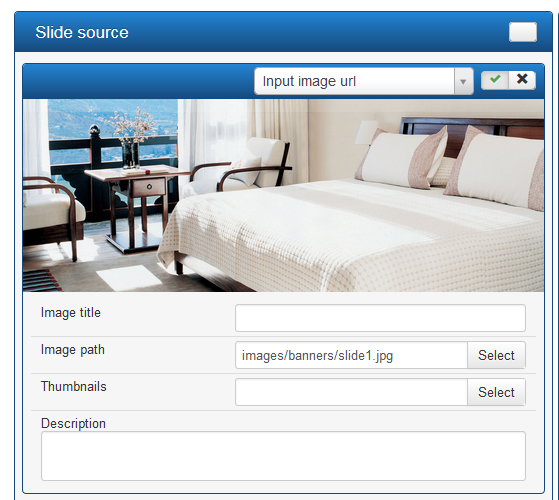
The important thing is to choose slide source type in the top, you can select: Input image URL, Youtube video, Choose article, Choose K2 article, Form folder, Query articles, Query K2 articles. Each type of slide source has different image settings. In JV Modern, we only use "Query article" slide source type. Within this type, the JV Slide Pro will get source from article . Let's check how to set up images and descriptions:
- Image title: Add title for the main image
- Image path: select main image from media Manager
- Thumbnails: select thumbnails from media Manager
- Description: in this section you can insert the path of description image, change title, heading, content.
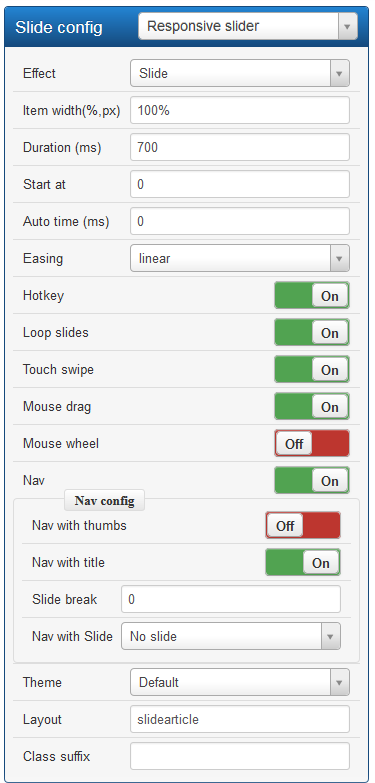
Back - end setting:
Parameter explanations:
- Effect: choose one of 6 beautiful effects
- Item width(%,px): enter value for slide width (in pixel or %), default 100%
- Duration (ms): enter value for duration of time a slide lasts
- Start at: enter a value to select which slide initialize the slideshow
- Auto time (ms): enter value for auto sliding time. Set 0 to disable auto play
- Easing: select easing function
- Hotkey: enable/disable arrow keyboard control
- Loop slides: enable/disable indefinite loop for slides
- Touch swipe: enable/disable slide touching function
- Mouse drag: enable/disable slide mouse drag function
- Mouse wheel: enable/disable mouse wheel to control slides
- Nav: enable/disable navigation function and buttons
- Nav with thumbs: enable/disable thumb navigation
- Nav with title: enable/disable navigation with image titles
- Slide break: set min and max slide item
- Navi with Slide: select to show navigation with slide
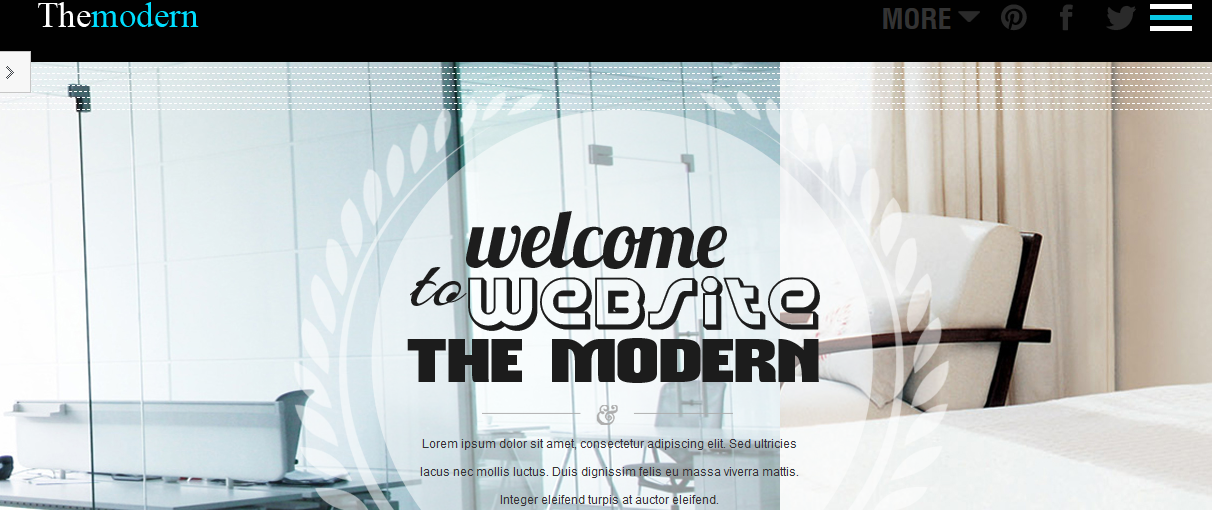
Module slide Pro in front - end:
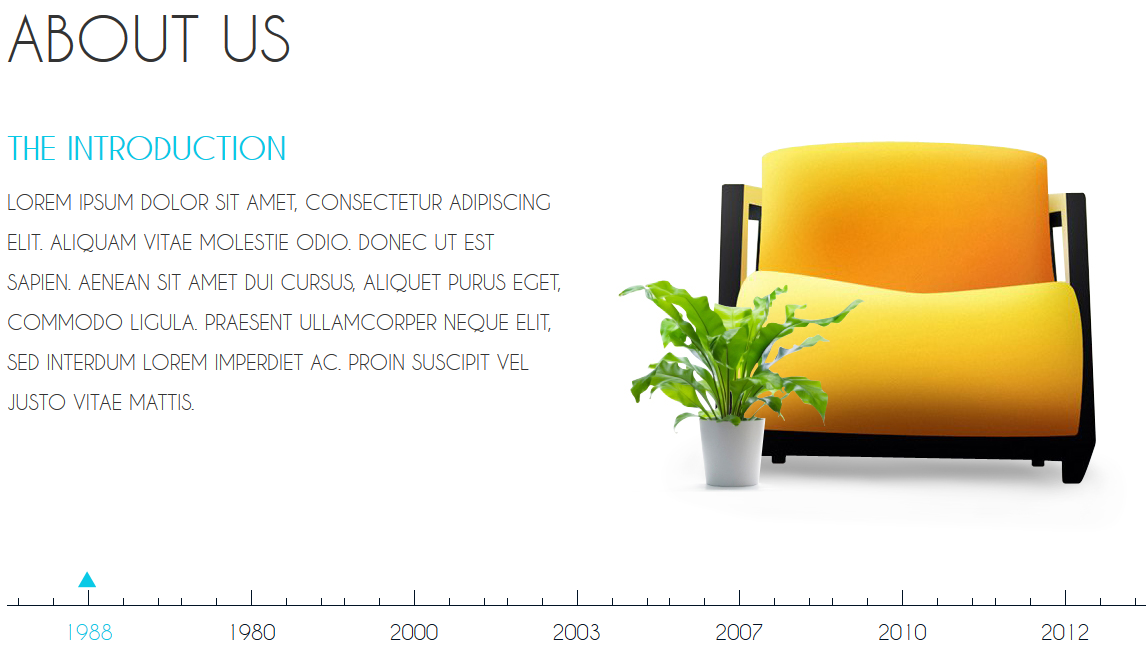
1.2. About Us
Slide Source Settings:
Click on "Add" in the bottom to add new slide
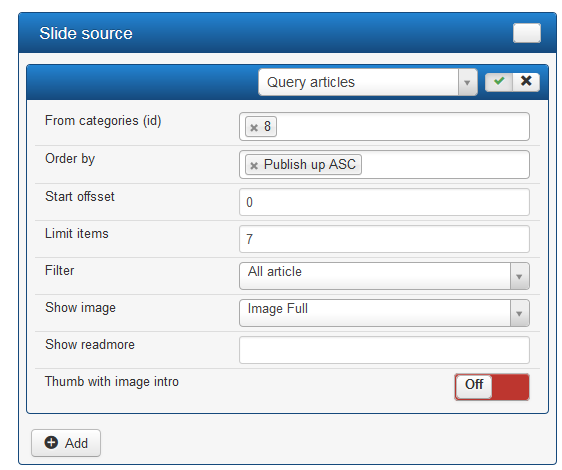
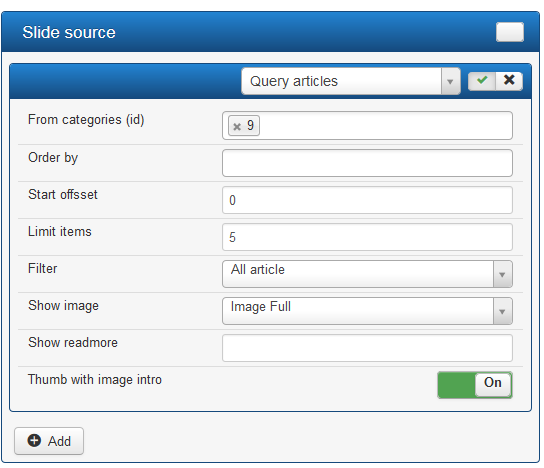
The important thing is to choose slide source type in the top, you can select: Input image URL, Youtube video, Choose article, Choose K2 article, Form folder, Query articles, Query K2 articles. Each type of slide source has different image settings. In JV Modern, we only use "Query article" slide source type. Within this type, the JV Slide Pro will get source from article. Let's check how to set up images and description:
- From categories (id): enter category id. JV Slide Pro will get source from articles in the selected category
- Order by: select order (Publish up ASC/ Publish up DESC/ Ordering ASC/ Hits ASC/ Hit DESC)
- Start offset: enter start offset
- Limit items : Enter limit items
- Filter: Select filter (All articles/ No featured/ Only featured)
- Show readmore: input readmore text, leave empty to disable
- Thumb with image intro: On/ Off
About us modules, as seen from front-end:
Slide Configurations:
- Effect: choose one of 6 beautiful effects
- Item width (%,px): enter value for slide width (in pixel or %), default 100%
- Duration (ms): enter value for duration of time and a slide lasts
- Start at: enter a value to select which slide initialize the slideshow
- Auto time (ms): enter value for auto sliding time. set
- Easing: select easing function
- Hotkey: enable/disable arrow keyboard control
- Loop slides: enable/disable indefinite loop for slides
- Touch swipe: enable/disable slide touching function
- Mouse drag: enable/disable slide mouse drag function
- Mouse wheel: enable/disable mouse wheel to control slides
- Nav: enable/disable navigation function and buttons
- Nav with thumbs: enable/disable thumb navigation
- Nav with title: enable/disable navigation with image titles
- Slide break: set min and max slide item
- Navi with Slide: select to show navigation with slide
1.3. Loavesfishes
Slide Source Settings:
Click on "Add" in the bottom to add new slide
The important thing is to choose slide source type in the top, you can select: Input image URL, Youtube video, Choose article, Choose K2 article, Form folder, Query articles, Query K2 articles. Each type of slide source has different image settings. In JV Modern, we only use "Query article" slide source type. Within this type, the JV Slide Pro will get source from article. Let's check how to set up images and description:
- From categories (id): enter category id. JV Slide Pro will get source from articles in the selected category
- Order by: select order (Publish up ASC/ Publish up DESC/ Ordering ASC/ Hits ASC/ Hit DESC)
- Start offset: enter start offset
- Limit items : Enter limit items
-Filter: Select filter (All articles/ No featured/ Only featured)
- Show readmore: input readmore text, leave empty to disable
- Thumb with image intro: On/ Off
Loavesfishes modules, as seen from front-end:
Slide Configurations:
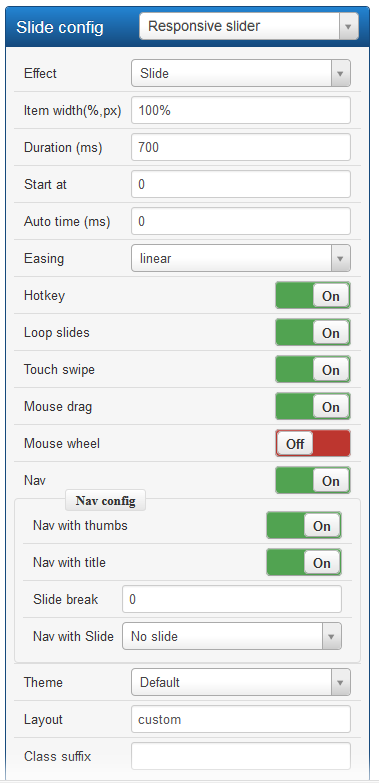
- Effect: choose one of 6 beautiful effects
- Item width (%,px): enter value for slide width (in pixel or %), default 100%
- Duration (ms): enter value for duration of time and a slide lasts
- Start at: enter a value to select which slide initialize the slideshow
- Auto time (ms): enter value for auto sliding time. set
- Easing: select easing function
- Hotkey: enable/disable arrow keyboard control
- Loop slides: enable/disable indefinite loop for slides
- Touch swipe: enable/disable slide touching function
- Mouse drag: enable/disable slide mouse drag function
- Mouse wheel: enable/disable mouse wheel to control slides
- Nav: enable/disable navigation function and buttons
- Nav with thumbs: enable/disable thumb navigation
- Nav with title: enable/disable navigation with image titles
- Slide break: set min and max slide item
- Navi with Slide: select to show navigation with slide
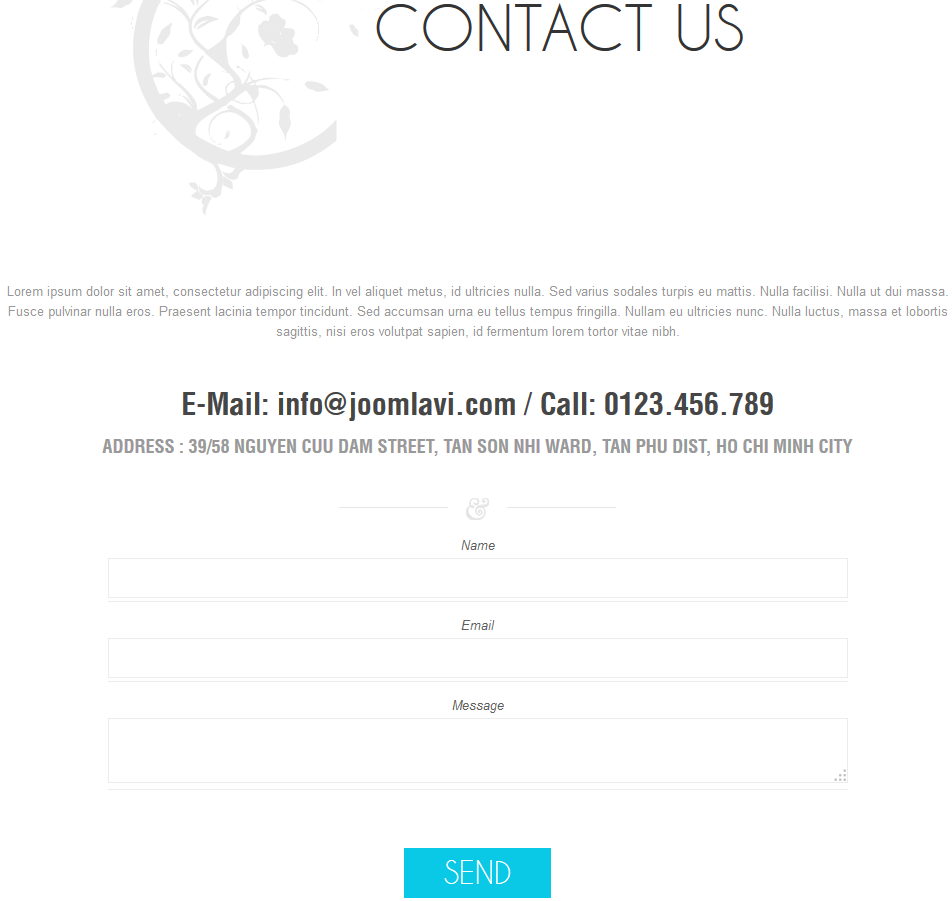
2. JV Contact
JV Contact is a great tool for getting in touch with your clients. The extension is easy to use with its user-friendly back end functionality. This module includes following key features: google map, contact form, Anti-spam with Recaptcha, Attachment, Social Sharing.
You may need to view JV Contact detailed guide to know how to config the Module.
- JV Contact Us Page
This module is configured to show contact form.
- Module position: contact
- Menu assignment: on "Contact us" menu item
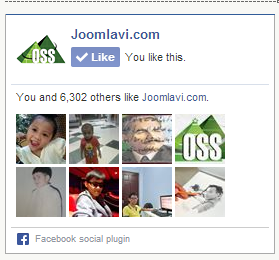
3. JV Facelinker Module
This module is used to display Facebook Like Box in your joomla site. You can easily maintain Facebook fan pages on your joomla website using JV Facelinker. It is the best way for you and you can save your time as using our module is extremely easy.
- Module position: left
- Menu assignment: Product pages
View Backend settings
Module in front-end:
If you are not familiar with this extension, please refer the following link:
4. JV Latest News Module
This is a exclusive module designed by Joomlavi team to show latest news in your joomla site. JV Latest News is very easy to use with key features:
- Get source from K2 or Joomla content
- Select specific category
- Load CSS bootstrap
- Select specific articles
- Select specific k2 item
- Show/hide pagination
Main setting
- Position: left- Module class suffix: news
- Menu Assignment: only on selected pages
Module in front-end:
5. JV Newsletters
- Position : Bottom - 6
- Menu assignment: On all pages

Front- End:

Custom HTML Modules
The custom HTML module is one of the default modules for Joomla! It is designed to contain any valid HTML code. There are many cases where you might want to put free-form HTML inside a web page. For example, you might want to create an HTML Image Map or you might want to copy HTML code from PayPal, Amazon, or some other sites. The Custom HTML Module allows you to create a self-contained HTML unit and then put it in any valid location on a page.
Note: If you are new to Joomla! and HTML, the best way for you is to copy and paste the code into the module. Or If you would like to edit the HTML code please notice on each of HTML module below.
How to create a new Custom HTML module or edit an existing one?
Like the way you create a new Joomla, default module. To 'add' a new Custom HTML module, navigate to Extensions >> Module Manager
Click the 'New' button and click on Custom HTML in the modal popup window.

To 'Edit' an existing Custom HTML module, in the Module Manager click on the Custom HTML Module's Title or click the Custom HTML module's check box and then click the Edit button in the Toolbar.
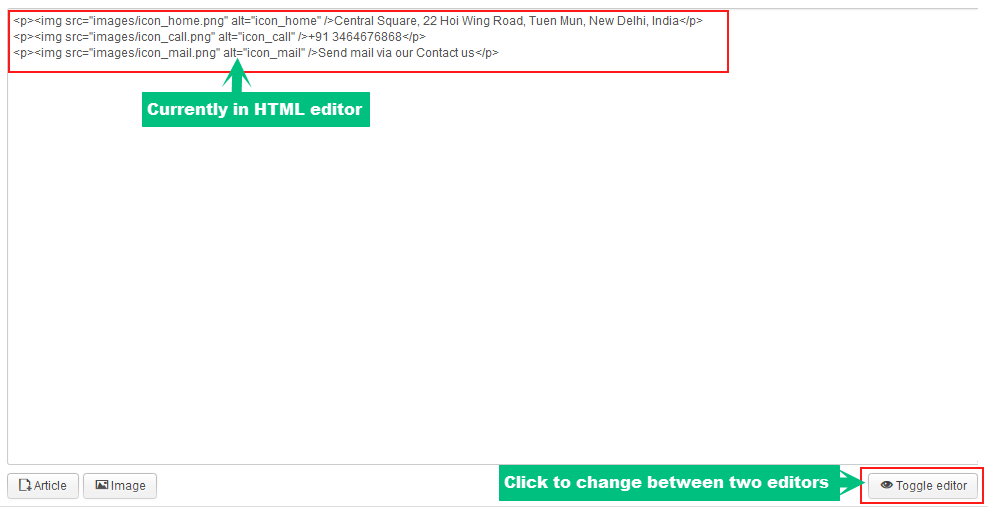
When editing the content you can use "toggle editor" button in the bottom of the editor. A toggle button allows the user to change between two editors: HTML and Plain text.
We have styled for each Custom HTML modules using different div classes. You need to follow the same format in order to get it displayed correctly. Then replace with your own links, images, text... Now we will go inside each custom HTML module built in JV Modern.
1. Go to contact:
- Module position: block - position 6
- Menu assignment: on "Home" pages
HTML code:
<div><a class="gopos3" href="#block-position-7" rel="bscroll">goto</a></div>Module in front- end:
2. Go to product:
- Module position: bottomb-1
- Menu assignment : on "Home" pages
HTML code:
<div><a class="gopos3" href="#block-position-6" rel="bscroll">goto</a></div>
Module in front-end:

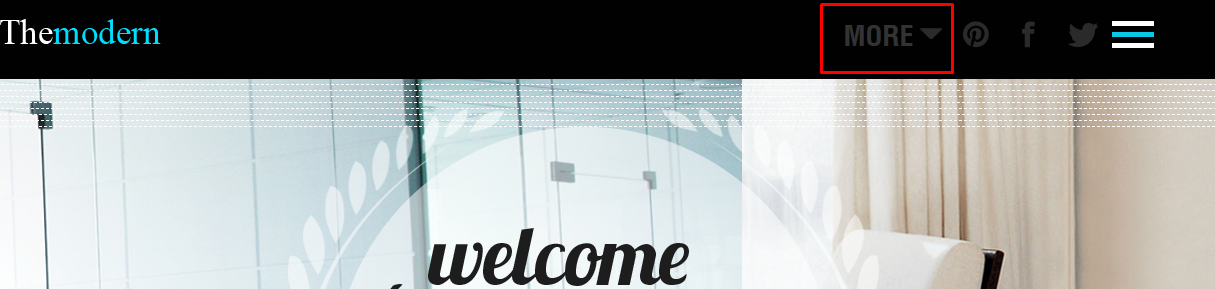
3. More link:
- Module position: header-top
- Menu assignment: on "Home" page
HTML code:
<ul class="menutop">
<li class="parent"><a href="/all-products/templates.html">More</a></li>
</ul>
Module in front-end
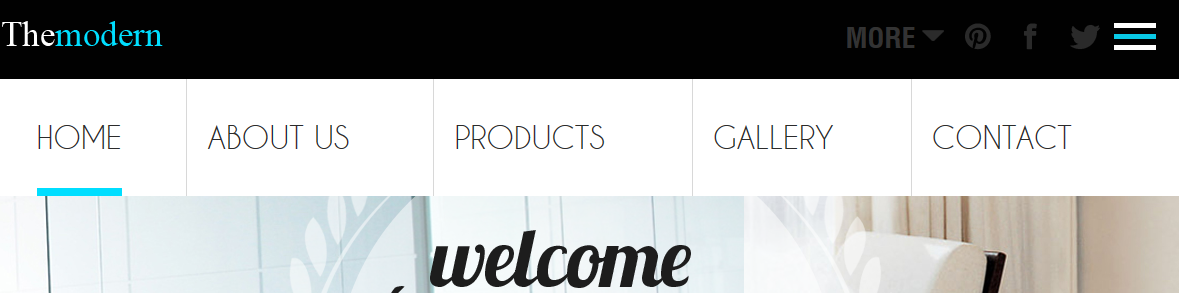
4. Main menu;
- Module position: home-menu
- Menu assignment: on "Home" page
HTML code:
<ul class="main-menu">
<li class="current"><a href="#block-slide" rel="bscroll">home</a></li>
<li><a href="#block-top" rel="bscroll">About Us</a></li>
<li><a href="#block-bottomb" rel="bscroll">Products</a></li>
<li><a href="#block-position-6" rel="bscroll">Gallery</a></li>
<li><a href="#block-position-7" rel="bscroll">contact</a></li>
</ul>
Module in front-end:
5. Social Link:
- Module position: search
- Menu Assignment: on all pages
HTML Code:
<div class="social_link social-icon-effect-1"><a class="pin" href="#" target="_blank"><span class="tx">p</span></a> <a class="facebook" href="#" target="_blank"><span class="tx">f</span></a> <a class="twitter" href="#" target="_blank"><span class="tx">t</span></a></div>
Module in front-end:

6. Welcome:
- Module position: Slideshow
- Menu Assignment: on 'Home" pages
HTML Code:
<div class="welcome-box"><span class="spike">spike</span> <span class="welcome">welcome</span> <span class="wl-line">line</span>
<p class="wl-text">Lorem ipsum dolor sit amet, consectetur adipiscing elit. Sed ultricies lacus nec mollis luctus. Duis dignissim felis eu massa viverra mattis. Integer eleifend turpis at auctor eleifend.</p>
</div>
<div><a class="go_to" href="#block-top" rel="bscroll"><span class="plus">txt</span></a></div>
Module in front-end:

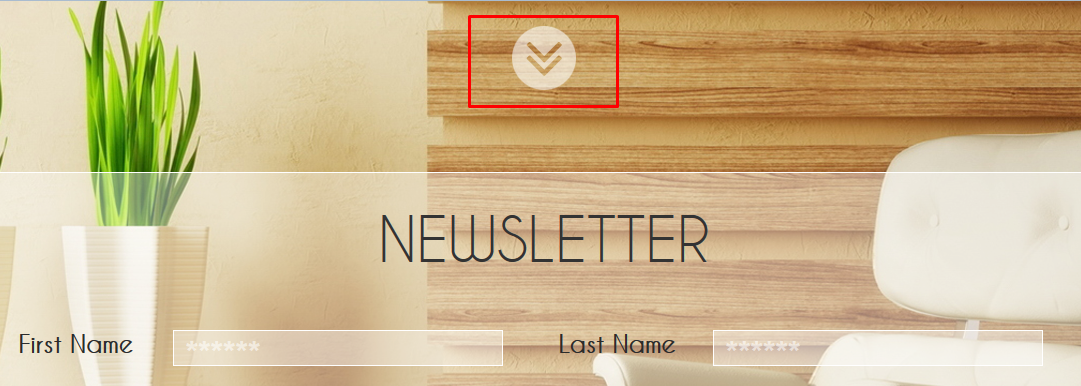
7.Go to block 3:
- Module position: topb-1
- Menu Assignment: on "Home" pages
HTML Code:
<div><a class="gopos3" href="#block-main" rel="bscroll">goto</a></div>
Module in front-end:
Menu configuration
One of important things you need to do with your site is managing menus, and menu items.
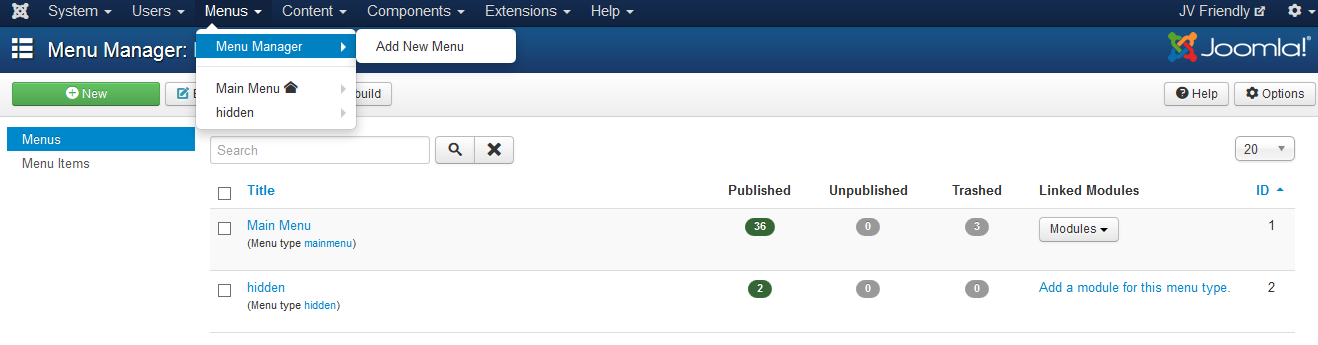
1 Menus manager
Navigate to Menus >> Menu Manager. In the menu manager page, you can:
- Add a new menu by clicking on "New" button.
- View all existing menus available in your site
- View menus' status, modules linked to the menus
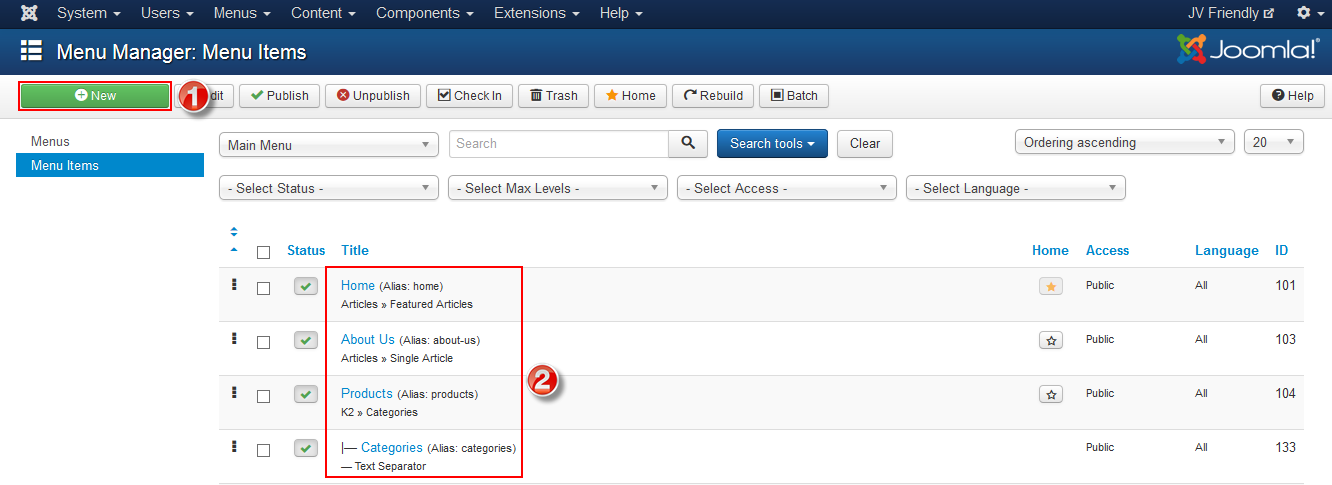
2 Menu item manager
The Menu Item Manager lists the menu items contained in a menu.
To access Menu Item manager, Select Menus >> [name of the menu] from the drop-down menu on the back-end. For example, if a Menu is called "Main Menu", select Menus → Main Menu. Or you can navigate to the Menu Manager and click on the icon in the Menu Items column.
Within Menu Item Manager you can do the followings:
- Add a new menu item (1)
- Edit any menu item (2)
- View menu item status
3 Menu Manager: Edit menu item
Menu items are the main structure of a Joomla site. Each Menu Item is linked to a webpage. The Menu Item Type determines the type of page that will display when this menu choice is selected by the User. Joomla! provides users 29 different Menu Item types. If you install third-party extensions, these may add more menu types.
To Edit a Menu Item: Select Menus >> [name of the menu] from the drop-down menu on the back-end. For example, if a Menu is called "Main Menu", select Menus >>Main Menu. Then either click the title of the menu item in the table list or select the menu item check-box and click the "Edit" icon in the toolbar.
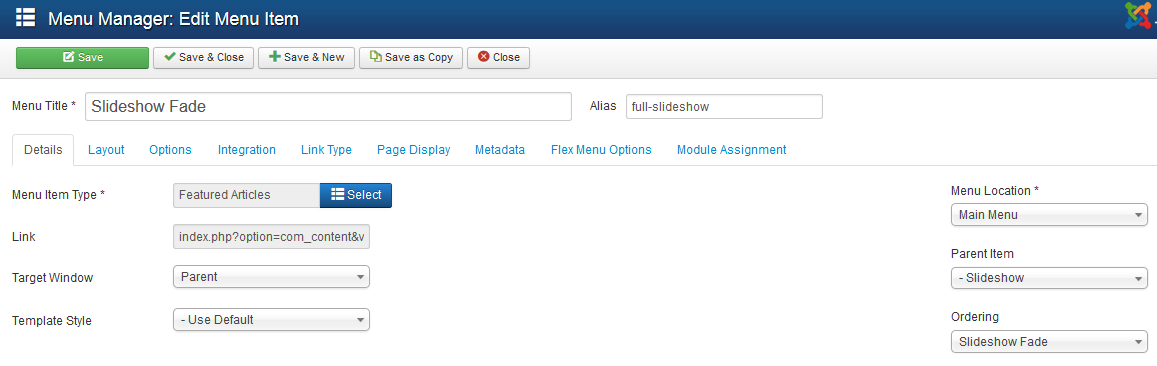
In this page, the most important thing you need to do is selecting the menu Item Type. After selecting, new tabs or parameters will appear.
You can configure each parameter in each tab when necessary. Hover over the each parameter to view the explanation.
K2 configuration
K2 component is a very popular and free component which helps you to control and manage site content easily. Let's view what can you do with this great extension and how to config. This part covers important and common facts you may use frequently with K2. If you need full detailed K2 document, please check our References part.
1. Installation
K2 can be easily installed on Joomla like other extension. If you are new,you may need to view the guide below
2. Manage Items with K2
From the backend area, navigate to Components >> K2 >> Items
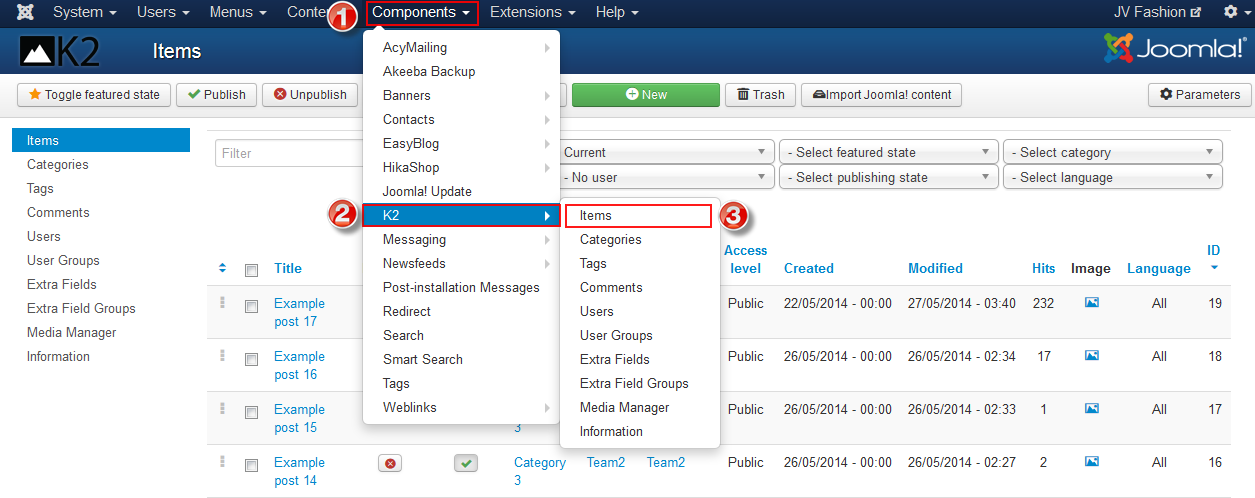
Within K2 Items you can do the followings:
- Create new K2 item: Click on "New" button in the toolbar to ad a new item
- Edit existing K2 item: Click on the item to edit that item
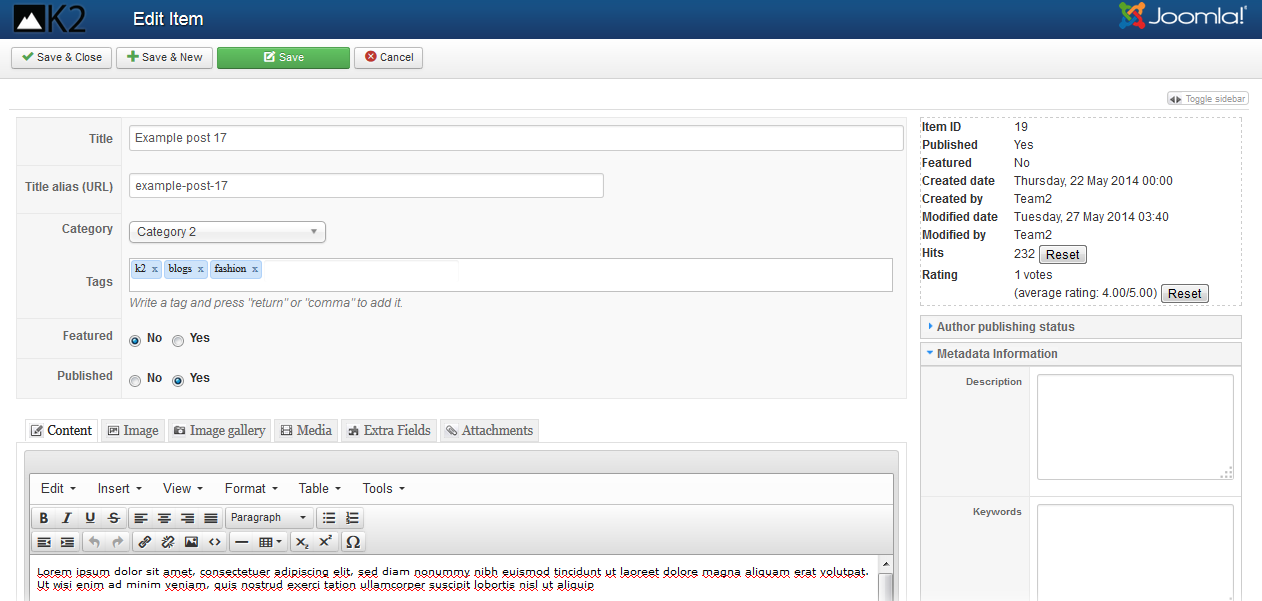
In the edit/add item page you can do important things:
- Change/add title of the item
- Upload images: you can upload an image via "Image" tab
- Edit your Author publishing status: Under the "Author publishing status" drop menu in the right side of the page, you can edit many publishing features
- Optimize item for Search Engine: Under the "Meta information" drop menu in the right side of the page, you can add/edit meta description, keywords, robots, author
3. Manage images with K2
In this section you need to distinguish between Media Manager and Image Tab.
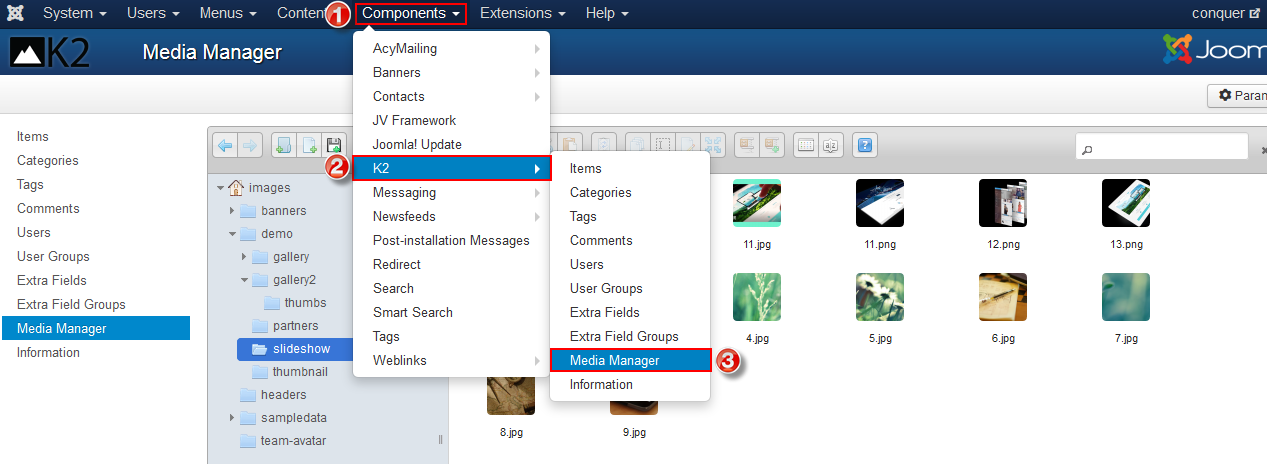
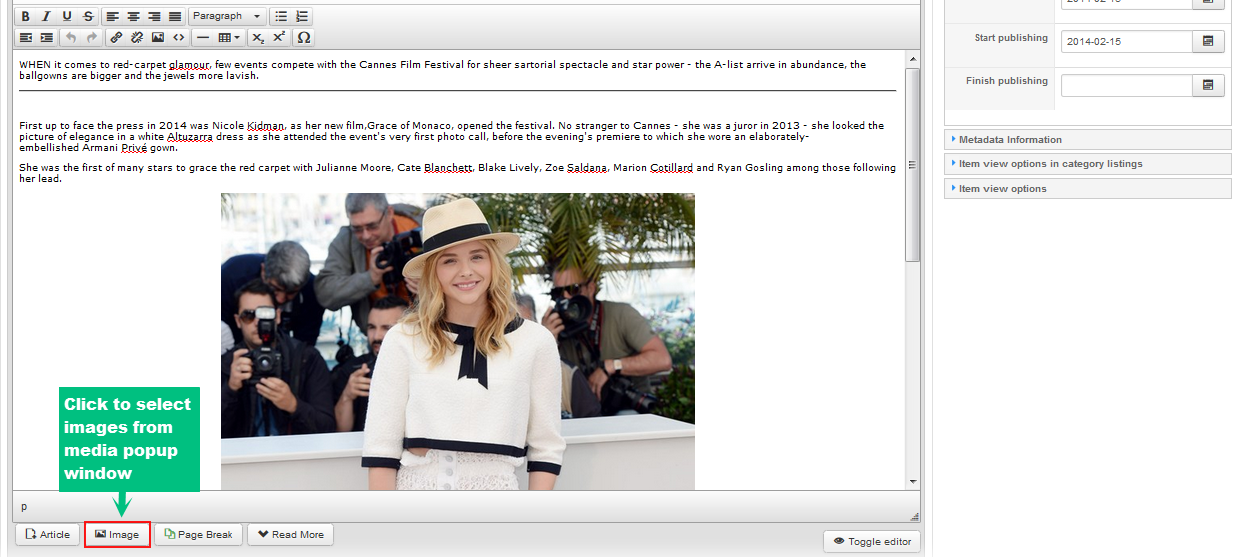
- Media Manager is used when you want to insert image into the text of items or categories. Before inserting the images directly into text filed, you need to upload the images to Media Manager by navigating to Components >> K2 >> Media Manager, in Media Manager you can create new folder to contains images, then upload images
Now you can insert the images directly into text field when you edit/add any item category. Simply click on "Image" in the bottom of the editor as shown in the picture below:
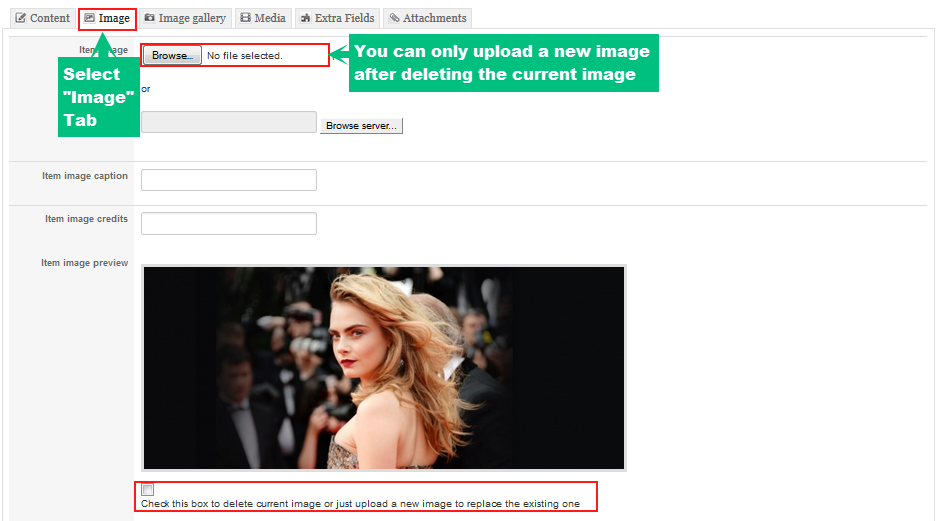
- Image Tab: as I mentioned above, Images uploaded via "Image" Tab usually represent as a main image for item or category. When uploading images via the Image Tab, you can upload directly from your computer without having to store it in any sort of Media Manager
4. Manage Categories with K2
In the administration area, go to Component >> K2 >> Categories , such like how to access to K2 Items.
You can do the followings in K2 Categories:
- Create a new categories
- Edit existing categories
- During editing/creating a categories you can change/add title, upload images into categories, etc. similar to what you've done with K2 Item
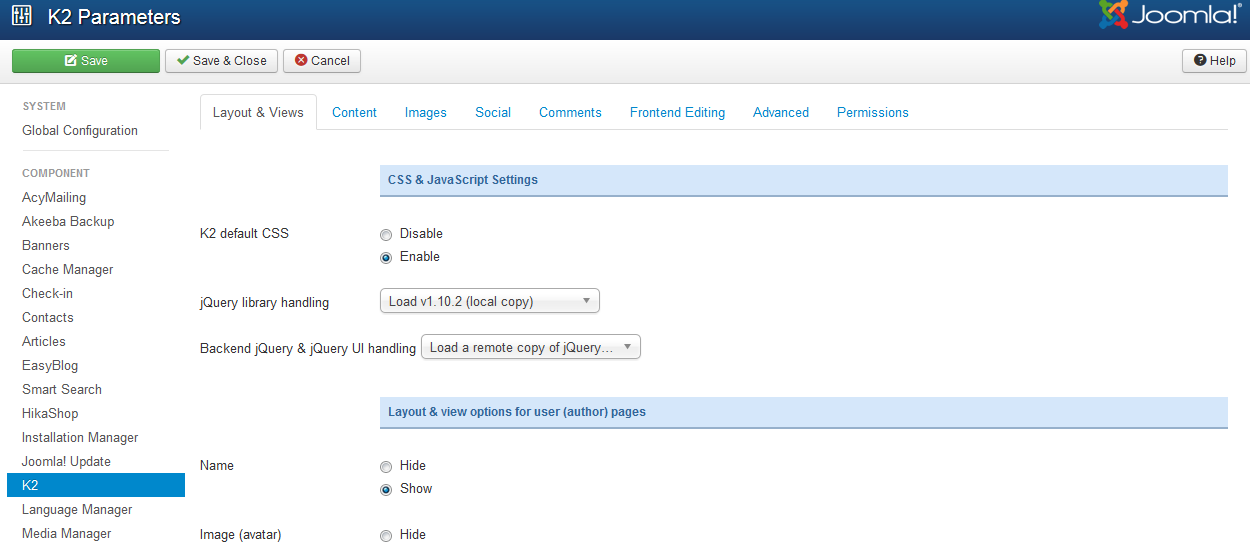
5. Global configuration
Go to System >> Global Configuration >> K2
In this section, you can see 8 tabs as you can see below
In each tab you can configure its parameters. There are so many parameters, I do not want to make you confused and tired by explaining all parameters, take it easy and find out by yourself.
6. K2 Modules
Besides K2 component, there are 5 K2 modules available for you to use: K2 Content, K2 Tools, K2 Comments, K2 User and K2 Users. All K2 modules used on JV Modern have specific setup.
Let's check K2 modules used in JV Modern Demo:
6.1 K2 Tools module
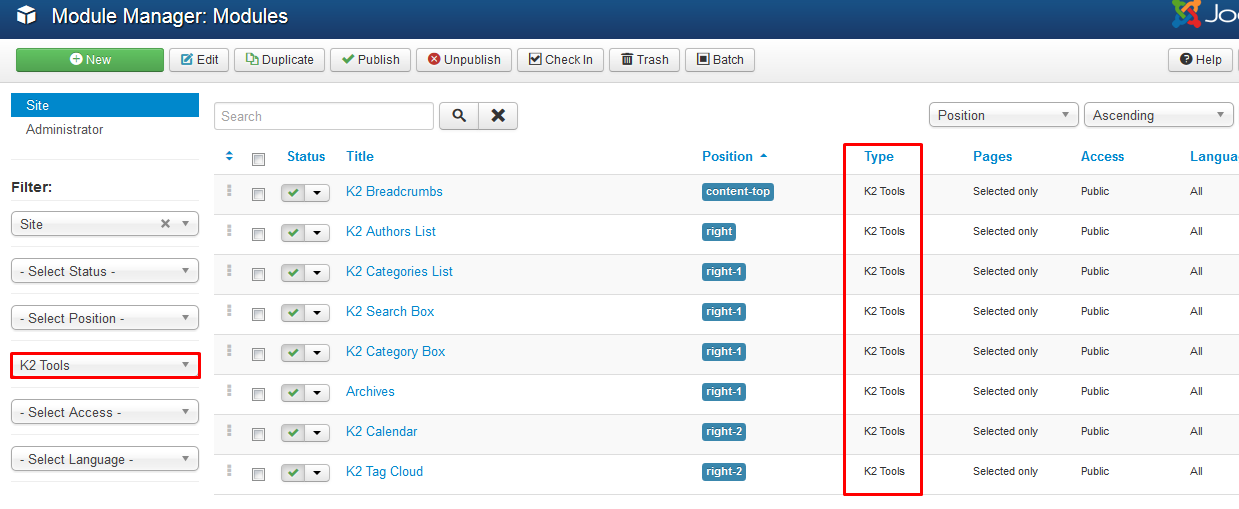
This type of module is a multi-functional module that comes with the following view options: Archive, Authors List, Blog Style Calendar, Breadcrumbs, Categories List (Menu), Category Select Box, Search Box, Tag Cloud, Custom Code. Each one of these view options is accompanied by a set of options which need to be taken into account in order to reach the desired outcome.
Listed in the image below are 8 K2 Tool modules used in our demo:
View: K2 Tools Back-end Settings
6.2 K2 Comment module
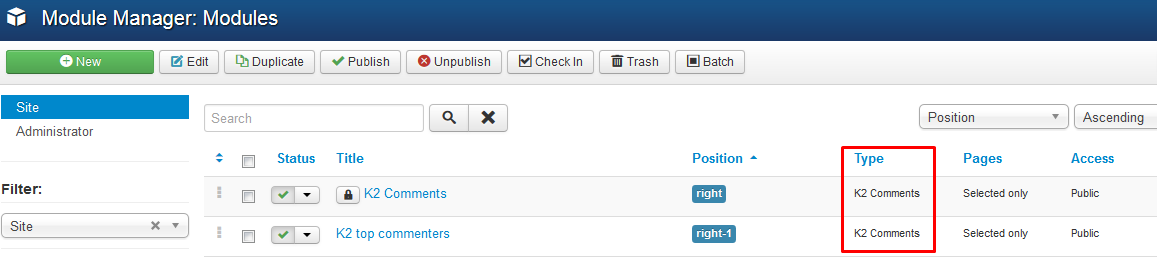
This module is used to show the Latest Comments or Top Commenters. This module, like the K2 Tools module, has options according to the chosen view.
Listed in the image below are 2 K2 Comment modules used in our demo:
View: K2 comment Back-end Settings
6.3 K2 Content module
The K2 Content module, allows a specific number of items filtered by category or specific items, to show with a specified ordering. Some of the available options for the items shown are: Title, Image, Author with author avatar and author description, Intro-text with the option of limiting the text, Tags, Category, Created Date, Read...More, Extra fields, Comment counter.
Below is K2 Content module used in our demo:

View: K2 Content Back-end Settings
6.4 K2 User module
The K2 User module is the equivalent or even better of the Joomla! Login module. Used to display a login box for users, when users are logged in the can see user toolbar, which allows them to perform tasks based on their access rights. Besides post-text, pre-text, login and logout redirections, greeting and name/username display, K2 User module also provides a text for the Greeting message, instead of a default message pre-defined, a user avatar and the option to render a Menu for the logged in users.
Below is K2 User module used in our demo:

View: K2 User Back-end Settings
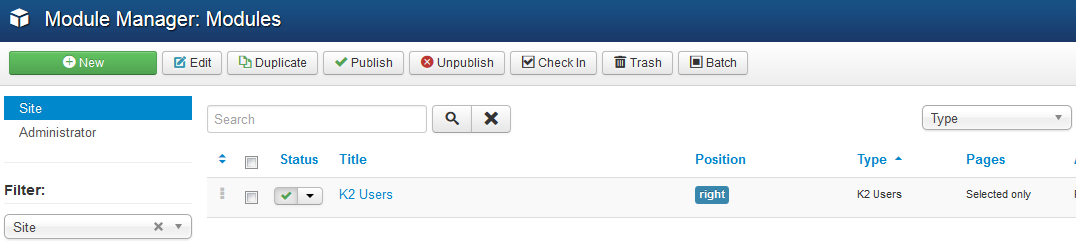
6.5 K2 Users module
This module shows all or specific number of users with their info (name, avatar, e-mail) and a number of the items they have written.
Below is K2 Users module used in our demo:
View: K2 Users Back-end Settings