Site Structure
In the next few section I will go through these steps in more details, with an eye to highlighting points particularly relevant to documentation.
Website structure refers to the framework in which the information or content of a website employs for both usability and presentation.
Below are the American Woman Artist website structure - It will show you the details of position - result in a guiline for everthing else to fall into place, as it lays the foundation to a solid navigation scheme for users and search engines.
What is a Joomla Module?
Modules are mostly blocks what you can see on your websites
You need to go to each module in admin to edit the content. >> Login to administrator, then go to Extensions >> Module Manager
Important!: There are a lots of modules, I'm going to show you where to modify modules. After accessing Module Manager, you need to know the position of modules, or you can search the module title as well, those are quickest way to find modules you're looking for.
Below are those Modules which you need to know for building your website:
I. Website Panel:
1. Register Position:
- Module Type: Module Menu.
- Menu assignment: On All Pages.
-View Backend setting:
The module in frontend:
2. Login Module:
- Module Type: Jv Login
- Menu assignment: On All Pages.
- The module in frontend:
3. Search Module:
- Module type: Module menu.
The module in frontend:
II. Content:
1. JV Slide Pro:
JV Slide Pro is an exclusive and professional extension designed by Joomlavi. When using JV Slide Pro, you can build your own unique site view. This is module that really help your website make a strong first impression. In our demo, JV Slide Pro is used for 2 modules: JV Slide Revolution Home Page and JV Slide Revolution (Index 4).
To configure the module, Navigate to Extensions >> Module Manager click on the module to edit. You will access to Module Manager: Module mod_slidepro
Slide source Settings:
The important thing is to choose slide source type in the top, you can select: Input image URL, Youtube video, Choose article, Choose K2 article, Form folder, Query articles, Query K2 articles. Each type of slide source has different image settings. In our demo we only use slide source type. Within this type, you can select main image and description image. Let's check how to set up images and description:
- Click on "Add" in the bottom to add new slide
- Image title: you can enter title for the main image
- Image path: select main image from media Manager
- Thumbnails: select thumbnails from media Manager
- Description: in this section you can insert the path of description image, change title, heading, content, Simply replace red content with your own content!
Slide Config:
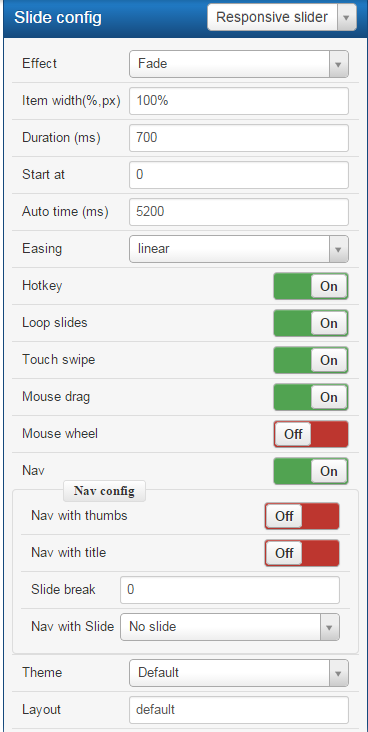
- Effect: choose one of 6 beautiful effects
- Item width (%,px): enter value for slide width (in pixel or %), default 100%
- Duration (ms): enter value for duration of time and a slide lasts
- Start at: enter a value to select which slide initialize the slideshow
- Auto time (ms): enter value for auto sliding time. set
- Easing: select easing function
- Hotkey: enable/disable arrow keyboard control
- Loop slides: enable/disable indefinite loop for slides
- Touch swipe: enable/disable slide touching function
- Mouse drag: enable/disable slide mouse drag function
- Mouse wheel: enable/disable mouse wheel to control slides
- Nav: enable/disable navigation function and buttons
- Nav with thumbs: enable/disable thumb navigation
- Nav with title: enable/disable navigation with image titles
- Slide break: set min and max slide item
- Navi with Slide: select to show navigation with slide
Related questions:
How To Change the Image Slideshows:
Step 1: Adding folders with images or Images to website album
Step 2: From the Image Menu, select "add images". Slideshow software will now include those pictures. Select those pictures that you wish to add to slideshow.
How to change the text of slide in JV Slideshow
To change the text of slide, please go to Field: JV Slide Pro >> Slide Source Box >> Change the content in the "description" field.
Let's take a look at the frontend
2. Module welcome to website:
- Module position: Home content
- Menu assignment: Main Menu >> Home
- HTML code:
<div class="welcome-awa">

<h2 class="wtitle">Welcome To Website Americanwomenartists</h2>

<div class="wdesc">American Women Artists is a non-profit organization dedicated to the inspiration, celebration, and encouragement of women in the visual fine arts.</div>
</div>
View the menu in frontend:
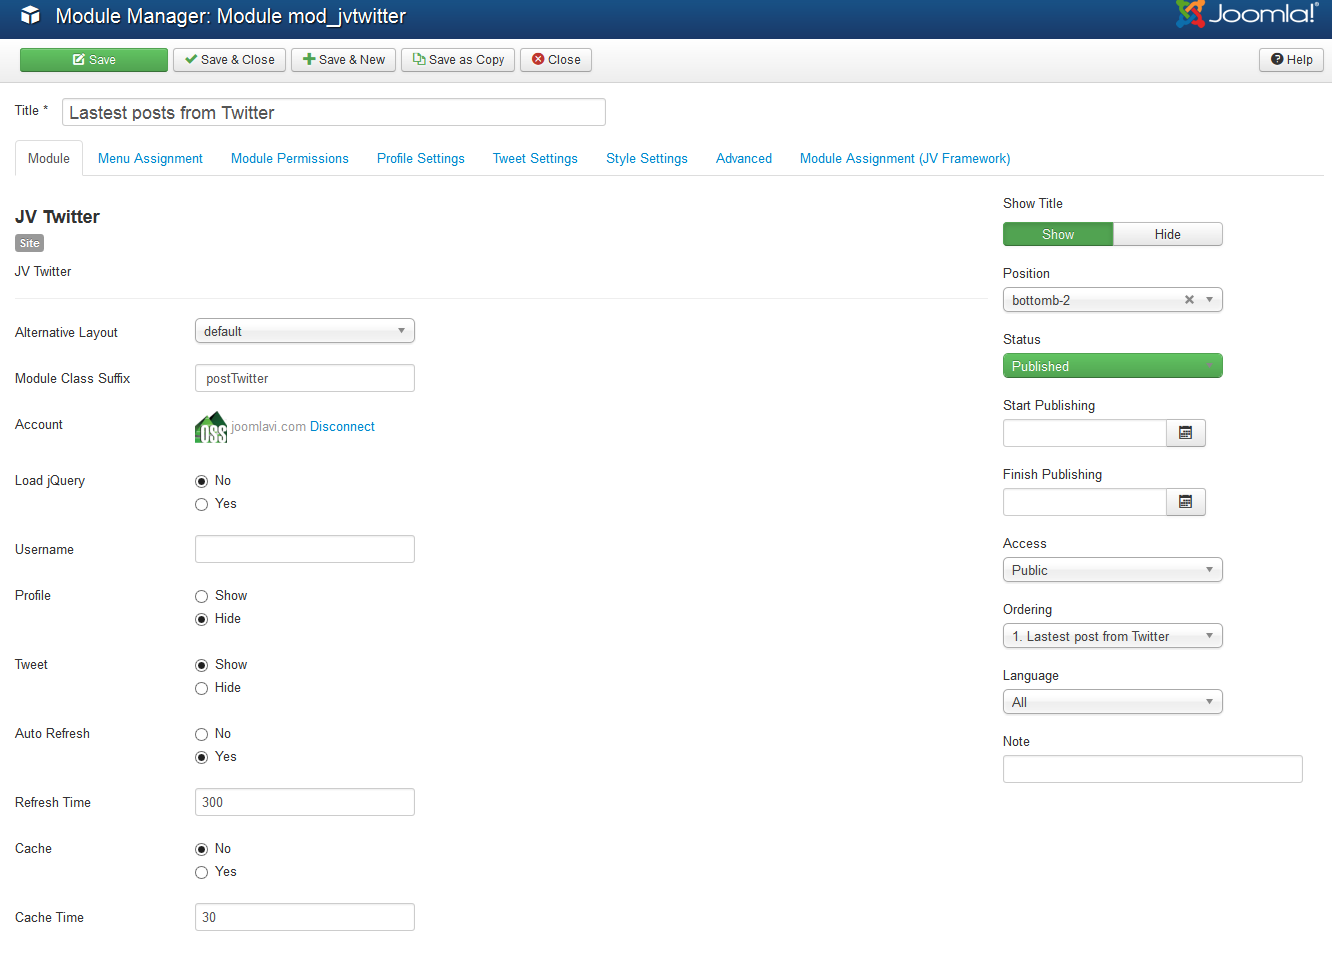
3. Module Latest Event:
In the Administration area, go to Component >> JEvents. To know more about JEvents, please read more of this documentations: https://www.jevents.net/docs/jevents
View Backend Setting:
The module in frontend:
4. K2 Content module:
The K2 Content module, allows a specific number of items filtered by category or specific items, to show with a specified ordering. Some of the available options for the items shown are: Title, Image, Author with author avatar and author description, Intro-text with the option of limiting the text, Tags, Category, Created Date, Read...More, Extra fields, Comment counter.
View K2 Content Module Backend Settings:
The module in frontend:
How to create the blog in K2 Content Module?
- Step 1: In the backend, go to Components >> K2 >> Items
- Step 2: In field select category, please choose field: Blog
- Step 3: Click button New when you want to create a new blog, then fill the suitable content + choosing suitable Image for it
Let's view the Test Blog on Frontend:
5. Quick Links Module:
- In the Administration area, go to Menu >> Quick link >> Add new menu items.
- View Backend Setting:
Menu title:: Title given to the hyperlink or form by the user who added it, or last edited it.
Link: URL link for the quicklink or form.
- Module in frontend:
6. Tucson Museum of Art Module:
You can find this module by going to Extension >> Module Manager >> And search this name.
- Module position: content-bottom
- Menu assignment: Main Menu >> Home
The Tucson Museum Of art module in frontend:
To edit the content: You need to change HTML code:
- HTML code:
<div class="feature-testimo-awa">
<p>The Tucson Museum of Art initiated the first American Women Artists exhibit in 1990, following in the annual tradition of the Prima Vera, a city wide celebration of women in the arts. In the subsequent years, AWA has reached audiences from California to Maryland to Italy and back. Now in their third decade, the acclaimed American Women Artists celebrate their commitment to art with works of high quality, original viewpoints, and enduring inspirations. Museums interested in significant 21st-century American art, how recurring themes crisscross in the lives of painters and sculptors, or the specific viewpoint of women, need look no further than an exhibition of the American Women Artists.</p>

<div><strong>Robert Knight</strong></div>

<div>Chief Executive Officer</div>

<div>Tucson Museum of Art</div>

</div>
Additional Component:
1. K2 Configuration
K2 component is a very popular and free component which helps you to control and manage site content easily. Let's view what can you do with this great extension and how to config. This part covers important and common facts you may use frequently with K2. If you need full detailed K2 document, please check our References part.
1. Installation
K2 can be easily installed on Joomla like other extension. If you are new,you may need to view the guide below
2. Manage Items with K2
From the backend area, navigate to Components >> K2 >> Items
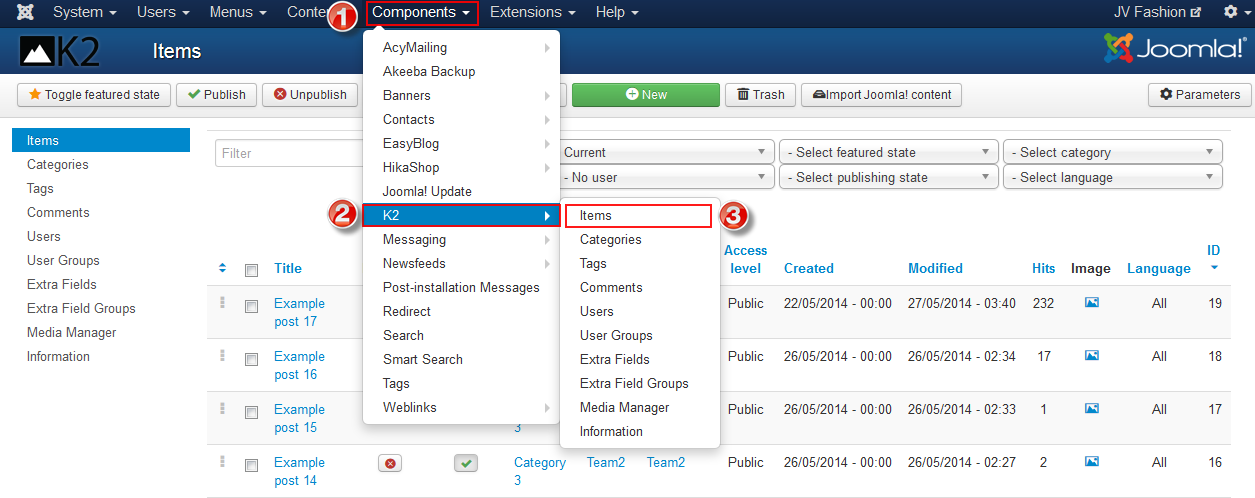
Within K2 Items you can do the followings:
- Create new K2 item: Click on "New" button in the toolbar to ad a new item
- Edit existing K2 item: Click on the item to edit that item
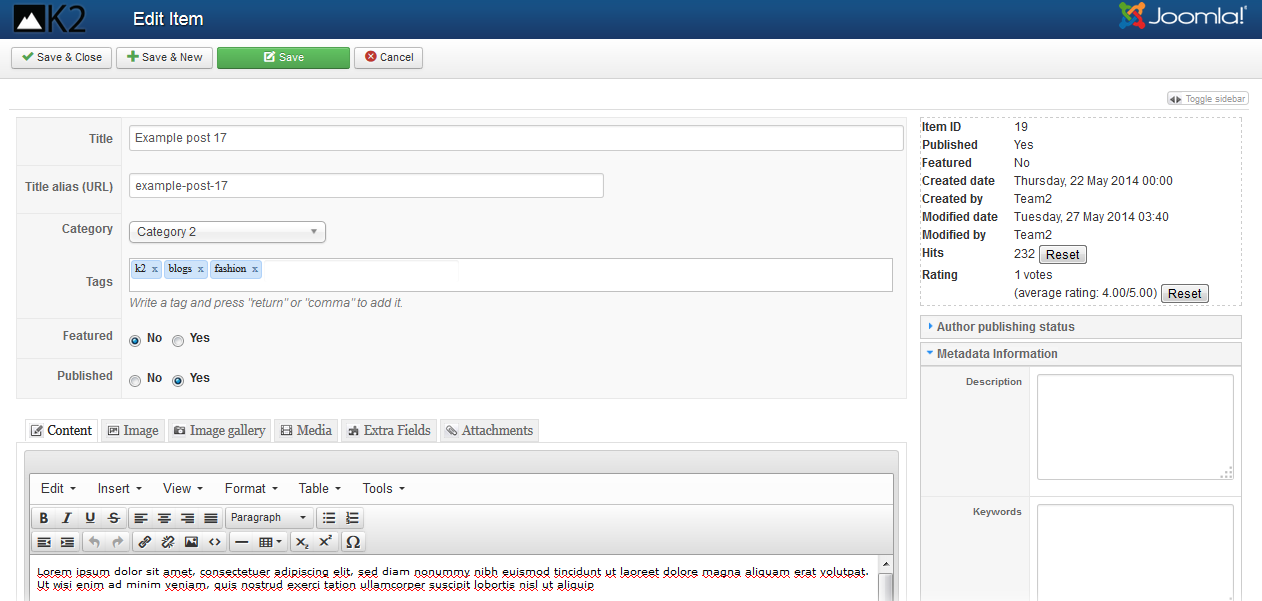
In the edit/add item page you can do important things:
- Change/add title of the item
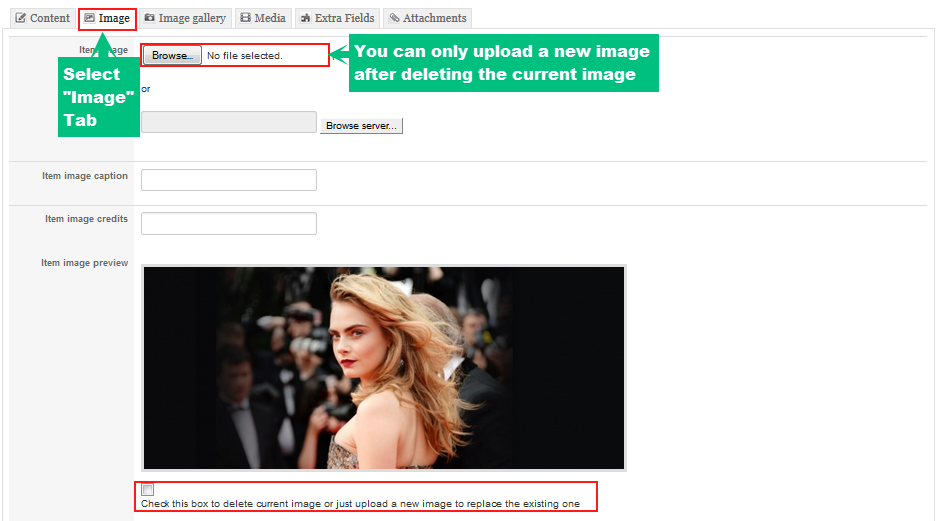
- Upload images: you can upload an image via "Image" tab
- Edit your Author publishing status: Under the "Author publishing status" drop menu in the right side of the page, you can edit many publishing features
- Optimize item for Search Engine: Under the "Meta information" drop menu in the right side of the page, you can add/edit meta description, keywords, robots, author
3. Manage images with K2
In this section you need to distinguish between Media Manager and Image Tab.
- Media Manager is used when you want to insert image into the text of items or categories. Before inserting the images directly into text filed, you need to upload the images to Media Manager by navigating to Components >> K2 >> Media Manager, in Media Manager you can create new folder to contains images, then upload images
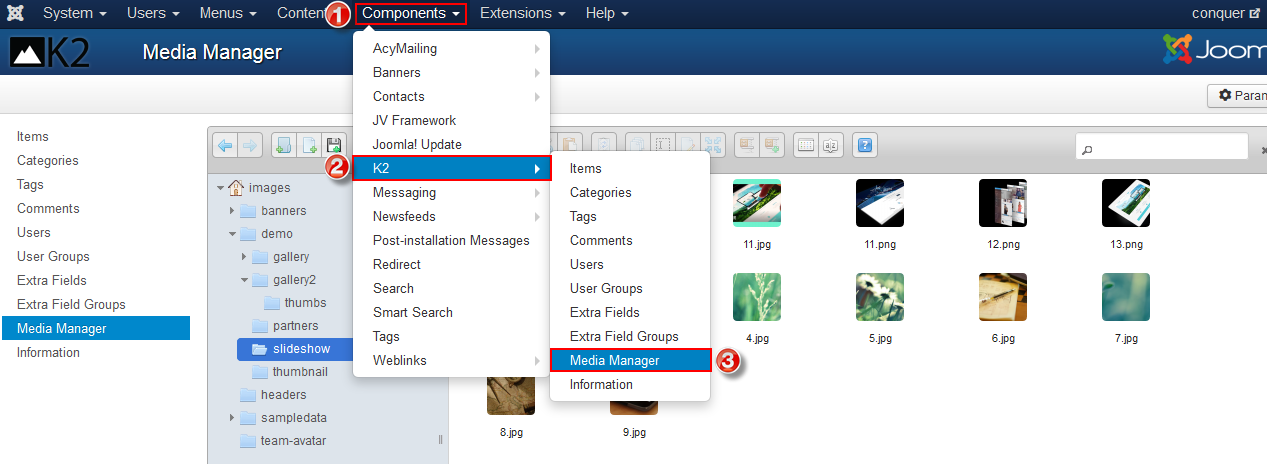
Now you can insert the images directly into text field when you edit/add any item category. Simply click on "Image" in the bottom of the editor as shown in the picture below:
- Image Tab: as I mentioned above, Images uploaded via "Image" Tab usually represent as a main image for item or category. When uploading images via the Image Tab, you can upload directly from your computer without having to store it in any sort of Media Manager
4. Manage Categories with K2
In the administration area, go to Component >> K2 >> Categories , such like how to access to K2 Items.
You can do the followings in K2 Categories:
- Create a new categories
- Edit existing categories
- During editing/creating a categories you can change/add title, upload images into categories, etc. similar to what you've done with K2 Item
5. Global configuration
Go to System >> Global Configuration >> K2
In this section, you can see 8 tabs as you can see below
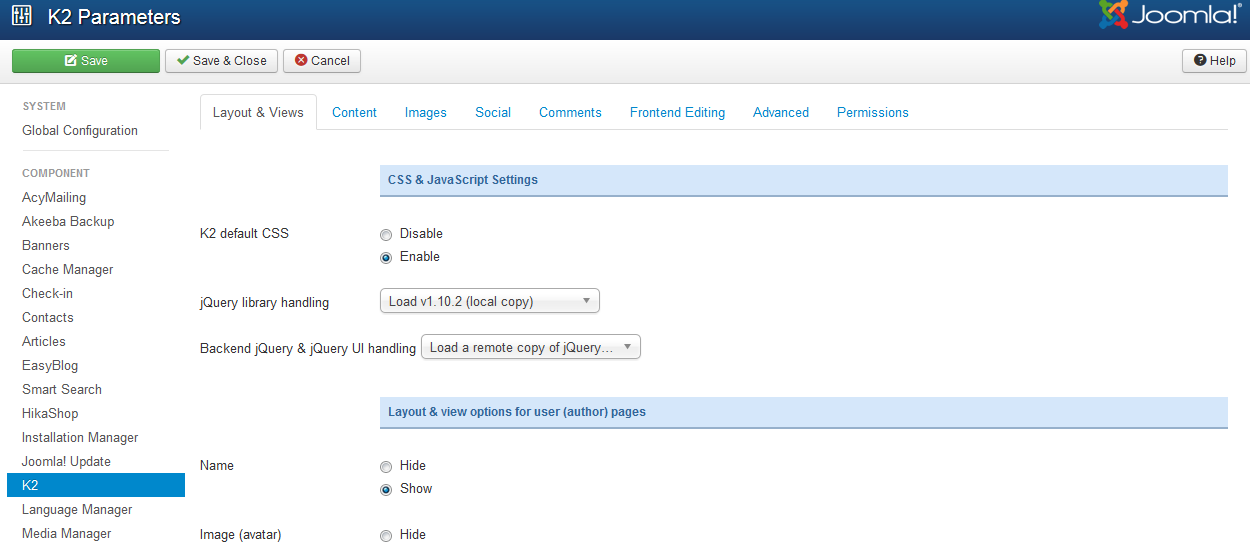
In each tab you can configure its parameters. There are so many parameters, I do not want to make you confused and tired by explaining all parameters, take it easy and find out by yourself.
6. K2 Modules
Besides K2 component, there are 5 K2 modules available for you to use: K2 Content, K2 Tools, K2 Comments, K2 User and K2 Users. All K2 modules used on JV Modern have specific setup.
Let's check K2 modules used in JV Hosting Demo:
6.1 K2 Tools module
This type of module is a multi-functional module that comes with the following view options: Archive, Authors List, Blog Style Calendar, Breadcrumbs, Categories List (Menu), Category Select Box, Search Box, Tag Cloud, Custom Code. Each one of these view options is accompanied by a set of options which need to be taken into account in order to reach the desired outcome.
Listed in the image below are 8 K2 Tool modules used in our demo:
View: K2 Tools Back-end Settings
6.2 K2 Comment module
This module is used to show the Latest Comments or Top Commenters. This module, like the K2 Tools module, has options according to the chosen view.
Listed in the image below are 2 K2 Comment modules used in our demo:
FREQUENTLY ASKED Questions
All Gurus once were Newbies, so this section is to answer the most common questions in template configuration for those who are new to Joomla.
1. How to change favicon for Joomla site?
If you install quickstart package, you will need to change the favicon.
To change favicon, take the following steps:
Step 1: Create a 16x16 pixel image.
Step 2: Name the image favicon.ico , so you have your own favicon.
Step 3: Replace the exsiting favicon.ico file with your own file favicon.ico to /<your joomla>/templates/<your template> directory .
During this step, you should use FTP application to log into your server. There are number of both free and commercial FTP application. In this example, I choose FileZilla.
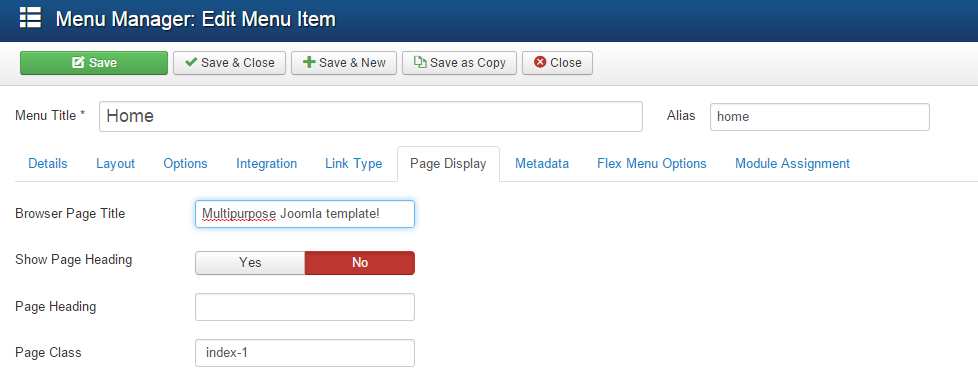
2.How to change browser title page?
This is a sample browser page title:
In the above sample, that is the browser page title for the Home Version 2 menu item. Please go to Menu Manager and open that menu item. Open the Page Display section. Specify Browser page title. Save changes. You can do the same for all menu items.
