Introduction
JV Conquer is a full responsive Joomla template dedicated for Art Companies & Businesses, but you can alter this beautiful template to make it suitable for anything else. This template is going flat and clean with a sensible layout structure. It supports the powerful Joomla content component - K2 component, RTL language layout, Bootstrap. JV Conquer is built on the powerful JV Framework making it easy to customize.
JV Conquer is also built from professional and easy to use extensions including: JV Slide Pro, JV Contact, JV Latest News, JV Hotnews… Those JV extensions are popular and trusted by Joomla folks from across the globe.
1. Features
 Fully responsive
 100% table-less design, HTML5 & CSS3
 Bootstrap integration
 Joomla 3x support
 RTL support
 4 Preset colors
 Typography and various module variations
 Mega Menu
 Beautiful slideshow effects
 Fonts icomon
2. JV and third party extensions supported
 JV Slide Pro
 JV Contact
 JV Facelinker
 JV Latest News
 JV HotNews
 Acymailing
 K2
K2
3. Supported pages
 Login page
 Registration page
 User Profile page
 Search page
 404 page
 Gallery page
 FQA page
 Pricing page
 Meet team page
 Categories page
 Item page
 Tag page
 User page
3. Module positions
As you know, each Joomla module must be placed in a module position. All module positions are specified by the template structure. It's very useful to understand the structure of the template.
You can also find module positions on the demo of the JV Conquer template. Visit JV Conquer demo, go to Explore >> Page >> Module positions
View: module positions
References
This guide is not intended to cover everything about a Joomla and third party configuration. As you know, Joomla! and third party extension configuration knowledge is extremely wide, so you can refer following link to view more details:
 Joomla FAQs
 Video Tutorials
 Joomla! Forum
 Joomla! 3.x Installation guide
 Joomla! default Modules
 Technical requirements
 Menu management in Joomla 3.x
 Acymailing configuration guide
 K2 Documentation
System requirements
1. Browser compatibility
JV Conquer was tested to be ready for seamless display on the following web browsers
 Firefox 4+
 IE (Internet Explorer) 8+
 Google Chrome 14+
 Opera 12+
 Safari 5+
2. Joomla 3 requirements
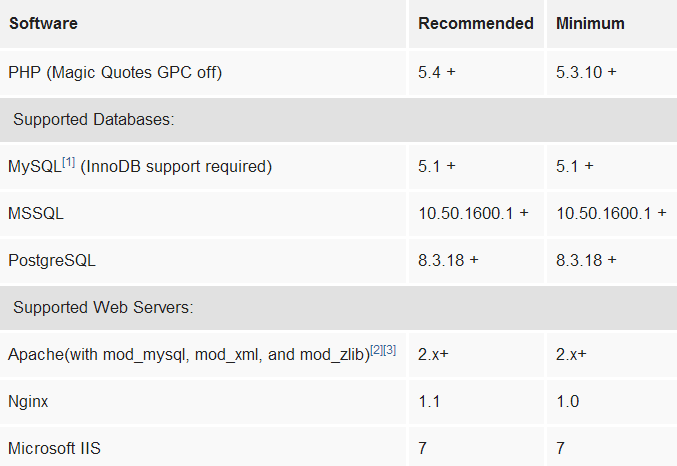
3. Development requirement
We recommend you using Localhost for development process. The following servers are preferred:
Windows:
 WAMP
WAMP
 XAMPP for windows
Linux:
 LAMP Buddle
 XAMPP for Linux
Download & Installation
To get privilege to download JV Conquer you need to sign up for a membership account
Log into your account and visit JV Conquer page, click on download button to JV Conquer download page
If you are new to Joomla! or planing to create a completely new Joomla site which replicates JV Conquer Demo, download quickstart package and then get started to install the quickstart as shown below
If you've already had an existing Joomla! site or experienced in Joomla!, download template, JV Framework 3.2 and extensions and then install on your Joomla site.
1. Quickstart Installation
Once you have the quickstart package downloaded on your computer you can proceed to installation process.
Choosing quickstart package to install helps you create an entire Joomla site site which includes Joomla! CSM, JV Conquer templates, JV extensions, sample articles, default Joomla! modules . This installation procedure is a perfect choice for those who are new to Joomla!. Following our guide can help you create your own site without much knowledge in programming!
After finishing this quickstart installation, you only need to edit or add text, logo, product images and information, menu, new articles... in the back-end administrative area.
Please refer to the following guide to learn how to install quickstart package.
2. Install JV Conquer on your existing Joomla site
Once you download JV Conquer template, JV Framework 3.2 and extensions. You can install them on your Joomla site, and then add new default Joomla! and custom HTML modules to your site.
Note: please view the next section to know how to configure the default Joomla! and custom HTML modules.
To build your site like JV Conquer Demo, take the following steps:
✔ Step 1: Install JV Framework 3.2 component by selecting Extensions >> Extension Manager, browse JV Framework 3.2 zip package and click upload and install as shown in the picture below:

✔ Step 2: By the same way, install JV Conquer template and other extensions on your Joomla!
Please view the following guide to know how to install new extensions (template, components, module, plugin) on your current Joomla site.
✔ Step 3 Once you have JV Conquer Template installed. Go to Extensions >> Template Manager, set JV Conquer as default for front-end

✔ Step 4: Add new default Joomla! modules and custom HTML module used in JV Conquer demo.
✔ Step 5: Style, customize template and configure extensions and modules as you will see in next parts
Template Customization
You can manage the template by navigating to Extensions >> Template Manager
Click on the name of the template in the Style column to edit style with our powerful JV Framework 3.2
Click on the name of the template in the Template column to edit core files
Styles column refers to changing the available parameters of a template, such as color, font-color, logo, etc. These are dependent on the parameters a template maker made available and are a convenience for quick changes. Template - column refers to editing the actual template files.
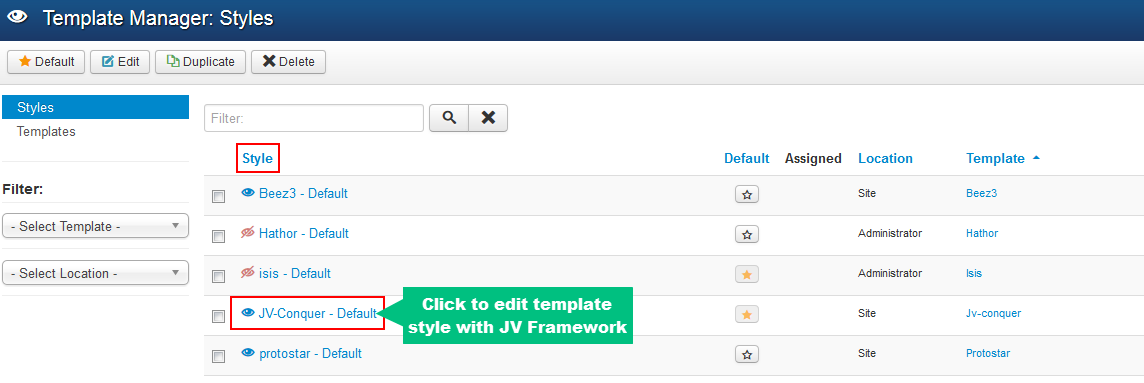
1. Edit Style
Accessing to Edit Style you can edit JV Conquer style with JV Framework 3.2. This area includes 10 tabs: Overview, Global, Google Fonts, Style, Megamenu, Grid Layout, Extension, Custom JS, Related Article, Assign. You can reset all settings to default by click on "Reset to default" in the top right corner. Now we will go to each tab to find out more
1.1. GLOBAL
This tab contains a collection of general parameters that affect the entire site.
The sets of parameters that can be found in this tab are:
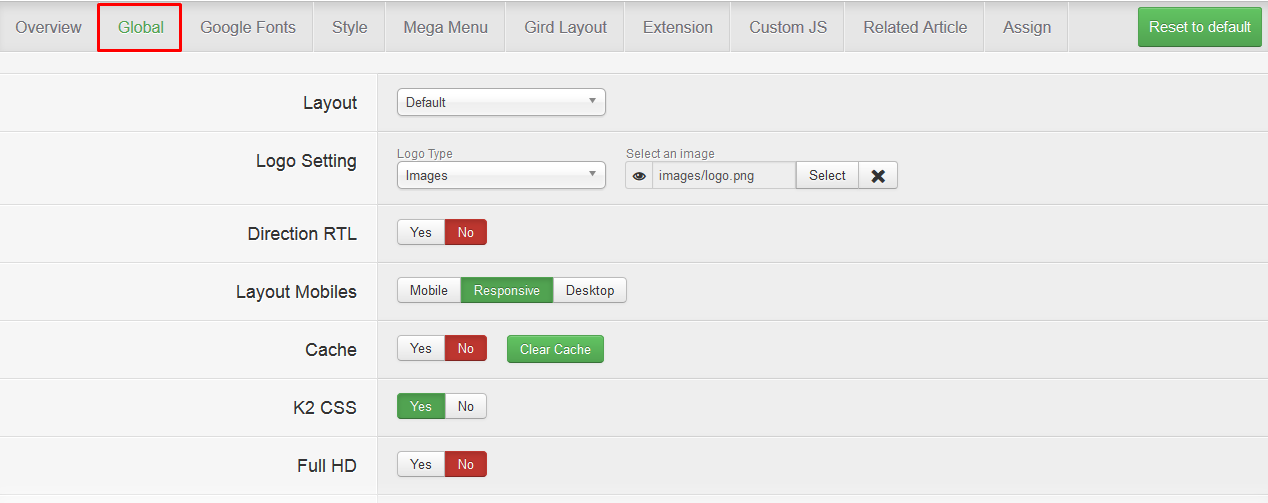
- Layout: Select layout for the template ( default/Left-Right-Main/Main-Left-Right/Mobile).
- Logo Setting: choose logo type (images/type). You can upload your own logo, add Logo text, slogan
- Direction RTL: enable/disable RTL mode
- Layout Mobiles: Allow you to select the type of layout that will be used when accessed from a mobile device
- Full HD: Enable/disable Full HD mode.
- Cache: This is where you enable/disable the cache function for JV Framework’s extensions or clear the cache.
- Compression: Allow you to optimize the site performance by utilizing various types of compression.
- Go to top: Enable/disable Go to top button
- Copyright: Allow you to enable/disable and modify copyright information.
1.2. GOOGLE FONT
In this tab, you can easily apply google font to your contents.
Click add, the choose a font type, then assign the font type to selectors as you can see below:

1.3. STYLE
This tab allows you to set/customize template color.
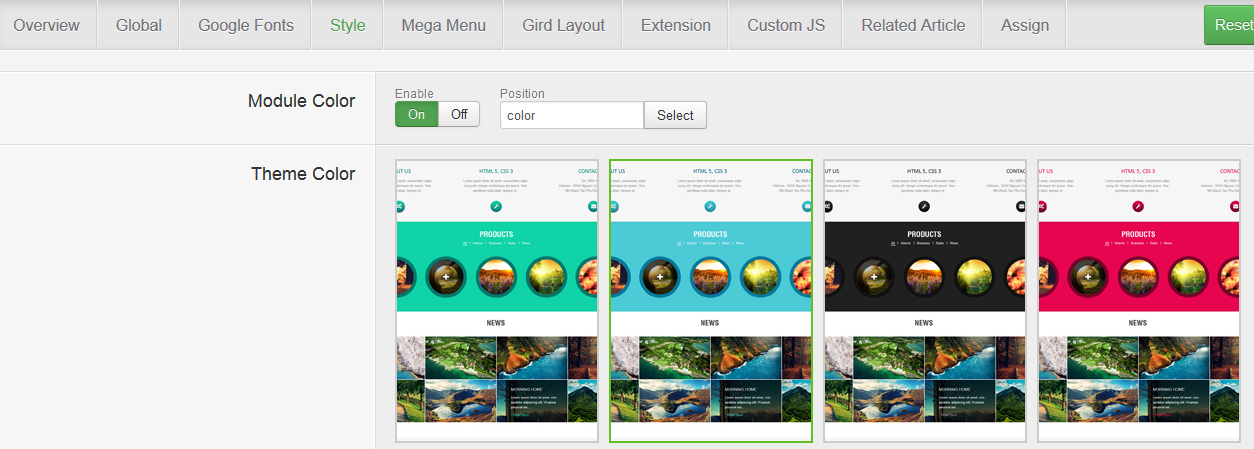
- Module color: you can select whether to show 4 preset colors in specific for front-end user to choose (you should turn it off this mode because you should be the only one to preset the entire theme color)
- Theme color: simply select a theme color
- Custom color: enable/disable custom theme color mode
- Custom theme color:
If enabled, you can easily add your own color to classes, ids, heading, paragraph... Simply edit colors with color box and assign selector: background or border or color. You can also edit classes, ids... in the Custom Css box
Click "on add new Custom color" to add and style new classes, ids...
1.4. MEGA MENU
This tab allows the user to configure the Megamenu and their sub-menus used in JV Conquer, as well as the menu responsive

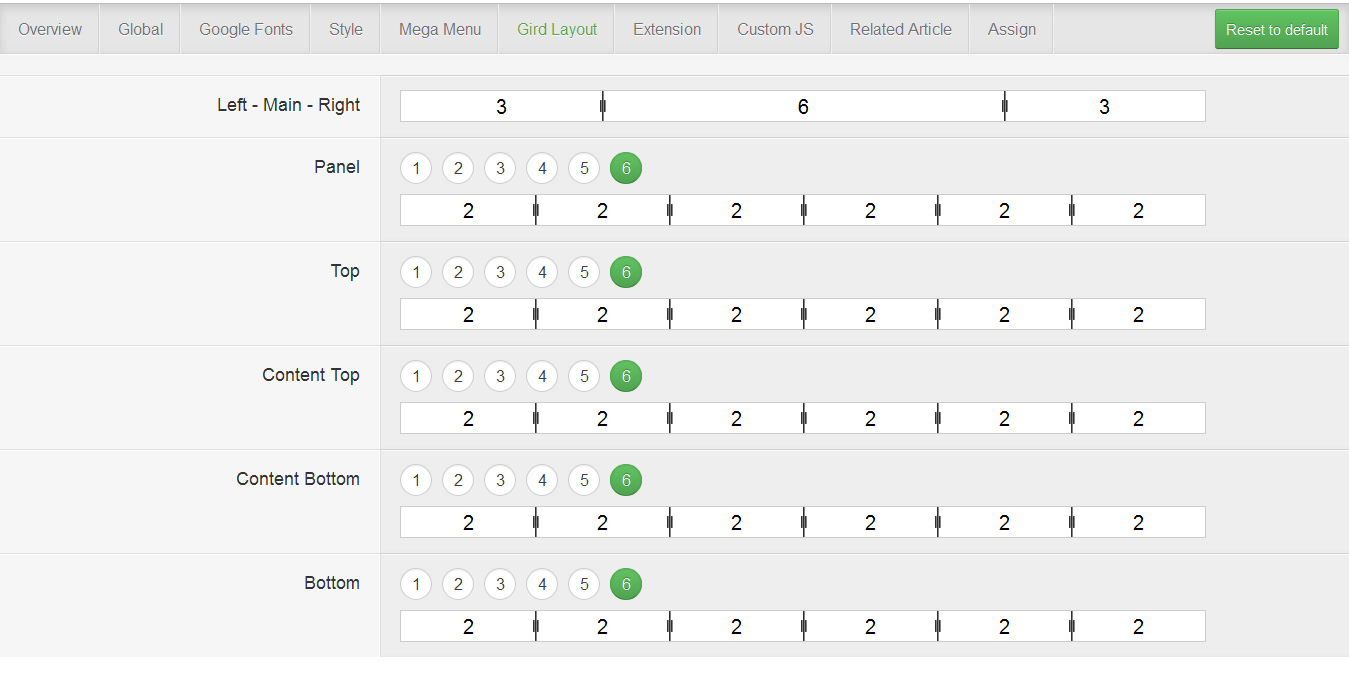
1.5. GRID LAYOUT
This tab allows you to adjust the size ratio of the grid layout.
1.6. EXTENSION
This tabs contains several sets of parameters that enhance or support the Framework .
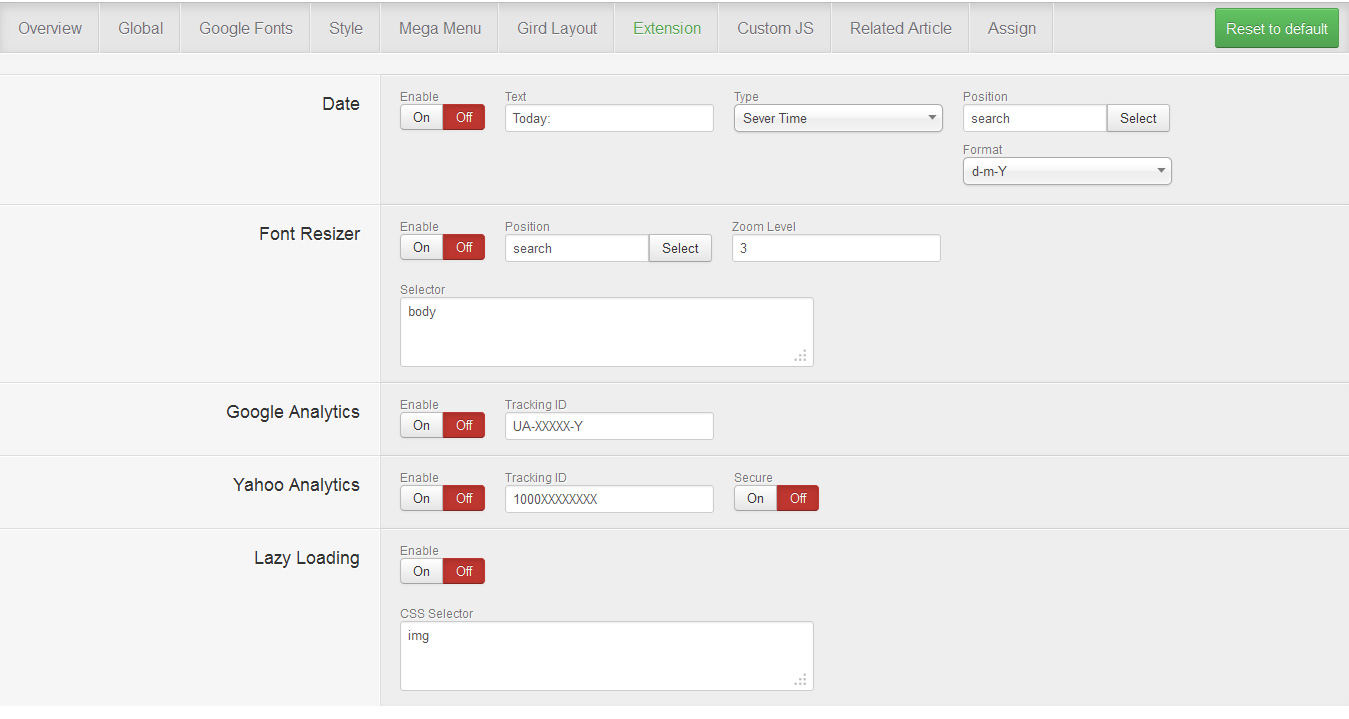
- Date: enable/disable the date indicator, as well as configure it.
- Font Resizer: enable/disable the font resizer.
- Google Analytics: enable/disable Google Analytic.
- Yahoo Analytics: enable/disable Yahoo Analytic.
- Lazy Loading: enable/disable lazy loading mode.
1.7. CUSTOM JS
This is where you can add custom JS to certain part of the site using class or id.

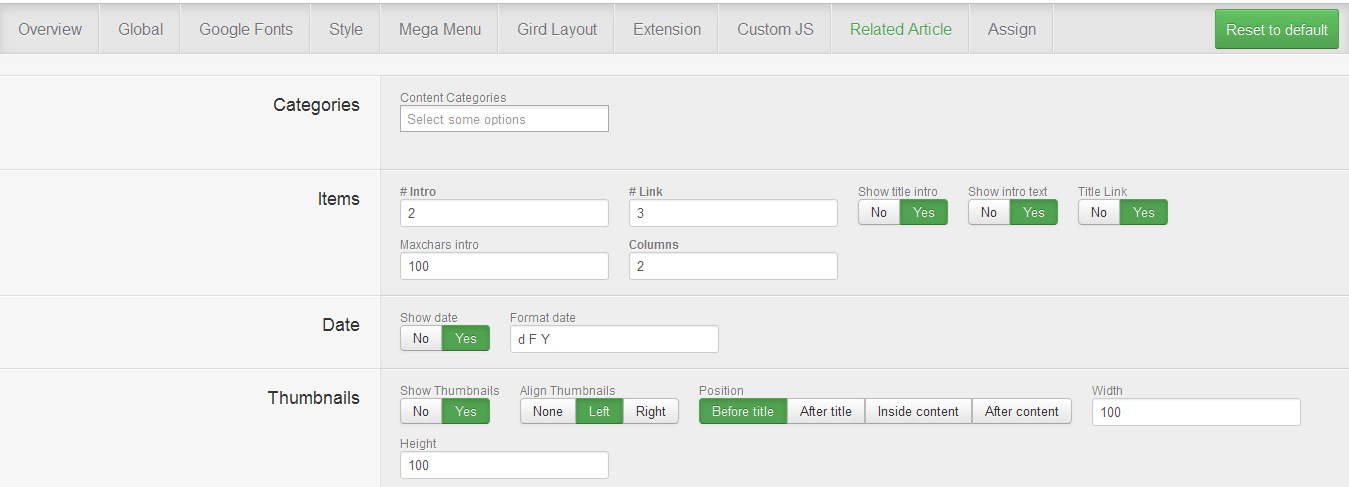
1.8. RELATED ARTICLE
This tab allows you to configure the Related Article features (show related article underneath the one being read).
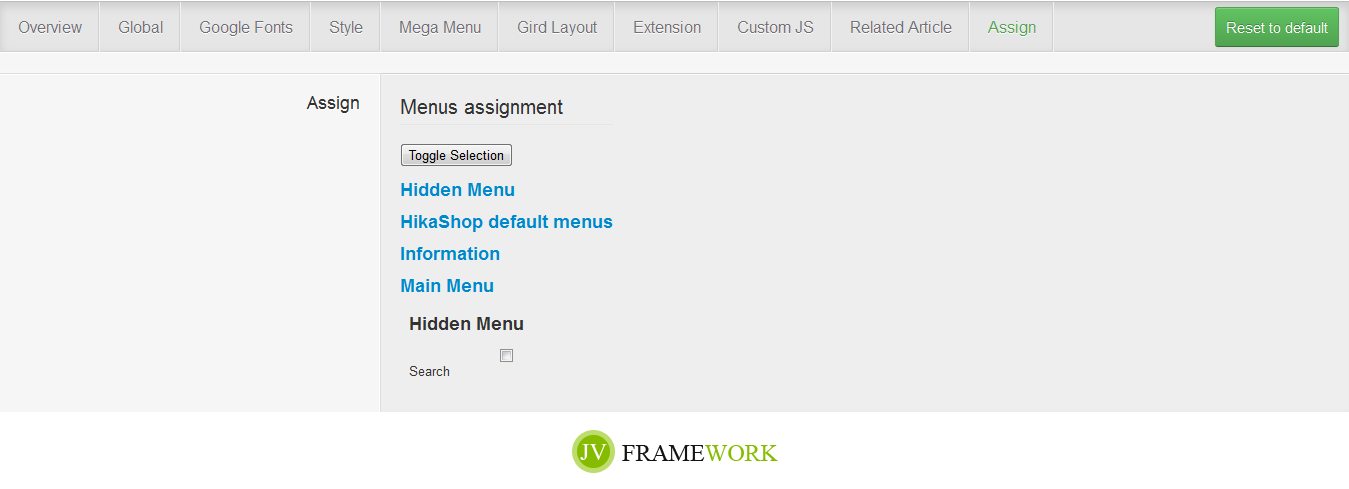
1.9. ASSIGN
If this style is not the default one, this is where you can assign which page will utilize this style instead of the default style.

2. Customize template
Joomla! gives you great feature to edit files directly on web browser by clicking on template title in the right-side template column. If you are familiar with HTML and CSS, this feature may help you.

Click any file and you'll be able to edit it directly in the browser.
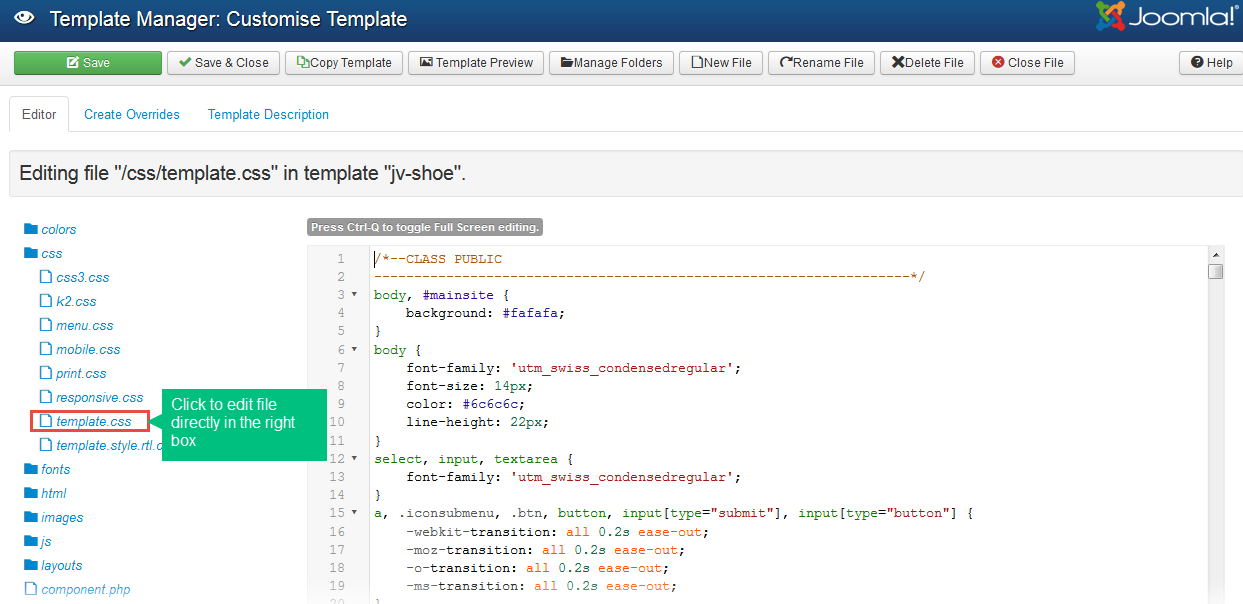
template.css file is an important file that contains entire template styling. This the biggest css file containing all the template styling. For your easy to find and edit code quickly, the file is arranged into the main segments:
2.2 Website/page title configuration
You also need to change website or page titles of your site, these are important and critical for SEO

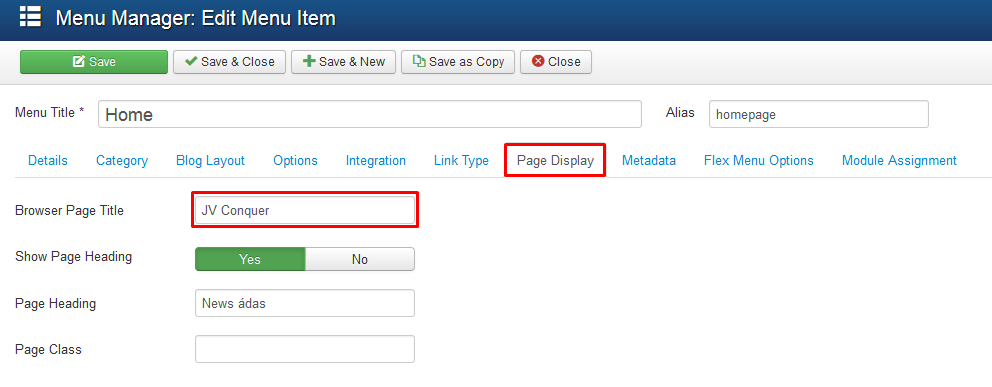
In order to change website/page/menu item title, take the following steps:
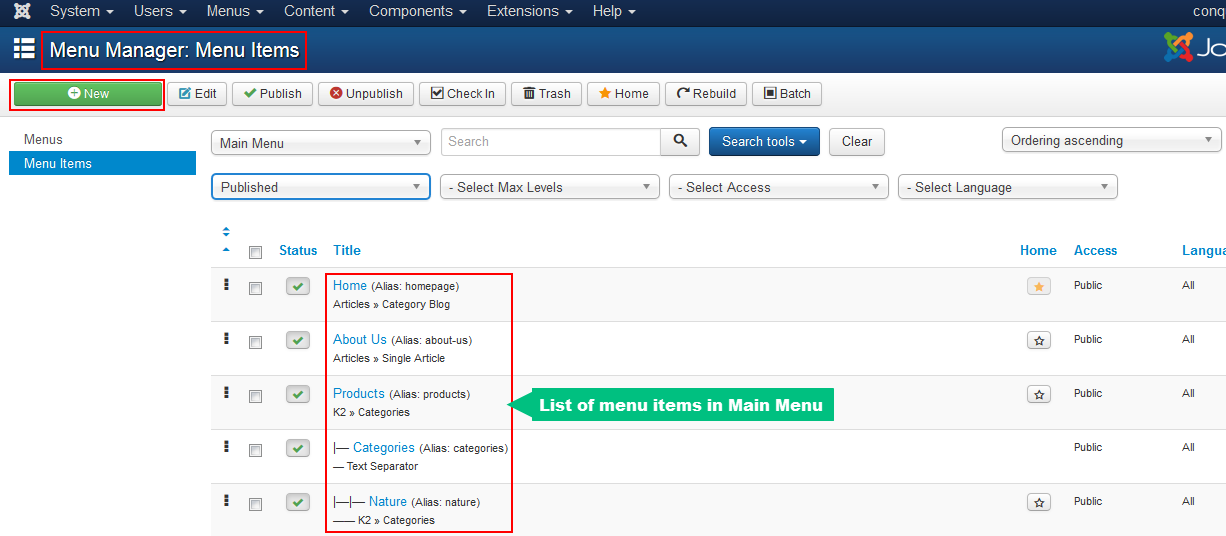
Step 1: Go go Menus >> Menu Manager in back-end admin panel, then select a menu.
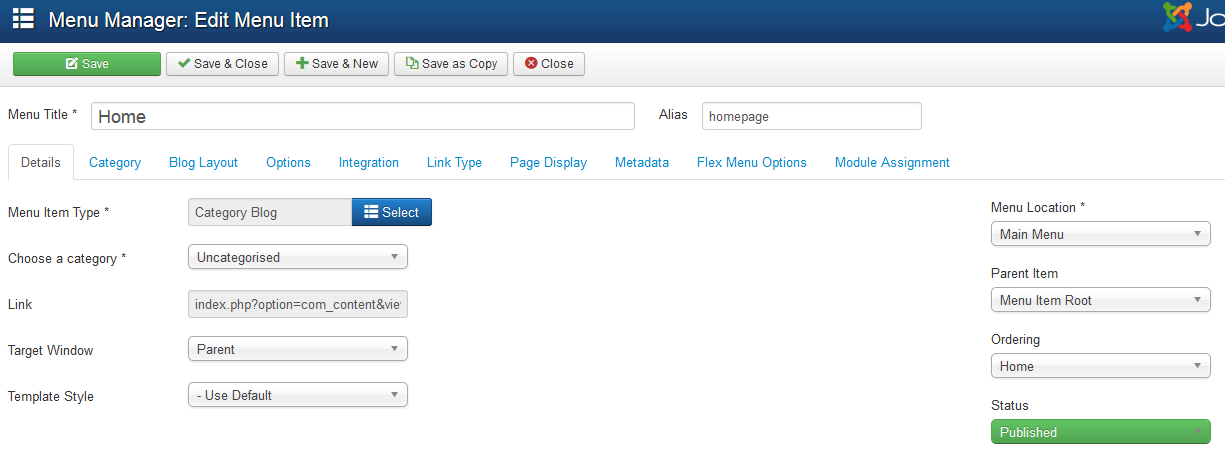
Step 2: In Menu Manager: Menu Items, Click on any Menu Item representing for specific page that you would like to change the title. (In this example I choose the Menu Item Home, which stands for the website
Step 3: In the Edit Menu Item page, choose tab Page Display, then add title for the Menu Item
2.3 Changing Favicon
Favicons are the small 16x16 pixel pictures you see beside some Webpage title in your browser.
![]()
To change favicon, take the following steps:
Step 1: Create a 16x16 pixel image
Step 2: Name the image favicon.ico , now you have your own favicon
Step 3: Copy the file to /<your joomla>/templates/jvconquer directory .
During this step, you should use FTP application to log into your server. There are number of both free and commercial FTP application. In this example, I choose FileZilla.
On you web server, open htdocs or public_html directory, then select where your Joomla has been previously installed
Scroll down to the template directory, double click to open it,
Continue to open jvconquer directory
Replace the exsiting favicon.ico file in jvconqure directory with your own file
![]()
JV Extensions
In this part, you are going to see JV Extensions used in JV Conquer including: JV Slide Pro, JV Contact, JV Facelinker, JV Latest News, JV HotNews.
When you configure JV Extension or any modules, to make sure the module display on front-end, do not forget to:
- Select position for the module (in Module Manager: tab Module)
- Publish the module (in Module Manager: tab Module)
- Assign the module to specific pages/menu items (in Module Manager: tab Menu Assignment):
1. JV Slide Pro
JV Slide Pro is an exclusive and professional extension designed by Joomlavi, It's not a free extension but will be included when you download JV Conquer.
You need to install Slide Pro extension and jvjquerylib plug-intogether. These packages can be found in JV Conquer package.
To configure the module, Navigate to Extensions >> Module Manager click on module Slide Pro. You will access to Module Manager: Module mod_slidepro
Slide source Settings:
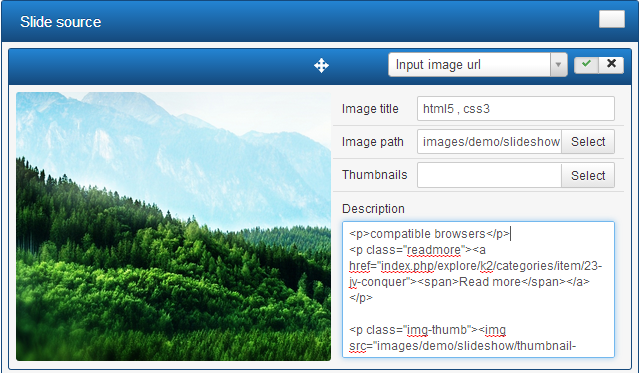
Click on "Add" in the bottom to add new slide
The important thing is to choose slide source type in the top, you can select: Input image URL, Youtube video, Choose article, Choose K2 article, Form folder, Query articles, Query K2 articles. Each type of slide source has different image settings. In our demo we only use slide source type. Within this type, you can select main image and description image. Let's check how to set up images and description:
- Image title: add title for the main image
- Image path: select main image from media Manager
- Thumbnails: select thumbnails from media Manager
- Description: in this section you can insert the path of description image, change title, heading, content, Simply replace red field with your own content!
- <p>compatible browsers</p>
- <p class="readmore"><a href="/index.php/explore/k2/categories/item/23-jv-conquer"><span>Read more</span></a></p>
- <p class="img-thumb"><img src="/images/demo/slideshow/thumbnail-1.png" alt="slide 1"></p>
Parameter explanations:
- Effect: choose one of 6 beautiful effects
- Item width (%,px): enter value for slide width ( in pixel or % ), default 100%
- Duration (ms): enter value for duration of time a slide lasts
- Start at: enter a value to select which slide initialize the slideshow
- Auto time (ms): enter value for auto sliding time. set 0 to disable auto play
- Easing: select easing function
- Hotkey: enable/disable arrow keyboard control
- Loop slides: enable/disable indefinite loop for slides
- Touch swipe: enable/disable slide touching function
- Mouse drag: enable/disable slide mouse drag function
- Mouse wheel: enable/disable mouse wheel to control slides
- Nav: enable/disable navigation function and buttons
- Nav with thumbs: enable/disable thumb navigation
- Nav with title: enable/disable navigation with image titles
- Slide break: set min and max slide item
- Navi with Slide: select to show navigation with slide
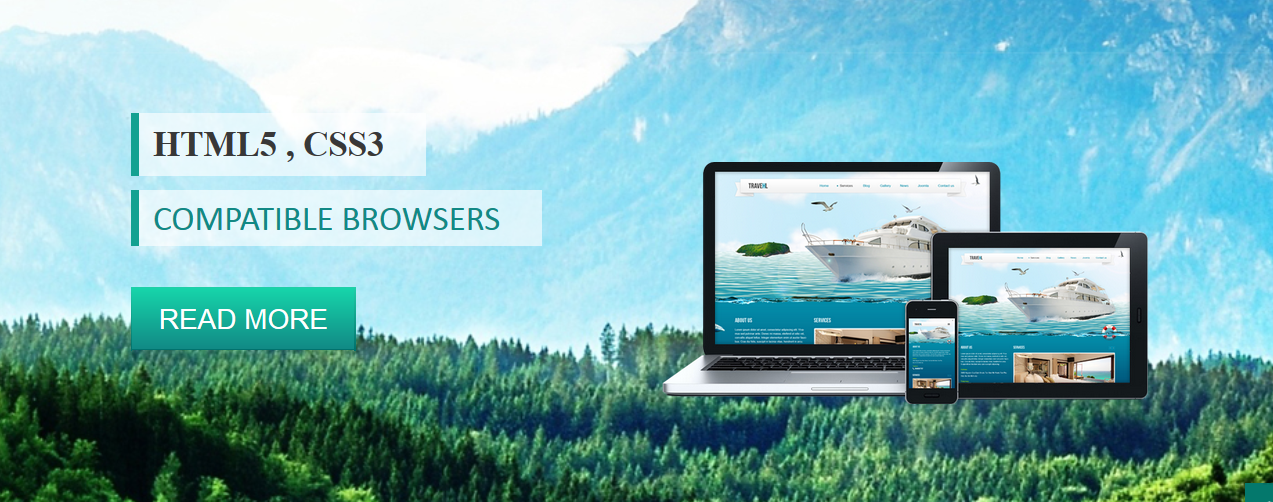
Module Slide Pro in Front-end:
2. JV Contact
You may need view JV Contact docs to know how to config the parameters
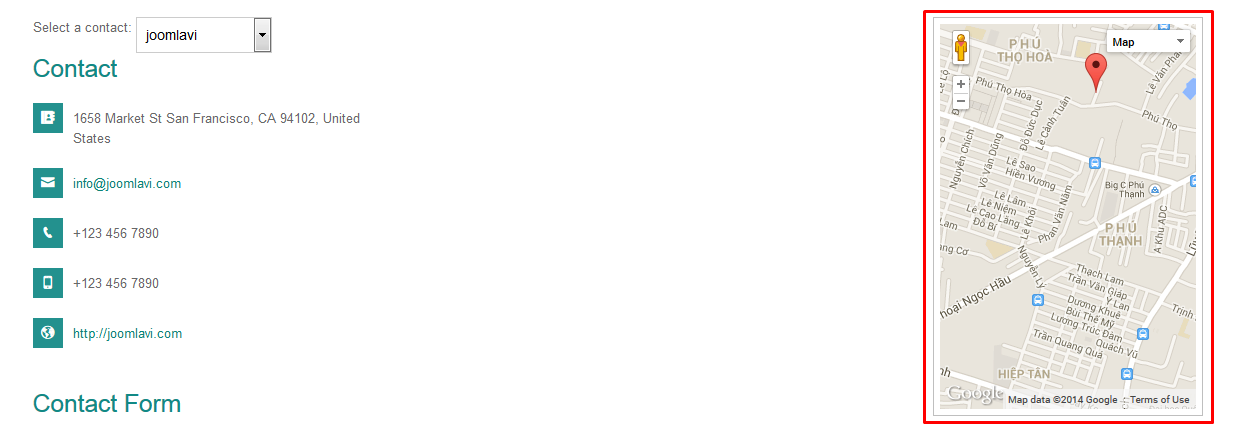
In JV Contact, we use JV Contact for 3 modules: contact us, map contact page, about us
2.1. Contact us
Main settings:
- Module position: bottomb-4
- Menu assignment: on all pages
- Module title: Contact us

2.2. About us
Main settings:
- Module position: bottomb-1
- Menu assignment: on all pages
- Module title: About us

2.3. Map contact page
Main settings
- Module position: right
- Menu assignment: only on contact page
- Module title: Map contact page
3. JV Facelinker
- Module position: right
- Menu assignment: only on pages selected

4. JV Latest News
This is an exclusive extension develop by Joomlavi. This professional and easy to use module is only included in template package.
JV Latest News is used for 7 modules in JV Conquer including: Blogs, News, Interior Products, Business Products, Nature Products, All Products, News.
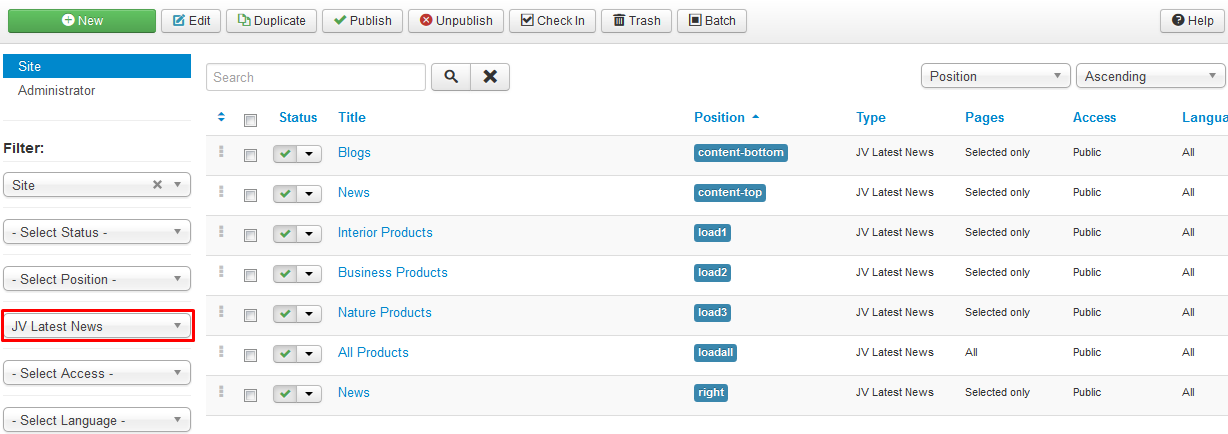
Now let's go inside each module.
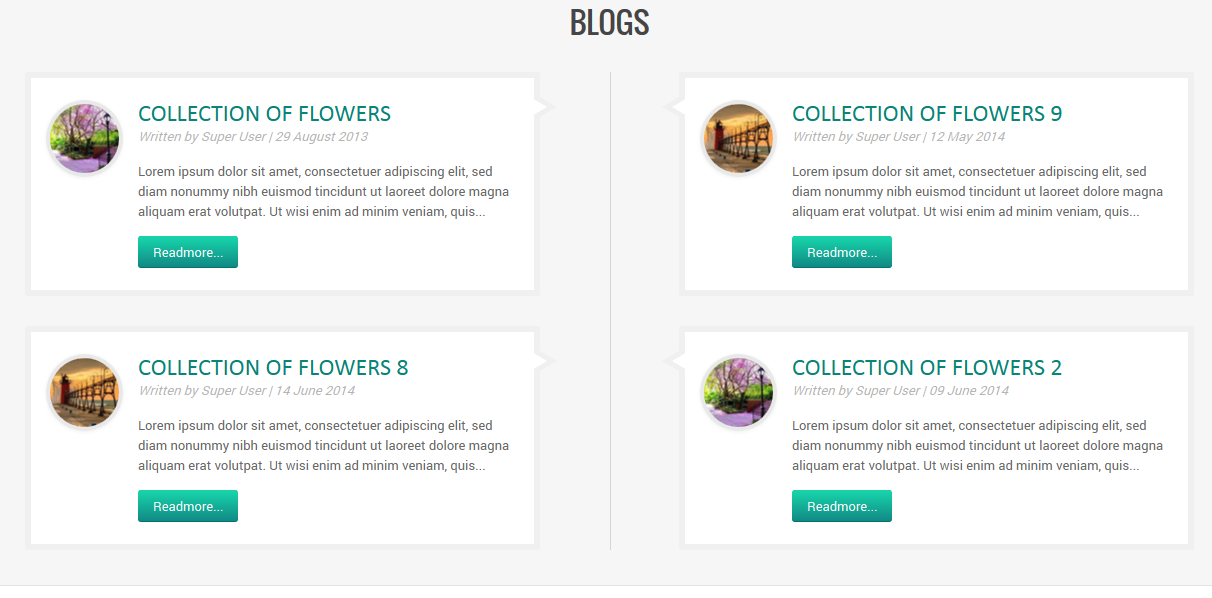
4.1. Blogs
- Module position: content-bottom
- Module Class: jvconquer
- Alternative layout: HomeBlog
View: Module settings
4.2. News
- Module position: content-top
- Menu Assignment: home page
- Module Class suffix: jvconquer
- Alternative Layout: HomeNews
View: Module settings

4.3. All Products, Interior Products, Business Products, Nature Products,
These modules are loaded in module Products (custom HTML) and configured the same except positions and categories:
- Module position: loadall, load1, load2, load3
- Module Class: not used
- Menu assignment: Home page
- Alternative Layout: HomeProduct
View: Module Settings

4.4. News
- Module position: right
- Module Class: not used
- Menu assignment: only on pages selected
- Alternative Layout: SidebarNews
View: Module settings

5. HotNews
- Module position: breadcrumbs
- Menu assignment: only pages selected
View: Module Settings

Custom HTML Modules
The custom HTML module is one of the default modules for Joomla! It is designed to contain any valid HTML code. There are many cases where you might want to put free-form HTML inside a web page. The Custom HTML Module allows you to create a self-contained HTML unit and then put it in any valid location on a page.
Create or a new Custom HTML module
If you manually install JV Conquer, you need to create custom HTML module, to make your site look like our demo, simply use our code in each module and change into your own content
Like the way you create a new Joomla! default module. To 'add' a new Custom HTML module, navigate to Extensions >> Module Manager
Click the 'New' button

Click on Custom HTML in the modal popup window.

Editing existing Custom HTML modules
If you install JV Conquer quickstart, you need to edit these custom HTML modules, we have built the code in each modules, all you need to do is change links, images, content... to create your real own site!
To 'Edit' an existing Custom HTML module, in the Module Manager click on the Custom HTML Module's Title or click the Custom HTML module's check box and then click the Edit button in the Toolbar.
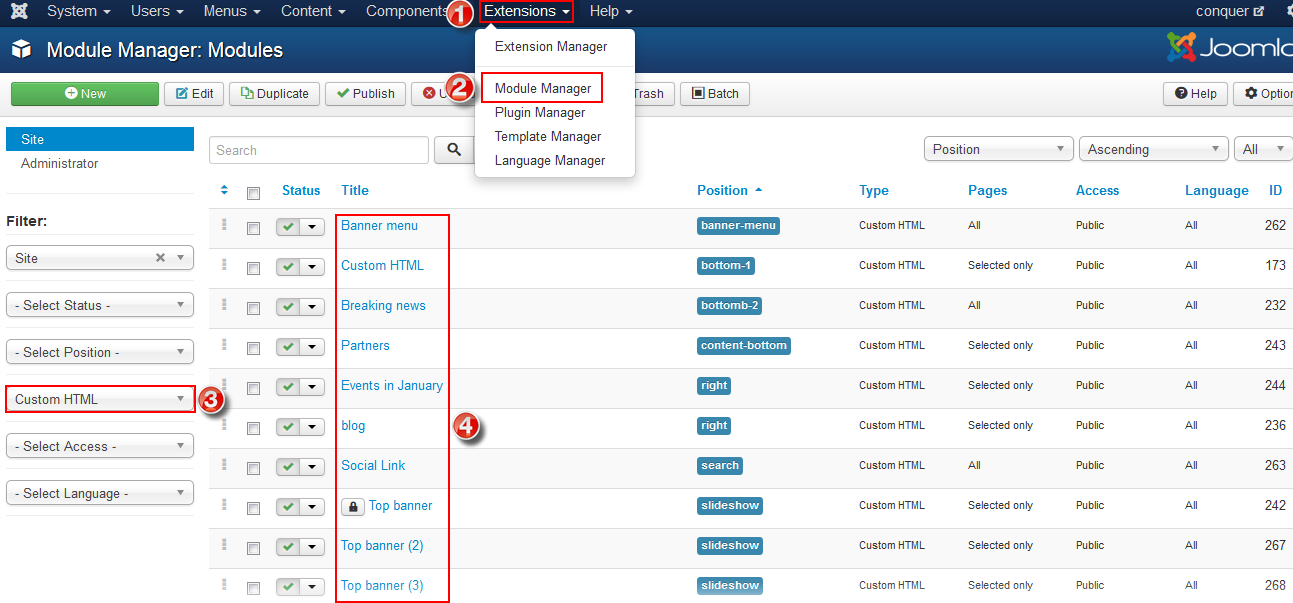
When editing the content you can use "toggle editor" button in the bottom of the editor. A toggle button allows the user to change between two editors: HTML and Plain text.

Now we will go inside each custom HTML module built in JV Conquer
1. Banner menu
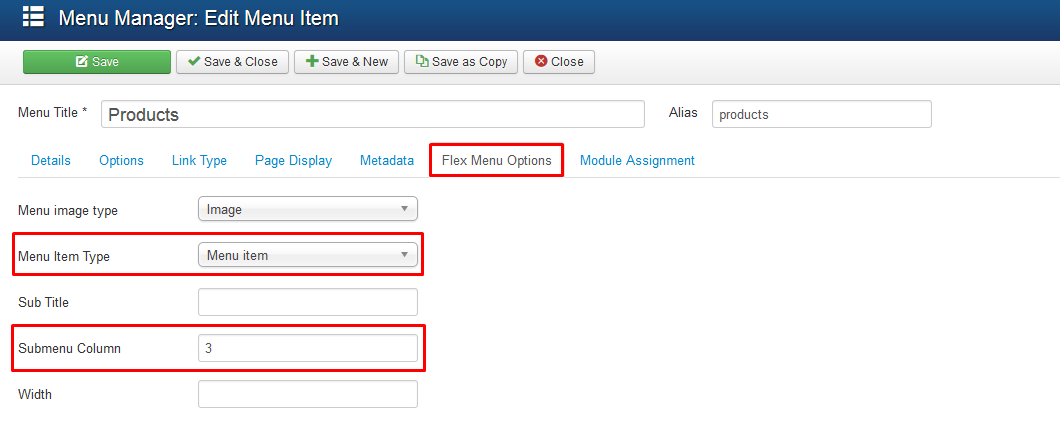
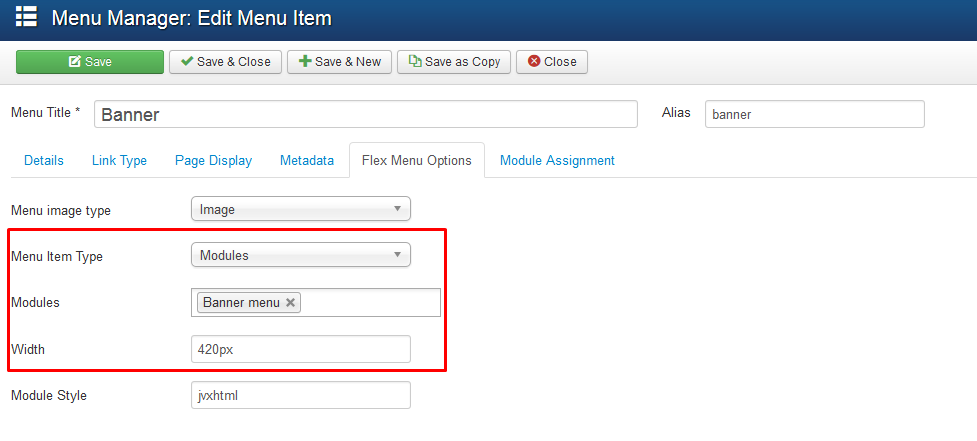
This module is loaded to Mega menu, view Mega Menu Configuration to know how to add a module to a Mega Menu
- Module position: none
- Menu assignment: on all pages

Replace the red fields with your own image paths and text in the following HTML code:
- <p><img src="/images/35.jpg" alt="module custom html frontend" /></p>
- <p><small>Lorem ipsum dolor sit amet, consectetuer adipiscing elit, sed diam nonummy nibh euismod tincidunt ut laoreet dolore magna aliquam erat volutpat.</small></p>
2. Custom HTML
- Module position: bottom-1
- Assigned: on home page

Replace the red fields with your own links and text in the following HTML code:
- <div class="jvtwitter"><span class="icon-twitter5"><span class="hidden">icon</span></span> New #<a href="/https://joomlavi.com">Joomlavi</a> competition. $3,000 Reward for the First 20 Bootstrap Admin Templates. <a href="/https://joomlavi.com">https://joomlavi.com</a></div>
3. Breaking News
- Module position: bottomb-2
- Assigned: on all pages

Replace the red fields with your own links and text in the following HTML code:
- <p><span class="color">Lorem ipsum dolor sit amet:</span> consectetur adipiscing elit. Nullam mollis auctor dignissim. Morbi magna justo, commodo id tellus ut, pretium blandit risus. Aenean lacinia pulvinar consectetur. Aliquam in augue ...</p>
- <ul>
- <li><a href="/https://joomlavi.com">Collection of flowers</a></li>
- <li><a href="/https://joomlavi.com">Collection of flowers</a></li>
- <li><a href="/https://joomlavi.com">Collection of flowers</a></li>
- </ul>
4. Partners
- Module position: content-bottom
- Assigned: on "about us" page

Replace the red fields with your own links and image path in the following HTML code:
- <div class="jvpartners" style="background-image: url();">
- <div class="content">
- <div class="row-fluid">
- <div><a href="/https://joomlavi.com"><img src="/images/demo/partners/p1.png" alt="parner 1" /></a></div>
- <div><a href="/https://joomlavi.com"><img src="/images/demo/partners/p2.png" alt="parner 2" /></a></div>
- <div><a href="/https://joomlavi.com"><img src="/images/demo/partners/p8.png" alt="parner 8" /></a></div>
- <div><a href="/https://joomlavi.com"><img src="/images/demo/partners/p3.png" alt="parner 3" /></a></div>
- </div>
- <div class="row-fluid">
- <div><a href="/https://joomlavi.com"><img src="/images/demo/partners/p4.png" alt="parner 4" /></a></div>
- <div><a href="/https://joomlavi.com"><img src="/images/demo/partners/p5.png" alt="parner 5" /></a></div>
- <div><a href="/https://joomlavi.com"><img src="/images/demo/partners/p6.png" alt="parner 6" /></a></div>
- <div><a href="/https://joomlavi.com"><img src="/images/demo/partners/p7.png" alt="parner 7" /></a></div>
- </div>
- </div>
- </div>
5. Events in January
- Module position: right
- Menu assignment: on on pages selected

Replace the red fields with your own text in the following HTML code:
- <p><b>A purple zone</b></p>
- <p>Lorem ipsum dolor sit amet, consectetur adipiscing elit. Praesent commodo quam tellus. Nulla condimentum odio a sem fringilla vestibulum. Cras fermentum ...</p>
- <p><a class="btn" href="#">Read more</a></p>
6. Social link
- Module position: search
- Assigned on: all pages
![]()
Replace the red fields with your own links in the following HTML code:
- <div class="jvsocial"><a class="socialToggle"> <span class="line"> <span class="hidden">icon</span> </span> <span class="line"> <span class="hidden">icon</span> </span> <span class="line"> <span class="hidden">icon</span> </span> </a>
- <div class="content"><a href="/https://www.facebook.com/joomlavi.page"> <span class="icon-facebook7"> <span class="hidden">icon</span> </span> </a> <a href="/https://twitter.com/joomlavi"> <span class="icon-twitter5"> <span class="hidden">icon</span> </span> </a> <a href="/https://plus.google.com/+Joomlavi_page/"> <span class="icon-google-plus"> <span class="hidden">icon</span> </span> </a> <a href="/https://www.linkedin.com/company/open-source-code-solutions"> <span class="icon-linkedin3"> <span class="hidden">icon</span> </span> </a></div>
- </div>
7. Top Banner
- Assigned: on "About us" page

Replace the red fields with your own image path, text in the following HTML code:
- <div class="jvtopbanner" style="background-image: url('../../documentation/joomla-templates/_span class__red-code__images/demo/slideshow/9.jpg');">
- <div class="content">
- <h2>About US</h2>
- <p>Lorem ipsum dolor sit amet, consectetur adipiscing elit. Vestibulum et.</p>
- </div>
- </div>
8. Top banner (2)
- Module position: slideshow
- Assigned: on only pages selected

Replace the text fields with your own image path, text in the following HTML code
- <div class="jvtopbanner" style="background-image: url('../../documentation/joomla-templates/_span class__red-code__images/demo/slideshow/5.jpg);">
- <div class="content">
- <h2>HTML5, CSS3</h2>
- <p>Lorem ipsum dolor sit amet, consectetur adipiscing elit. Vestibulum et.</p>
- </div>
- </div>
9. Top banner (3)
- Module position: slideshow
- Assigned: on Blog page

Replace red fields with your own links, text in HTML code:
- <div class="jvtopbanner" style="background-image: url('../../documentation/joomla-templates/_span class__red-code__images/demo/slideshow/6.jpg');">
- <div class="content">
- <h2>Blogs</h2>
- <p>Lorem ipsum dolor sit amet, consectetur adipiscing elit. Vestibulum et.</p>
- </div>
- </div>
10. Top banner (4)
- Module position: slideshow
- Assigned: on News page

Replace red fields with your own image path, text in the following HTML code:
- <div class="jvtopbanner" style="background-image: url('../../documentation/joomla-templates/_span class__red-code__images/demo/slideshow/7.jpg');">
- <div class="content">
- <h2>News</h2>
- <p>Lorem ipsum dolor sit amet, consectetur adipiscing elit. Vestibulum et.</p>
- </div>
- </div>
11. Top banner (5)
- Module position: slideshow
- Assigned: on "Contact us" page

Replace red fields with your own image path, text in the following HTML code:
- <div class="jvtopbanner" style="background-image: url('../../documentation/joomla-templates/_span class__red-code__images/demo/slideshow/8.jpg');">
- <div class="content">
- <h2>Contact US</h2>
- <p>Lorem ipsum dolor sit amet, consectetur adipiscing elit. Vestibulum et.</p>
- </div>
- </div>
12. Top banner (6)
- Module position: slideshow
- Assigned: on pages selected

Replace red fields with your own image path, text in the following HTML code:
- <div class="jvtopbanner" style="background-image: url('../../documentation/joomla-templates/_span class__red-code__images/demo/slideshow/4.jpg');">
- <div class="content">
- <h2>JV Conquer</h2>
- <p>Lorem ipsum dolor sit amet, consectetur adipiscing elit. Vestibulum et.</p>
- </div>
- </div>
13. About us
- Module position: top-1
- Assigned: on home page

Replace red fields with your own link, text in the following HTML code:
- <p>Lorem ipsum dolor sit amet, consectetur adipiscing elit. Integer scelerisque dui ipsum. Suspendisse nulla diam, tempor et .</p>
- <p><a class="btn" title="About us" href="/index.php/about-us"><span class="icon-cog"><span class="hidden">icon</span></span></a></p>
14. HTML5, CSS3
- Module position: top-2
- Assigned: on home page

Replace red fields with your own link, text in the following HTML code:
- <p>Lorem ipsum dolor sit amet, consectetur adipiscing elit. Integer scelerisque dui ipsum. Suspendisse nulla diam, tempor et.</p>
- <p><a class="btn" title="HTML5, CSS3" href="/index.php/explore/k2/categories/item/23-jv-conquer"><span class="icon-wrench"><span class="hidden">icon</span></span></a></p>
15. Contact us
- Module position: top-3
- Assigned: on home page

Replace red fields with your own link, text in the following HTML code:
- <p>Lorem ipsum dolor sit amet, consectetur adipiscing elit. Integer scelerisque dui ipsum. Suspendisse nulla diam, tempor et.</p>
- <p><a class="btn" title="contact us" href="/index.php/contact"><span class="icon-mail"><span class="hidden">icon</span></span></a></p>
16. Products
- Module position: topb-1
- Assigned: on home page

Replace red fields with your own link, text in the following HTML code:
- <div class="jvtabproduct">
- <ul class="nav nav-tabs">
- <li class="active"><a href="#tabs1">All</a></li>
- <li><a href="#tabs2">Interior</a></li>
- <li><a href="#tabs3">Business</a></li>
- <li><a href="#tabs4">Nature</a></li>
- </ul>
- <div id="myTabContent" class="tab-content">
- <div id="tabs1" class="tab-pane active"></div>
- <div id="tabs2" class="tab-pane"></div>
- <div id="tabs3" class="tab-pane"></div>
- <div id="tabs4" class="tab-pane"></div>
- </div>
- </div>
There are 4 modules loaded to this module. To know how to put modules to article or module, please refer to this guide
acymailing configuration
This component allows you to maintain real communication with your contacts via e-mail marketing, newsletters...
1. Module Newsletter
Position: right
Assigned: on pages selected
Module type: Acymailing module
View: Backend-settings
Acymailing module in front-end:

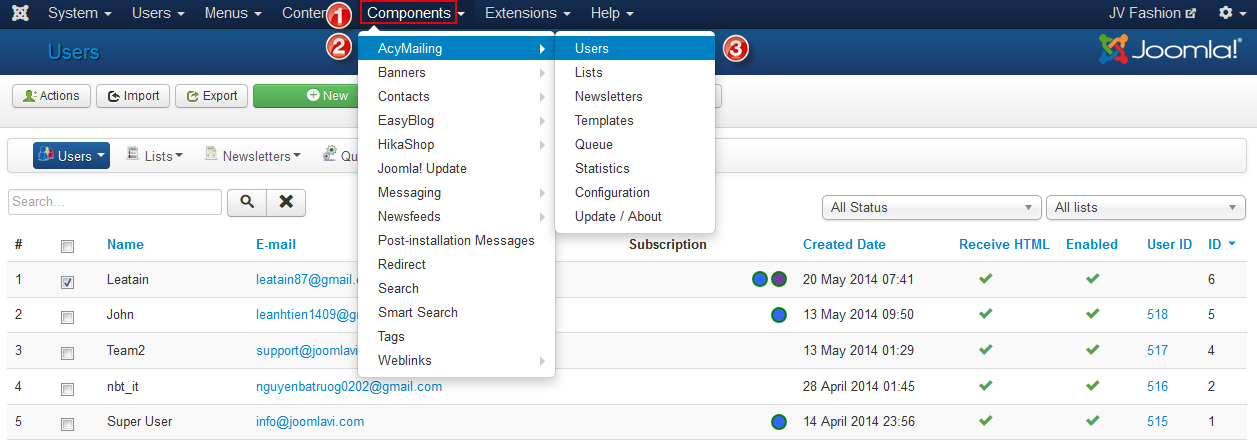
2. Acymailing Dashboard
To access acymailing Dashboard and its tabs, navigate to
The tabs within Acymailing Dashboard:
 Users - this is a list of the users that AcyMailing is able to send to.
 Lists - there can be multiple lists stored within AcyMailing in order to allow you to send a different newsletter to different users.
 Newsletters - this is where you create, manage and send newsletters.
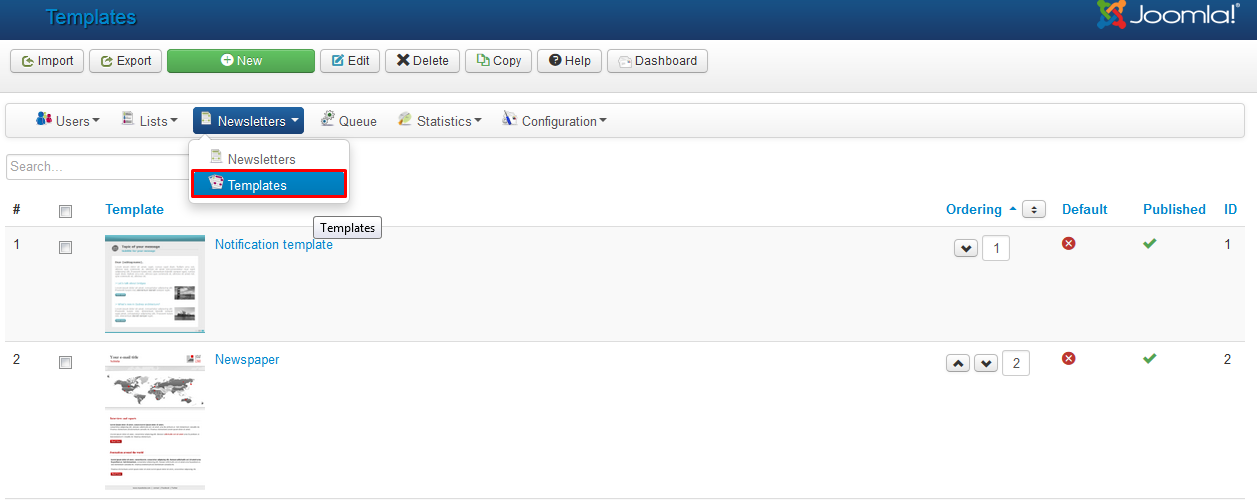
 Templates - this is where the templates are stored. A template is assigned to a list.
 Queue - this is used in the case that your newsletter sending process gets interrupted.
 Statistics - this is used to view how many users are opening your newsletters and how many are going unread.
 Configuration - these are settings configured by Argonyx upon setup of the site.
2.1 User
Within the Users tab, you can:
- Click on an E-mail address in order to view the user's subscription, change their name, email and which list they're subscribed to.
If the tickbox for the column 'Enabled' is set to a red cross (click on the icon to toggle), the user will no longer receive emails from AcyMailing.
The icons in the top right of the page allow you to import a list of subscribers and create new subscribers using the new button.
- Click on "New" button to go to the New subscriber page. Fill in the user's details and choose which list to subscribe the user to, then press Save.
- Import a list of subscribers using Microsoft Excel.
2.2 List
Within the Lists tab, you have the following options:
The list of lists - this displays all current lists. Click on a list name to edit that list.
New - create a new list using the New button in order to assign different users to different lists.

2.3 Newsletter
Within the Newsletters tab, you can do the following:
- Create a new newsletter using the New button.
- Edit/review previous newsletters.
- Preview / send Newsletters.
When you are creating a new newsletter, be sure to fill out the Subject, and which lists the newsletter is being sent to on the right hand side. You may also add attachments using the right hand side bar.
You may then click Preview/Send to have a look at the final copy of the newsletter and send a test to yourself to double check. Once ready, press send.

2.4 Templates
Within this tab, you can
- Create a Newsletter template
- Edit existing Newsletter-template
2.5 Queue
When the newsletter is sending, the window will need to be left open. If this is interrupted for any reason, go to the Queue tab, and press Process.

2.6 Statistics
This will show you a straightforward set of information on how each newsletter has performed.

2.7 Configuration
This tab enables you to configure AcyMailing. This tab contains sub-tabs: Main configuration, Queue process, Subscription, Interfaces, Security, Plugins, Languages.
During the install process, AcyMailing will be automatically configured using your Joomla Configuration but you can modify it at any time.
You will also find a tool to easily publish/unpublish the AcyMailing plugins and add/modify the AcyMailing languages files.

K2 configuration
K2 component is a very popular and free component which helps you to control and manage site content easily. Let's view what can you do with this great extension and how to config. This part covers important and common facts you may use frequently with K2. If you need full detailed K2 document, please check our References part.
1. Installation
K2 can be easily installed on Joomla like other extension. If you are new,you may need to view the guide below
2. Manage Items with K2
From the backend area, navigate to Components >> K2 >> Items
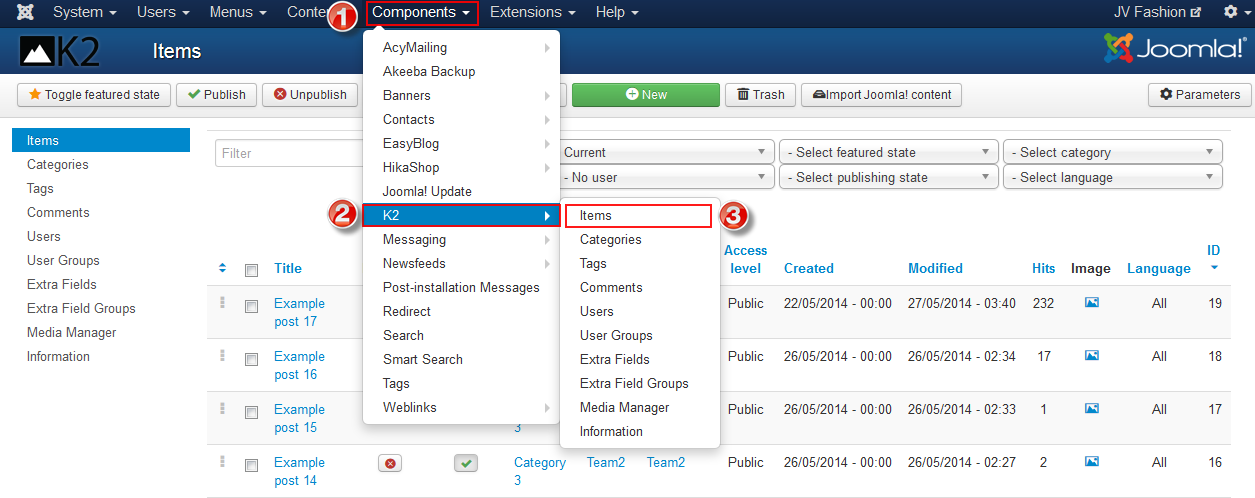
Within K2 Items you can do the followings:
- Create new K2 item: Click on "New" button in the toolbar to ad a new item
- Edit existing K2 item: Click on the item to edit that item
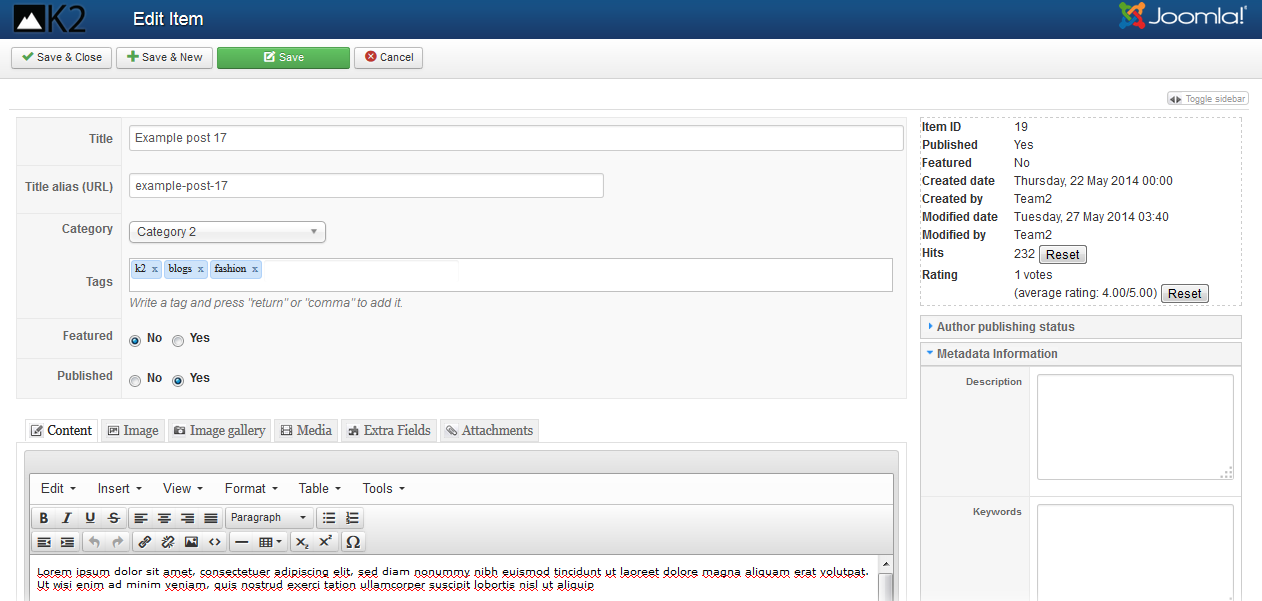
In the edit/add item page you can do important things:
- Change/add title of the item
- Upload images: you can upload an image via "Image" tab
- Edit your Author publishing status: Under the "Author publishing status" drop menu in the right side of the page, you can edit many publishing features
- Optimize item for Search Engine: Under the "Meta information" drop menu in the right side of the page, you can add/edit meta description, keywords, robots, author
3. Manage images with K2
In this section you need to distinguish between Media Manager and Image Tab.
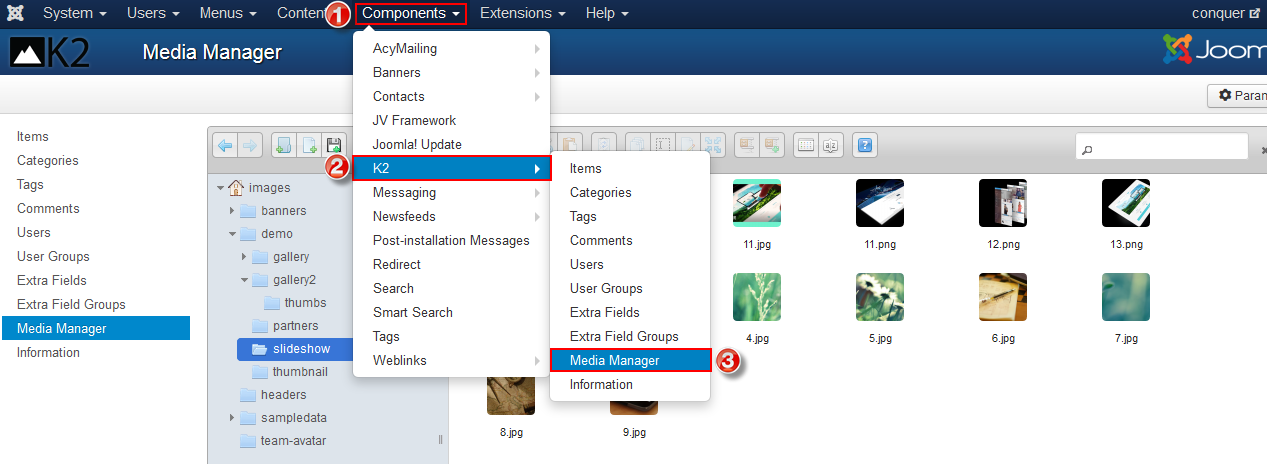
- Media Manager is used when you want to insert image into the text of items or categories. Before inserting the images directly into text filed, you need to upload the images to Media Manager by navigating to Components >> K2 >> Media Manager, in Media Manager you can create new folder to contains images, then upload images
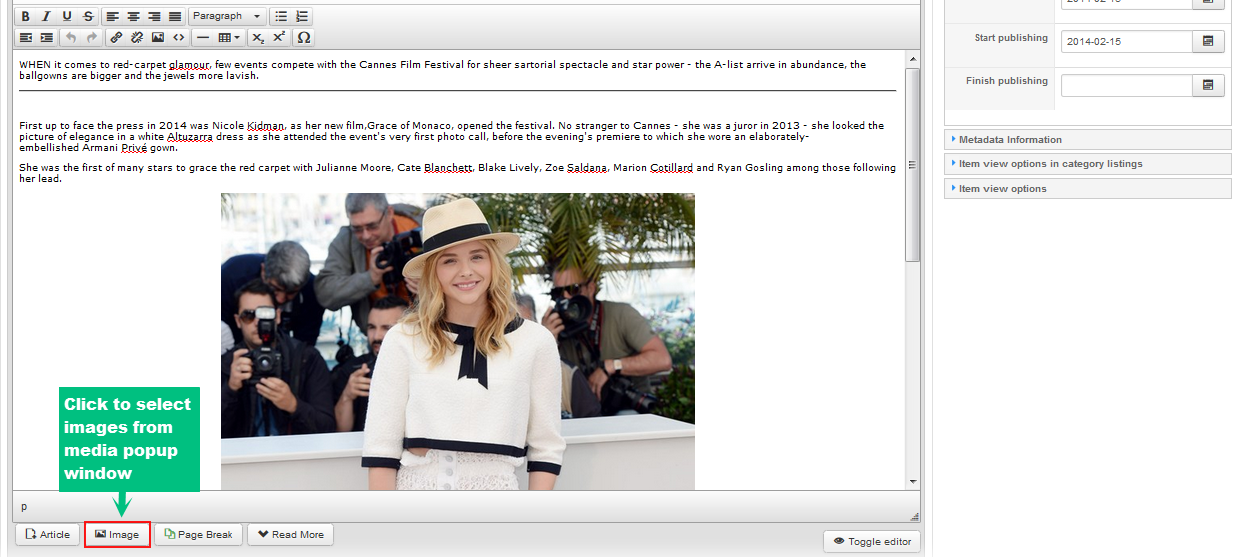
Now you can insert the images directly into text field when you edit/add any item category. Simply click on "Image" in the bottom of the editor as shown in the picture below:
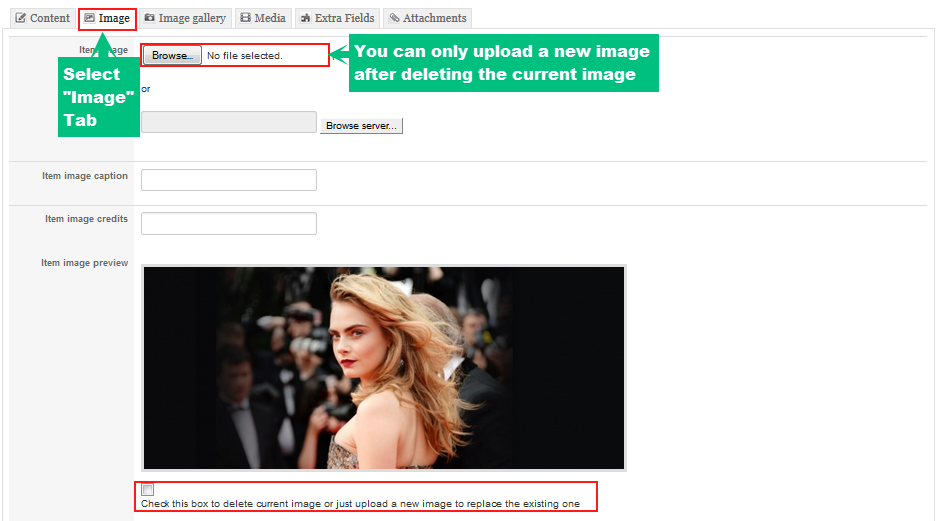
- Image Tab: as I mentioned above, Images uploaded via "Image" Tab usually represent as a main image for item or category. When uploading images via the Image Tab, you can upload directly from your computer without having to store it in any sort of Media Manager
4. Manage Categories with K2
In the administration area, go to Component >> K2 >> Categories , such like how to access to K2 Items.
You can do the followings in K2 Categories:
- Create a new categories
- Edit existing categories
- During editing/creating a categories you can change/add title, upload images into categories, etc. similar to what you've done with K2 Item
5. Global configuration
Go to System >> Global Configuration >> K2
In this section, you can see 8 tabs as you can see below
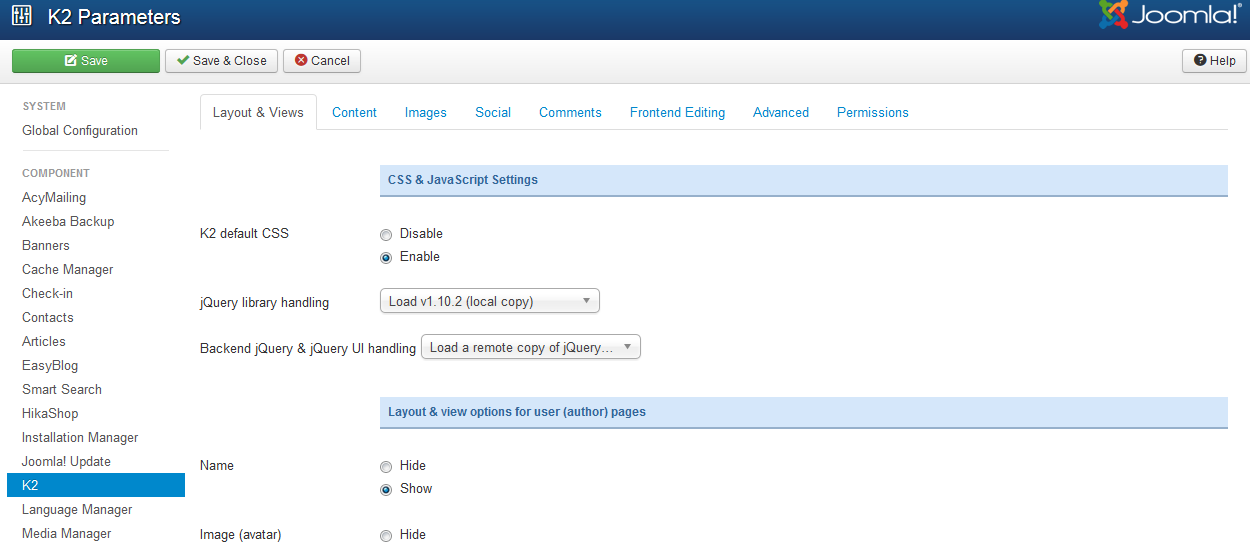
In each tab you can configure its parameters. There are so many parameters, I do not want to make you confused and tired by explaining all parameters, take it easy and find out by yourself.
6. K2 Modules
Besides K2 component, there are 5 K2 modules available for you to use: K2 Content, K2 Tools, K2 Comments, K2 User and K2 Users. All K2 modules used on JV Conquer have specific setup.
Let's check K2 modules used in JV Conquer Demo:
6.1 K2 Tools module
This type of module is a multi-functional module that comes with the following view options: Archive, Authors List, Blog Style Calendar, Breadcrumbs, Categories List (Menu), Category Select Box, Search Box, Tag Cloud, Custom Code. Each one of these view options is accompanied by a set of options which need to be taken into account in order to reach the desired outcome.
Listed in the image below are 8 K2 Tool modules used in our demo:
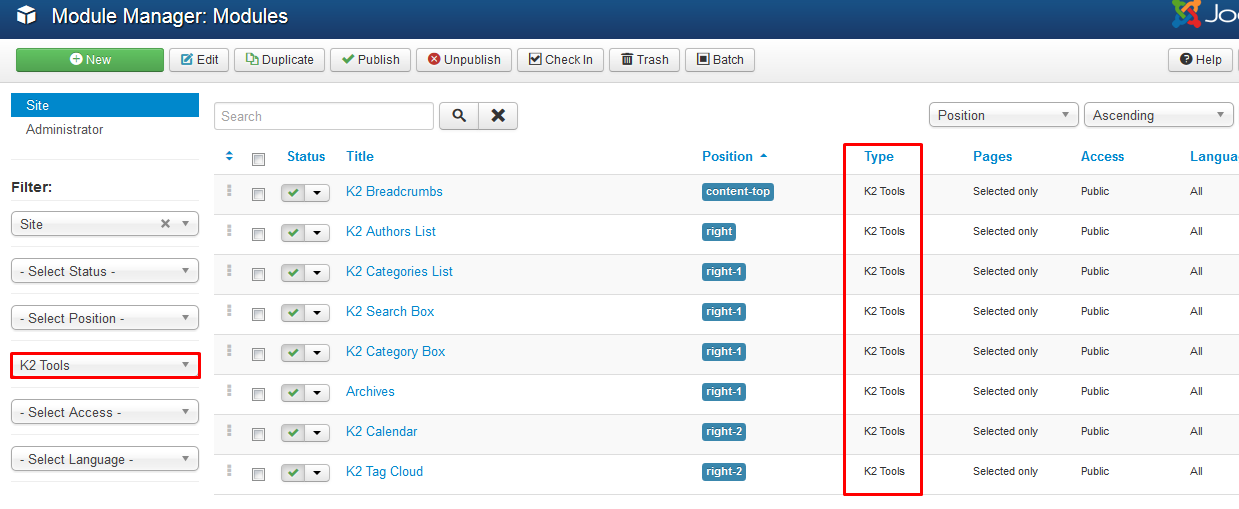
View: K2 Tools Back-end Settings
6.2 K2 Comment module
This module is used to show the Latest Comments or Top Commenters. This module, like the K2 Tools module, has options according to the chosen view.
Listed in the image below are 2 K2 Comment modules used in our demo:

View: K2 comment Back-end Settings
6.3 K2 Content module
The K2 Content module, allows a specific number of items filtered by category or specific items, to show with a specified ordering. Some of the available options for the items shown are: Title, Image, Author with author avatar and author description, Intro-text with the option of limiting the text, Tags, Category, Created Date, Read...More, Extra fields, Comment counter.
Below is K2 Content module used in our demo:

View: K2 Content Back-end Settings
6.4 K2 User module
The K2 User module is the equivalent or even better of the Joomla! Login module. Used to display a login box for users, when users are logged in the can see user toolbar, which allows them to perform tasks based on their access rights. Besides post-text, pre-text, login and logout redirections, greeting and name/username display, K2 User module also provides a text for the Greeting message, instead of a default message pre-defined, a user avatar and the option to render a Menu for the logged in users.
Below is K2 User module used in our demo:

View: K2 User Back-end Settings
6.5 K2 Users module
This module shows all or specific number of users with their info (name, avatar, e-mail) and a number of the items they have written.
Below is K2 Users module used in our demo:

View: K2 Users Back-end Settings
SP Image Gallery Configuration
SP Image Gallery is a module which shows thumbnail view of all images of a directory and click on them will show full size in lightbox.
This module is designed by JoomShaper, you may need go to JoomShaper to download SP Image Gallery
This module can be installed easily like other extensions. If you are new you may need to know How to install extensions
In JV Conquer, SP Image Gallery is used in 2 modules, let's go inside each of them:
1. Gallery
- Position: right
- Assign: on pages selected
View: Back-end settings

2. Gallery Widget
- Position: bottomb-3
- Assign: on all pages
View: Back-end settings

Recommendation
This guide is not intended to cover everything about third party extension, it focuses on replicating the Demo settings for template and extensions. If you need know further configuration. Please view References.
If you are new and confused, we recommend installing quicstart on your localhost before loading to real host. View our resources above to configure each part of the template. If you have any ideas, suggestions or questions, do not hesitate to Contact us .


